
[ad_1]

New Lightroom Feature: Multi-Batch Exporting
In Lightroom, there isn’t a “save” feature like there is in Photoshop. Instead, photos are “exported”. When you export photos you create new files that include all the adjustments you made in Lightroom. Lightroom can export photos in jpeg, png, psd, tiff, dng, and more!
Starting in Lightroom 9.0, a handy multi-batch export feature was added so you can now export images using multiple export presets at same time.
This means that instead of exporting the same images two different ways (think – web resolution files and print resolution files) you can export BOTH ways in a single step. AND, it’s as easy as checking boxes.

How to Use Lightroom’s Multi-Batch Export Feature
Step 1. Select Photos
Select the photos you want to export in the Lightroom filmstrip.
Step 2. Open the Export Dialog Pop-Up Box
To open the Export Dialog pop-up box, go to File>Export. Make sure “Hard Drive” is the option selected at the top of the pop-up box.
Step 3. Select the Export Presets
Check the box in front of the preset names you want to use on export. Once you choose a preset the settings in the export dialog box will no longer be available to change.
Step 4. Click Export
When you are ready to export, just click the export button. If any of your selected presets are set to “Choose folder later”, the Folder Selection dialog box will open for you to choose a location.

How to Create Export Presets
The new multi-batch export option requires that you have export presets already created. Creating export presets is a great way to save time and is very easy to do.
Just follow these steps to create an export preset:
Step 1: With a photo selected, go to File>Export.
Step 2: Choose the settings you want applied to your image on export from the various sections in the Export Dialog pop-up box.
Step 3: Click Add from the Presets section of the Export Dialog box (located on the left side of the pop-up box).
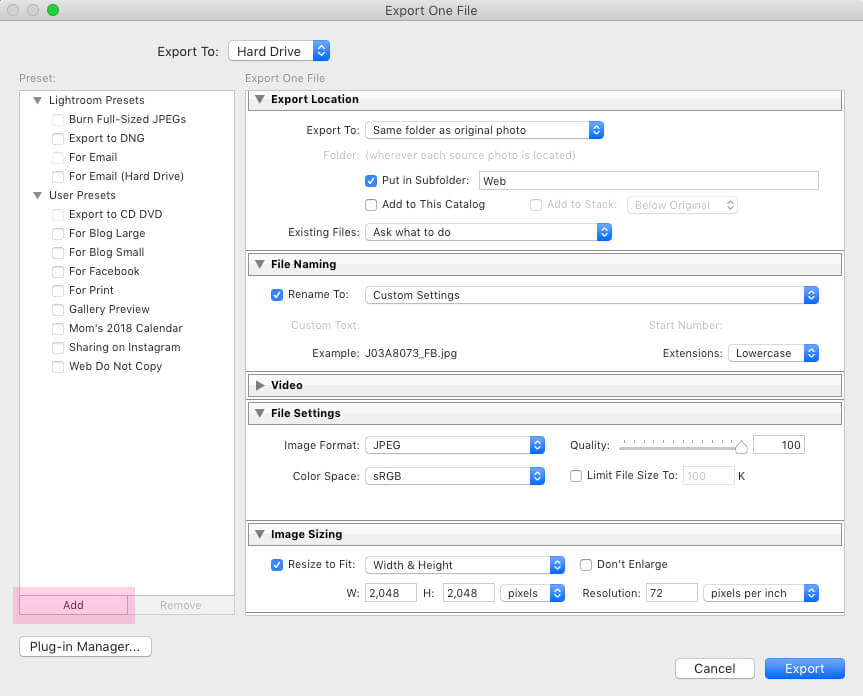
Step 4: Give the new preset a name and select the folder you want the preset to show in and press “Create”.

Conclusion
When using Lightroom, you should try to automate whenever possible to save time!
The process of creating export presets and then using the multi-batch export feature in Lightroom is one of these automation shortcuts that has the ability to save you precious time editing! And we all love to save time when we can!
Do you have any questions or comments about How to Use Lightroom’s Multi-Batch Export Feature? Leave us a comment below – we would LOVE to hear from you! And PLEASE SHARE this post using the social sharing buttons (we really appreciate it)!


[ad_2]
Source link