In terms of fitness, for a beginner, joining a gym can seem a little daunting. But if you do make the commitment to start a new exercise routine taking that first step is the hardest …
[ad_1] Camera vs. Computer It’s essential to understand the differences between JPEG and RAW image files and how those differences can affect your final product. There is a big difference between the two file types, …
[ad_1] Legend has it that Heinz Kluetmeier donned scuba gear and dove into the Olympic pool at a long-ago games and set up cameras on the bottom, wiring them so he could fire them remotely. …
[ad_1] This weekend I made a new set of square Photoshop/PSE templates with a minimal circle theme. They come with clipping masks so you can easily add your images. You can remove the decorative lines …
[ad_1] Clinical neuropsychologist Andy Mitchell is well-respected for his work in the fields of neurology and psychiatry. In this episode, he sits down with me to share the groundbreaking, real-world experiences with psychedelics detailed in …
Adobe Photoshop CC is a well-known digital imaging software that is a must-have for all photographers. The latest version was released in October 2017 and has better results in terms of photo editing and image manipulation.
As part of the Adobe Creative Cloud suite, it gives photographers instant access to all updates once they are made available. While some photographers may opt to stick to earlier versions, improvements to the latest version include the following advantages:
It supports more cameras than the older versions.
Its ability to enhance, edit and manipulate photos has improved.
It has better graphics and a larger user interface.
Adobe Photoshop CC has amazing image editing tools that turn ordinary pictures into works of art. With the wide range of brushes and smoothing value of 0-100, photos have clearer lines. This version of Photoshop has the ability to enhance and create 3D artworks and paintings. Portrait photographers can use it to resize and reshape faces and it also has a perspective wrap that comes in handy when fixing distortions. It is easy to use on high resolution monitors, has added noise reduction in videos, and allows users to share photos and creations with ease. It also offers access to Lightroom CC, a photo organizer and selector that makes it possible to keep images well-organized.
When the time comes to edit your images, open the image you’d like to edit in Photoshop and use the tools in the toolbars accordingly. If a photo is crooked, make use of the Crop tool to straighten it.
If you need to clear out any blemishes, use the Spot Healing Brushes. Distracting objects can be removed with the Patch Tool, and by using the Blur Effects from the gallery, emphasis can be placed on the parts of the photo that need to stand out. (Watch the video to see how to Blur Effects can be used in image editing.) There is a wide range of filters that can be used to ensure that the intended tone is portrayed in the photo. In photography, most clients prefer high quality pictures with no blemishes.
If you’re a photographer who strives to capture somewhat dull moments and convert them into works of art, Adobe Photoshop CC is the perfect tool for you. It will enable you to fill your portfolio with photos that will attract new clients and keep the old ones coming back for more. With the new specifications that have been added, your images will be even better than before.
In terms of fitness, for a beginner, joining a gym can seem a little daunting. But if you do make the commitment to start a new exercise routine taking that first step is the hardest part. You will find that week after week you feel a little less uncomfortable at the gym. As you start to get in better shape and spend more time there, the gym start to feel a little at home. If you stay long enough and get into really good shape the fitness club will soon become a place you love to visit for your workouts. One tip that will make a big difference; go to the gym with a detailed fitness routine and hire a trainer for a just a few sessions to help show you how to do the exercises properly.
Mix your cardio training up daily. Take a brisk walk or jog the first day. Don’t do too much. maybe walk a half mile each time you walk for a week. The next week extend it out to a mile. Keep doing this week to week. This would be the same with jogging or any aerobics exercises. I am not going to get into all the different aerobics exercises you can do. Just Google aerobic exercises and you will find tons of them.
Working out at home, parks and schools will save you at least a few hundred per year from the cheapest memberships. While estimating how much money you’re wasting, don’t forget to add gas wasted during trips through stop and go traffic as joggers pass you by, flavored water you bought for your workout gymand most importantly, your time, which is really priceless.
There are 4 essential components of fitness. If you want to get fit and avoid injury, you’ll need some variations of all of them. Many clients complain about taking the time to stretch or just want to do cardio without weight training or weight training without cardio. You need them ALL. So what are they?
So long as you try to spice up what you normally seem like, then you’ll get his attention. A person likes to determine some variety, and the identical previous norm would possibly begin to bore him. You’ll positively make him want you if you try something new along with your hair, makeup, or clothes.
If you grew up involved in athletic activities, you may have learned something about physical fitness training along the way. However, most individuals do not have the foggiest idea how to get started with an exercise program and would benefit greatly from experienced instruction.
Writing and distributing articles is the best thing that you can do to offer your potential clients with information that is related to your niche and to the product that you sell. Your prospects will most likely to buy from you if you show off your expertise in your field. People who are looking for diet plans for example, will only buy from those internet marketers who are considered experts in crossfit gym locator.
Simply order your copy of My Recovery and Cure from Anxiety & OCD today, and receive this free bonus offer of Fitness: “The Guide to Staying Healthy” at NO additional cost!
Ah, yes, this is the big one. If there’s been one area where the HIT Jedis, the crossfit yasCults, and the Wobble Board Wrecking Crew have succeeded in convincing young, impressionable football players that lifting heavy will slow you down.
The Quadriceps are a group of four muscles on the front of the thigh and are responsible for the movement of the knee joint. The main function of the quadriceps is to extend or straighten the knee. They are crucial in walking, running, jumping and squatting. The best gym columbia mo, exercises are leg extensions, lunges, leg presses and squats.
It’s essential to understand the differences between JPEG and RAW image files and how those differences can affect your final product. There is a big difference between the two file types, especially if you plan on doing some editing.
After shooting a picture in RAW, what you see on your camera won’t match what you see later on your computer. The camera is showing you a JPEG image, not a RAW file. Your camera will automatically process the JPEG file to realistically capture what you saw and shot. Once you import the RAW file into Lightroom, that JPEG processing vanishes. You’re left with the unedited (original) RAW file. Thus, the difference between what you see on your camera and your computer.
It’s not all doom and gloom, though. RAW files contain a lot of data, giving you more to work with for editing. While JPEG images might look good in your camera, they have less detail, making them trickier to edit without losing quality. This is why many serious photographers prefer to shoot RAW images. It will cost them some effort and time to edit, but they will have more to work with. The results are far better images than an average JPEG.
Restraint With Editing
Achieving excellent photo editing results involves using restraint to ensure a balanced outcome. Make the edits selectively, keeping in mind that if your goal is to create a realistic image, you’ll want to be selective and avoid dramatic changes.
While most images need individualized edits, the most common elements to adjust are:
Exposure
Shadows
Highlights
Saturation
Temp
When and how (and probably where) you shoot an image will influence the edits needed. For example, photos taken outdoors will likely need different modifications than images taken inside because lighting significantly impacts photos.
Often, a few tweaks of the sliders are all that’s needed to correct an image. The further you push a slider, the more you erode the image quality. You’ll begin to lose detail, and imperfections will start to appear.
Legend has it that Heinz Kluetmeier donned scuba gear and dove into the Olympic pool at a long-ago games and set up cameras on the bottom, wiring them so he could fire them remotely. His assistant asked him if they had permission to do this. “We’re not going to ask permission,” came the reply. No one was going to say no to Heinz. And because of that, an audacious act of brazen, lovely, break-the-rules attitude born of supreme photographic skills and confidence, millions of people have enjoyed stunning photographs. The epitome of sports photography – split-second photographs of the thrilling finishes of Olympic swimmers touching the wall for gold. Kluet’s famed pic, called “The Golden Touch,” shot from underwater, proved Michael Phelps had beaten Mirado Cavic of Serbia by .01 of a second. Typically of Heinz, afterward he simply called this astonishing frame of photography “improbable.”
Thankfully, Heinz passed on the know how and the guts to another generation who came along at SI. Bill Frakes, legendary among a variety of sports genres, became known for thrilling shots of close finishes at horse racing, taking the art and science of remote camera work to the next level of precision.
FYI, now, of course, underwater cameras, representing the major news agencies, are standard fare at every Games.
At the Ali-Cleveland Williams fight, Neil Leifer stashed a camera in the girders, looking straight down at the ring. A legendary picture was made, and after that, every boxing photog wanted to put a remote camera over the ring.
Such was the sway and swagger of Sports Illustrated, an enormously successful and powerful pinnacle of sports journalism. Beautiful, heartfelt, and incisive writing thrived on pages populated by some of most stunning sports images ever made. A potent mix of words and pictures. So potent it had a circulation of over a million. Think about it. So compelling was this magazine that a million plus people rushed to buy it so they could read about and see moments from GAMES THAT WERE ALREADY OVER. This occurred well before Ron Howard started directing movies.
The passing of this magazine caused me to reflect, and gather some photographic bits and pieces from years in the field for them. It was fun, wistful, and occasionally painful, as in, “I shoulda done better on that job….”
In a magazine run by word merchants, the stellar photography thrived. Not because many of the editors there understood or cared about photography. (“Why are these pictures so expensive to shoot?” was typical management reaction.) But they did know they desperately needed pictures. And amazing photos ensued, even if they were underplayed. Bill Eppridge famously referred to the magazine as “Spots Illustrated,” given the small size of many published photos that deserved more room on the page.
The legendary names associated with the magazine comprise a formidable list indeed. Zimmerman, Leifer, Cooke, Drake, Iooss, Kluetmeier, Frakes, Iacono, Tiedemann, Biever, Millan. (A partial list!) Photogs with smarts, experience, knowledge of the game being covered, and an almost preternatural ability to be in the right place, with the right lens, at the critical moments of a contest. And, because the magazine was so successful, it fostered and funded competitive attitudes and an unparalleled level of visual ambition. Witness Bill Frakes updating strip camera photography to capture an astonishing photo of Marion Jones at the Sydney Games. Months of negotiation with the Olympic powers that be, and the ever-paramount TV honchos, testing and re-testing, and then delivering when the chips are down, and the gun goes off.
Sports Illustrated has heard its last starter’s gun, ref’s whistle and quarter horn. The pictures live on, memorializing and celebrating the athletes we revere, capturing the anguish, pain, exhilaration, and effort required to be the best on the field. Thank goodness.
I remember getting invited to a big dinner at the 1984 Olympics, some 20-25 of us gathering for a meal. I was on assignment for ABC-TV, a callow pup, never having shot a Games. I did not belong there. The legends were present, laughing and joking. Confidence brimmed and sloshed like an overpoured beer. I looked around the table and wondered….if ever, if ever….I could shoot a picture for SI. About a year later, a contract was offered, and the adventure began.
And now the magazine passes into memory. Glad I have the pictures. It was an honor.
More tk….
The post Game Over at Sports Illustrated appeared first on Joe McNally Photography.
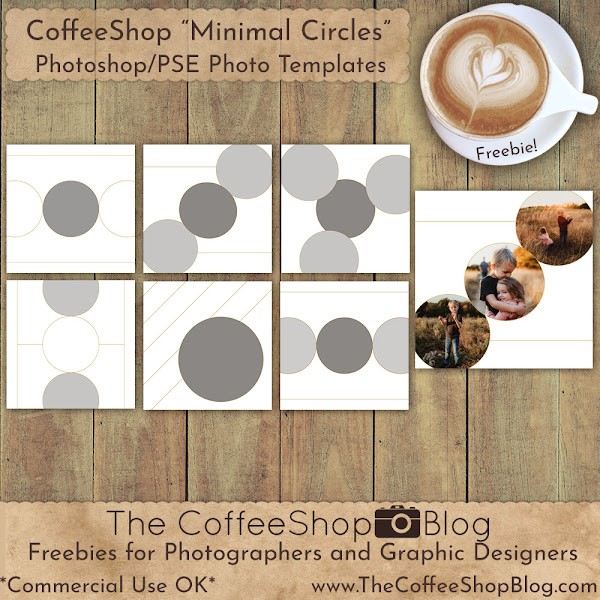
This weekend I made a new set of square Photoshop/PSE templates with a minimal circle theme. They come with clipping masks so you can easily add your images. You can remove the decorative lines or adjust their color to taste and add paper or a different color to the background. These boards can be posted on social media and are high enough resolution to be printed.
I even included a little Photoshop/PSE loading action so you can add photos to these storyboards as fast as any phone app.
CoffeeShop “Minimal Circles” Photo Template Set.
Do you want to download thousands of professional CoffeeShop PSE/Photoshop actions (including exclusive ones not found anywhere for free), textures/overlays, scrapbooking papers, clip art/design elements, photo storyboards and frames, and Lightroom presets from this site in one convenient zipped file AND help support this one-woman blog?
Just click here for my CoffeeShop Mega Download Pack!
Clinical neuropsychologist Andy Mitchell is well-respected for his work in the fields of neurology and psychiatry. In this episode, he sits down with me to share the groundbreaking, real-world experiences with psychedelics detailed in his new book, ‘Ten Trips: The New Reality of Psychedelics‘, and shine a light on how they can be used to help creative individuals on their journey of self-realization, stress management and growth.
What are Psychedelics?
Let’s start off with a basic definition of our subject matter: what are psychedelics?
Psychedelics are a group of substances that can produce profound changes in consciousness, including alterations in perception, mood, thoughts and emotions. They include plant-based psychedelics such as mushrooms; lab-synthesized psychedelics such as LSD, and other compounds such as DMT.
Psychedelics have been heavily studied over the years for their neuroplastic effects on the brain. They break down the modularity of perception so that parts of the brain that would normally be isolated from each other can communicate. This means that usual, everyday thought patterns can be replaced by more creative and open-ended thinking.
Andy’s Decision to Explore Psychedelics
Most people with a pre-existing interest in psychedelics – or any aspect of natural wellness, for that matter – have heard of Michael Pollan. The American author and journalist is known for writing several best-selling books on the topics of farming, gardening, and the socioeconomic impacts of food. He really caught public attention with the release of ‘How to Change Your Mind’ about five years ago.
In the book, Pollan covers the history of psychedelics and their potential therapeutic effect on a range of mental health issues. He documents promising experiments with LSD and psilocybin to argue their positive effects for those struggling with various addictions, depression, and social anxiety.
Andy says he first read Michael Pollan’s book shortly after it came out in 2018. At the time, he hadn’t explored much of the topic but the title alone was enough to pique his interest. Sitting in a Whole Foods parking lot in Monterey, he soon found himself face-to-face with the very people who call this lucid substance life-changing and took the opportunity to try it first-hand. Psychedelic ceremonies quickly changed his perception of what it meant to get high and it was at this point that he realized the psychological and spiritual power of these substances.
Michael Pollan’s book was and remains fascinating for its in-depth account of the author’s own exploration of psychedelics. But at the same time, Andy felt that it was limited in scope. Pollan only reviewed three substances, while there was a greater 10 to explore. His writing also took an arguably lucid approach that felt hard to relate to. What does the entire panoply of psychedelic possibilities look like, beyond the clinical settings covered in this book?
Andy pitched that very question to publishers and was soon on a mission to create an unprecedented encyclopedia of psychedelics, their effects, and the insights they offer into the human experience. This new book would paint a broad picture, from a subjective and objective point of view, and across 10 different settings.
Setting This Project Apart From Existing Research
Of course, contributing to a conversation started by someone as revered as Michael Pollan wouldn’t be easy. Andy greatly respected the author’s take on psychedelics and credits it with his interest in the area of study altogether. However, there were definitely some gaps in need of filling. Andy saw an opportunity to break the clinical bounds and look at the historical, philosophical, scientific, and cultural elements of psychedelics. He wanted to explore not just the science behind these powerful substances but also how they fit into our collective experience as human beings.
There were also expectations to subtract from the equation; while Michael’s research had made big waves, years on it became associated with what many in science call the ‘Michael Pollan effect’. This effect, coined by anthropologist Tehseen Noorani, is the tendency for the public to perceive any scientific research on psychedelics as ‘just another take’ on what Michael Pollan had already written.
With this in mind, Andy set off on a journey to gain a greater understanding of how different cultures view psychedelics and their potential uses. He visited various sites around the world where he encountered shamans, healers, and other practitioners who use these substances for healing purposes. Breaking free from Western mental health norms, Andy sought to see the world through a new perspective and to understand the potential of psychedelics beyond the traditional medical model. He mingled with individuals who were on their own personal journeys of discovery in what would turn out to be 40 different ceremonies over the course of 60 days.
While scientific research was the drive behind the project, Andy admits he couldn’t help but feel transformed during his journey. He found himself looking inward at his own upbringing, identity, and experiences to uncover things he never knew.
Real Benefits Require Work
Maladaptive habits like procrastination and overthinking are among the prime reasons why people begin exploring psychedelics. There’s something to be said about the power of inner thoughts, which Andy explains are part of a greater default mode network in the human brain. This internal circuitry is responsible for a lot of the internal dialogue and automatic thoughts we experience on a daily basis. It’s also been linked to habit formation, so it’s no wonder that many people struggle with their inner monologue, which tends to be critical and self-defeating.
Psychedelic use can provide an opportunity for us to step outside of this internal dialogue and gain a different perspective on our thoughts, habits, and behavior. It can also provide insight into how the default mode network works in our own minds, allowing us to better understand our inner thoughts and the patterns behind them.
But like all forms of therapy, Andy emphasizes that it requires work. It’s not like taking a pill and suddenly you know what to do. You have to learn how to use the lessons psychedelics give you, and that takes time. It’s all about being open to the idea of exploration as well as learning about yourself in the process.
Andy Mitchell’s fresh perspective on psychedelics is a welcome addition to the conversation about mental health and well-being. He provides a unique take on how psychedelics can be used to explore our inner selves and gain insight into the thoughts and patterns that shape our lives.
By using this approach, we are better equipped to challenge unhealthy thought processes within ourselves, whether they apply to creative endeavors or any other facet of life. I highly recommend reading ‘Ten Trips: The New Reality of Psychedelics’ as soon as it’s available at your local bookstore.
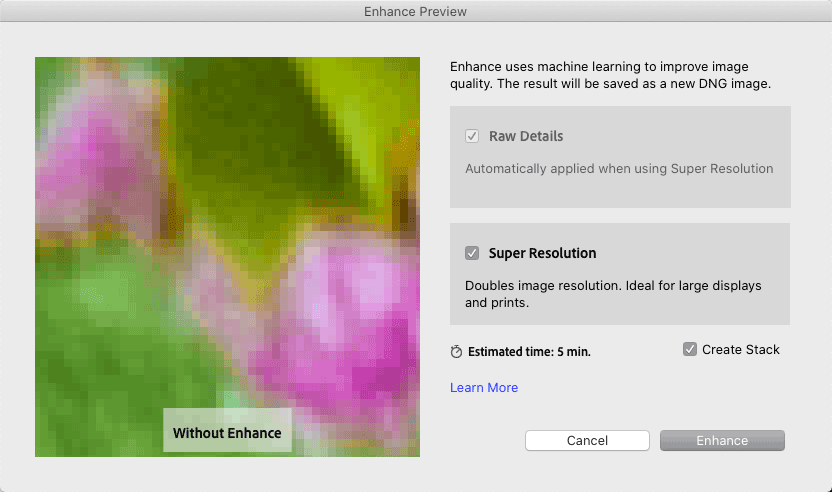
The new Super Resolution feature uses artificial intelligence to increase the size of your image to four times its original size in pixels. (It doubles the length and the width.) This can be useful for making large prints or for upsizing a small crop of an image. Super Resolution will work on any file type (raw, JPEG, TIFF, etc.).
Raw Details (previously known as Enhance Details) and Super Resolution are now in one Enhance dialog. Right-click in your image and choose Enhance…
Raw Details must be run with Super Resolution if your image is a camera-proprietary raw file (not a DNG, JPEG, TIFF, etc.).
Lightroom can’t handle photos over 65,000 pixels or 512 MP, so Super Resolution won’t work on files large enough that the 4x increase would put them over the limit.
The quality of enlargement compared to upsizing during export and print, but be careful – Super Resolution can introduce color artifacts and noise. Evaluate your image closely (zoomed in to 100%) after running the process. For best results, use raw files, since any artifacts in other file types will be enlarged. That said, I wouldn’t hesitate to use this on other file types – I’d just check the result carefully.
In this article, Eric Chan of Adobe discusses Super Resolution and how it was developed.
Free Photoshop tutorial. Ultimate guide to select and mask in Photoshop, how to get perfect edges on every background removal
When you make selections to cut out images, often you will have problems with the edges. You’ll see halos, jaggies, blockies, smudgies and other problems. (I just coined the phrases Smudgies and blockies, you’ll know them when you see them.) Photoshop contains a number of tools to address these edge problems. Many people aren’t using all these tools because they often don’t know what each tool does. That’s my goal here, to explain these tools and demonstrate when to use them. I wanted to make a comprehensive walk-through of every feature in Select and Mask and how it works. Here is Part 1 of this tutorial, dealing with soft edges like hair and fur. Part 2 is here
Select and Mask Ultimate Guide, Part 2 – Global Refinements and Smooth edges
This tutorial is made in Photoshop 2024. It will work with Photoshop CC and newer.
We will be using all the options in the next 2 tutorials. Be aware that you don’t have to use all the tools on every selection, I just want to explain each so you know what to do when you encounter jaggies, blockies, smudgies and other problems on the edges.
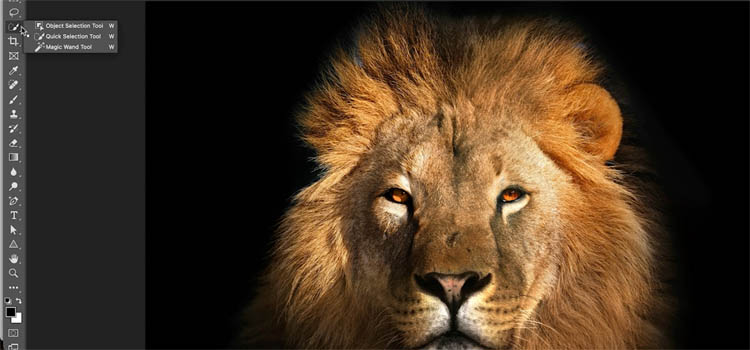
We need to start by making a selection.
I have created many tutorials and even a course on making selections. I’ll list just a few here. You can search or browse for many more here at PhotoshopCAFE
Using the Pen Tool
3 Ways to fix edges on cutouts
3 ways to cut out anything in Photoshop
For this tutorial, we will use the fastest way to get a decent initial selection.
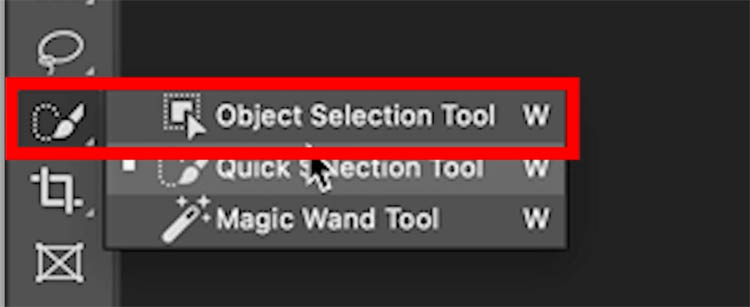
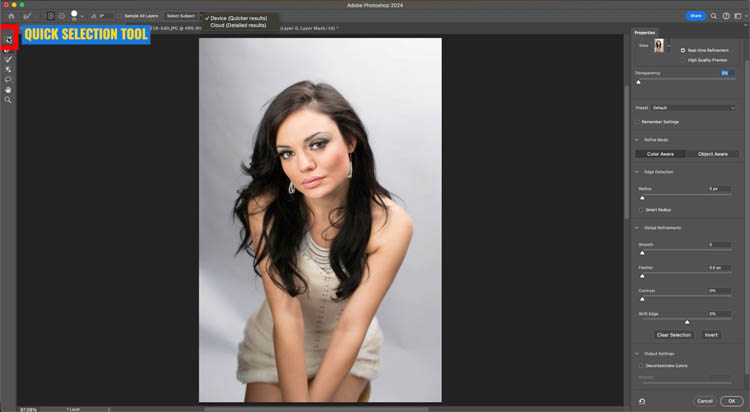
Choose the Object selection tool
Under the dropdown at Select subject, you’ll see two options
Device: Processes on your computer and is the fastest option, doesn’t require internet connection.
Cloud: Uploads to Adobe server farm and takes advantange of massive computational power. Rwequires active internet connection and takes longer.
choose Cloud.
Click Select Subject (This uses Adobe Sensei ai to make the selection. Different ai than Firefly which powers Generative ai)
Sensei does not use up generative credits.
The selection will be made.
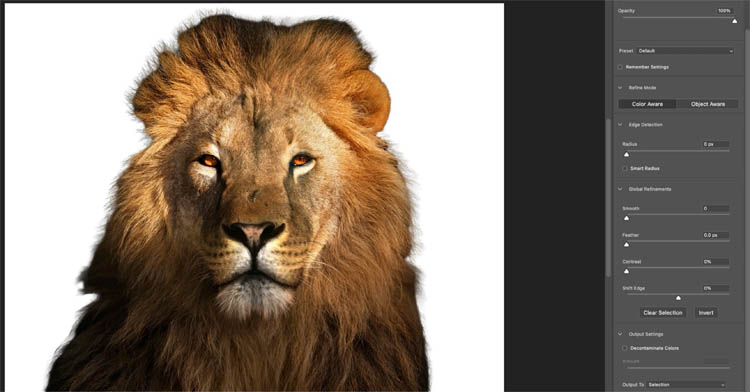
Note: You can use any selection method you like to get to this point of the pipeline, we just used Select and Mask because it’s fast. I’m using a simple background for this image. It’s not because the Photoshop tools are bad, or I’m not able to work on difficult images, we are doing a simple one, to make the learning uncluttered and easy to follow. I have other tutorials on making challenging selections if that is the task you are facing right now.
Choose Select and Mask
We are now in the Select and Mask Workspace and this tutorial will mainly focus on the suite of tools available here.
Notice we have a Quick selection tool at the top of the toolbar on the left. We also have select subject available here. Some people prefer to open the image in Select and Mask and then make the selections. I prefer to make the selections first (like we did here). I have 2 reasons. 1. It’s faster, Photoshop lags when making selections in Select and Mask. 2. I like to have all the Photoshop tools available for making my initial selection.
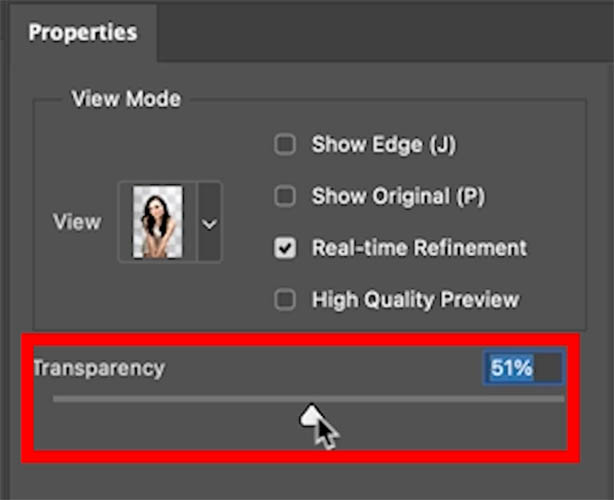
If you don’t see the cutout, adjust the Transparency slider in the view mode, if you are in Onion Skin view.
Viewing the Mask in Select and Mask
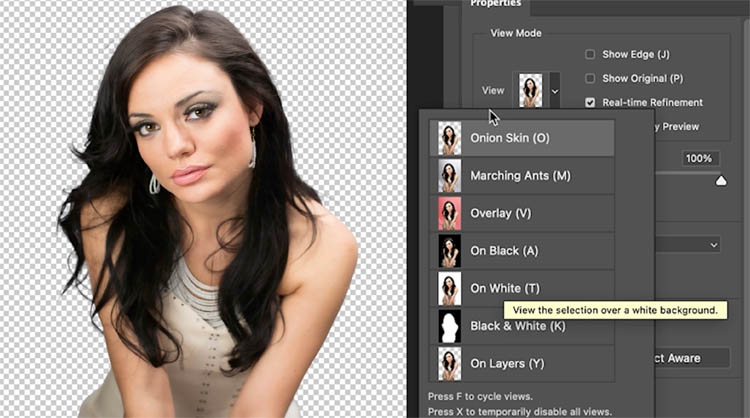
In the view, there are lots of ways to view the edges.
The main ones I use are: Onion skin (O key) This lets you adjust the transparency of the background as a guide
On White (T key) So you can see the dark edges on light areas
On Black (A key) So you can see the light edges on dark backgrounds
Black and White (K key) this is the same as viewing the mask or an alpha channel. It lets you easily see problems on the mask.
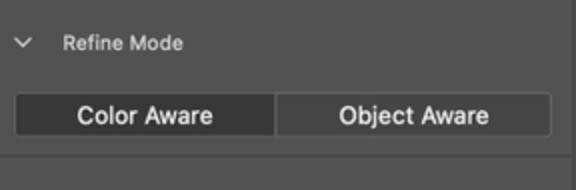
There are 2 options in refine mode. Each uses a different algorithm.
Color aware is usually best for simple backgrounds. Object aware is usually best for complex backgrounds.
How does Edge Detection Work?
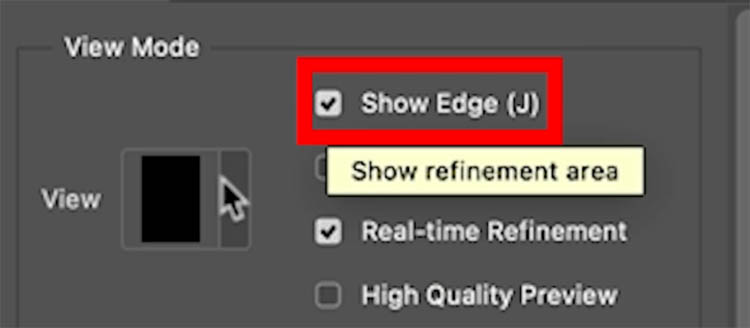
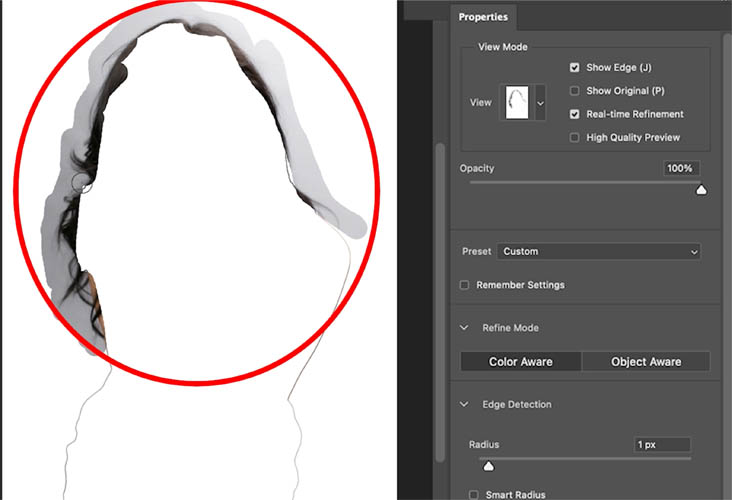
Turn on Show Edge to see how the tool works. (I don’t often turn this on when working, only if I need to visualize something).
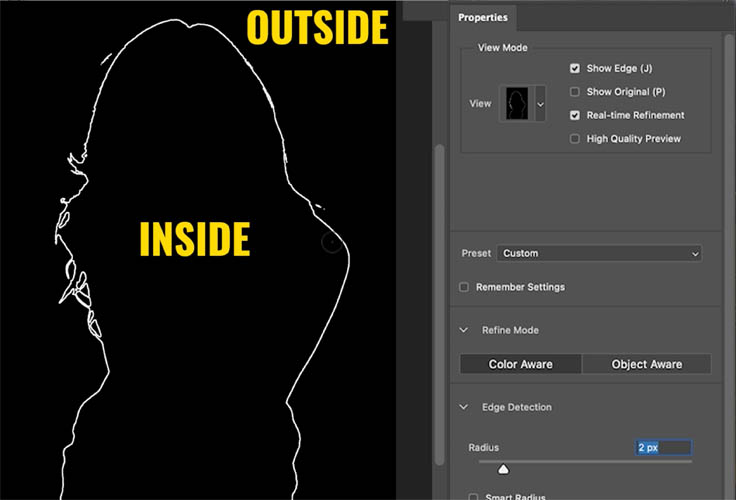
Move the radius slider so that we have an edge to look at.
The areas inside the edge are kept and the are outside the edge will be hidden.
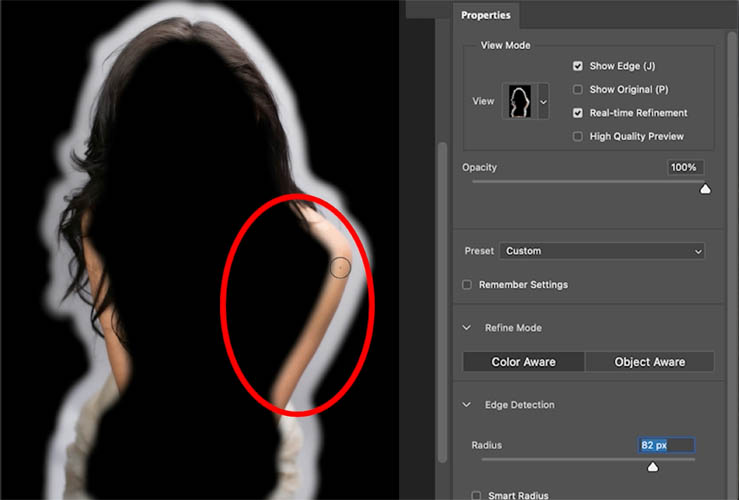
Here I increased the size of the edge to 82, so you can see what’s happening.
The edge is the transition area, or the area where Photoshop decides what belongs to the subject and what should be background.
A thin edge will produce a smoother selection, a wider edge is good for soft areas like hair, fur, smoke etc, because it’s wide enough to cover the transition areas.
What do we do when there is a combination of smooth and soft edges, like a person? One sized edge won’t work for all.
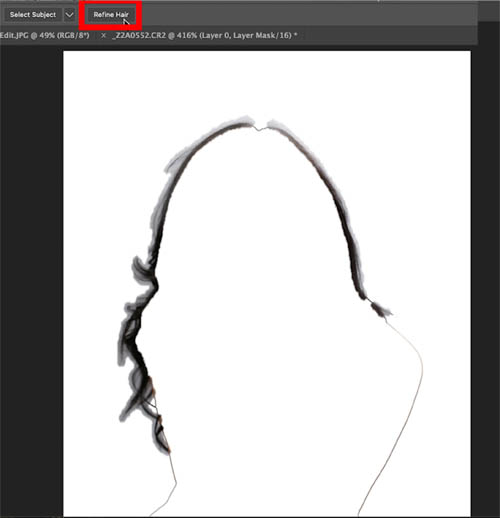
This is what the Refine tool does
Change the edge radius to 1, or 0.
Paint around the hair wit the refine tool. Make sure to paint on the middle and include the edges of the both subject and background. Make sure you cover all the edges of the hair.
If we turn on Show Edges, you can see what happened.
Notice the edges are thin (I set radius to 1). But now we have a wider edge around the hair because we painted it with the refine brush.
The algorithm in Photoshop will try and mask the hair in this edge.
There is a faster way to do this step.
If you click the Refine Hair button, notice Photoshop will add a wider edge around the hair for you. You may still have to touch it up with the refine brush, but this gives you a head start.
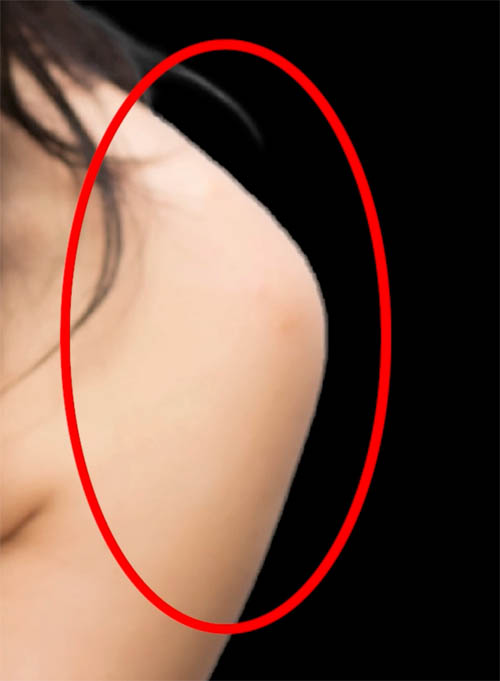
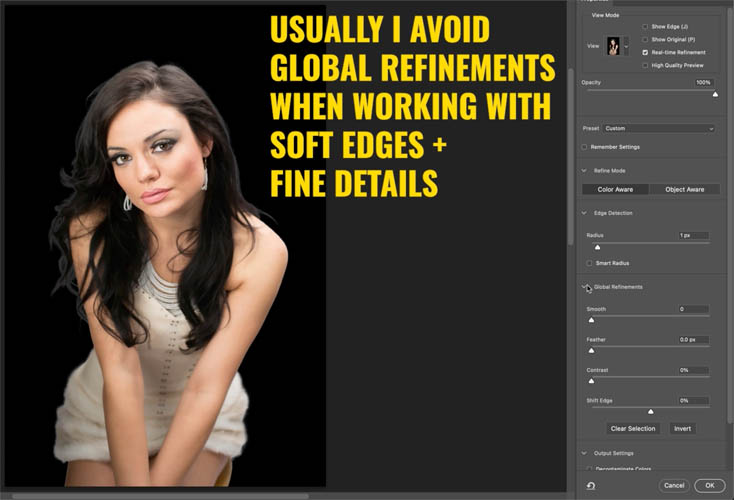
If you zoom in on the smooth parts like the arms, notice the edge isn’t very good.
We can fix this using Global Refinement tools.
However, if you use global refinements tools when you have hair, it messes with the edges.
see how even moving 1 slider gives us helmet hair.
Don’t make any global refinements yet, I’ll show you how to handle that.
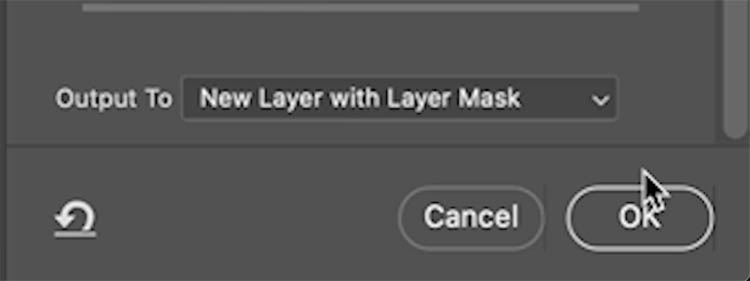
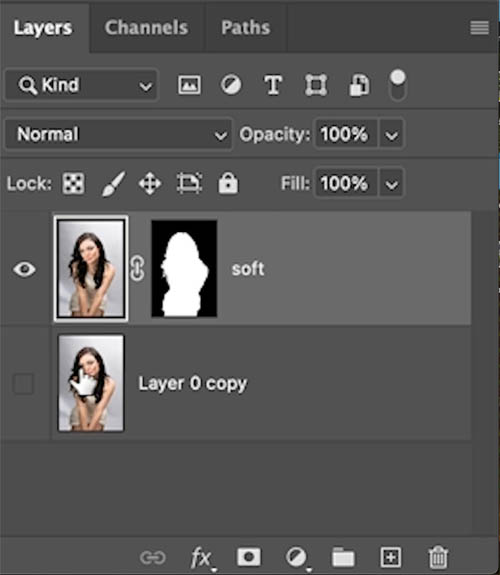
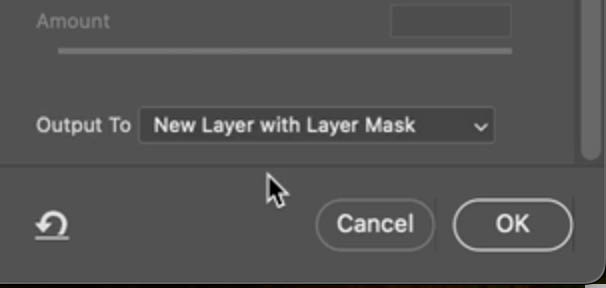
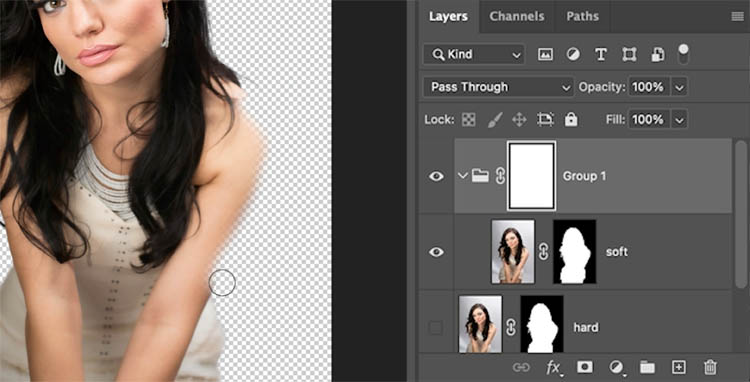
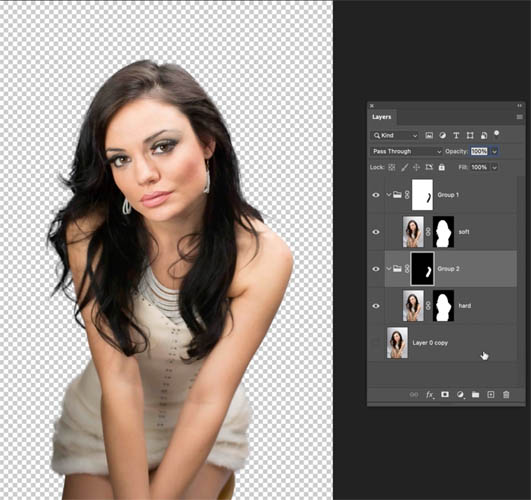
Under Output, choose New Layer with Layer Mask.
Click ok
Name this new layer “Soft”.
BTW, this selection is good enough for many low resolution purposes like social media and online use where people aren’t zooming in close to the image.
Combining soft and smooth edges
Let’s look at how to refine the smooth edges like the arms without messing up the hair selection.
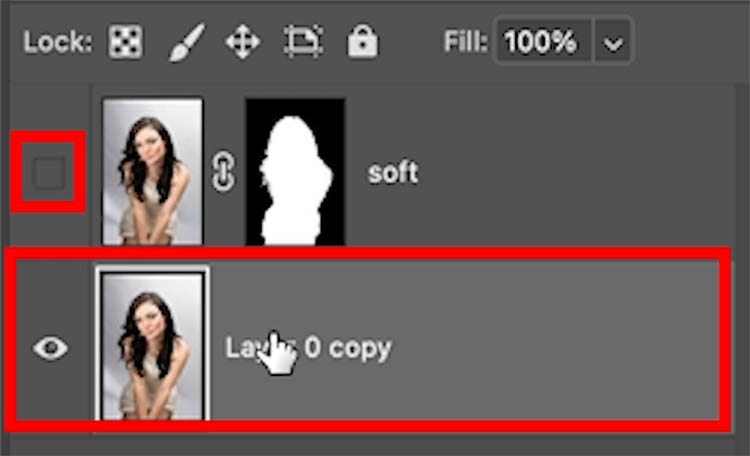
Hide “soft” layer
Choose the bottom layer
Once again choose Select subject and click on Select and mask, like we did at the beginning.
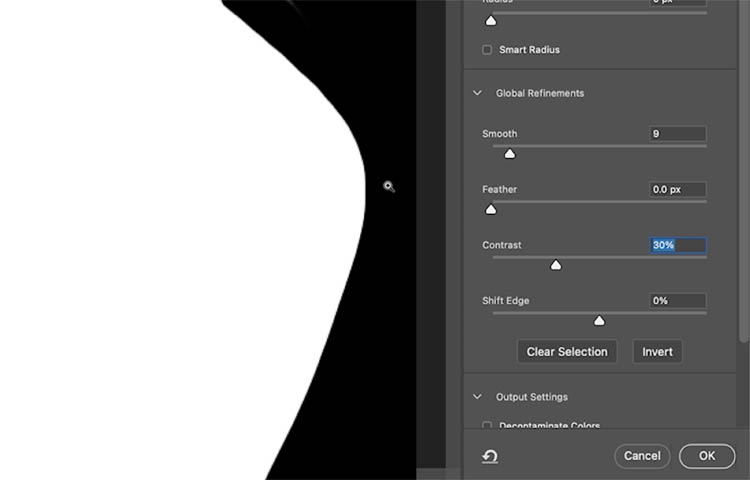
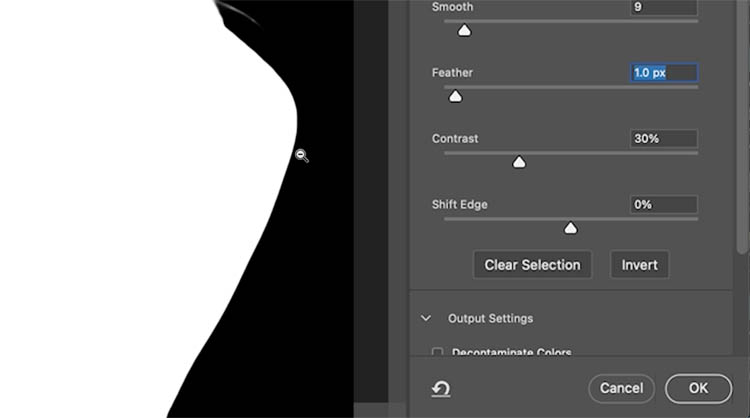
We are viewing on black i view.
See the edge is uneven and rough.
If we move smooth, it will reduce the ridges and valleys. (We jumpdeeper into Global refinements in part 2 of this tutorial ).
The edge is blurry.
Use Contrast to sharpen the edge.
If the edge looks too sharp and jaggy, add a small amount of feather. (These tools will all be explained properly in part 2)
Now we have made the smooth edges look better. Don’t even worry about what the hair edges look like in this pass.
Choose new layer with layer mask.
Click ok
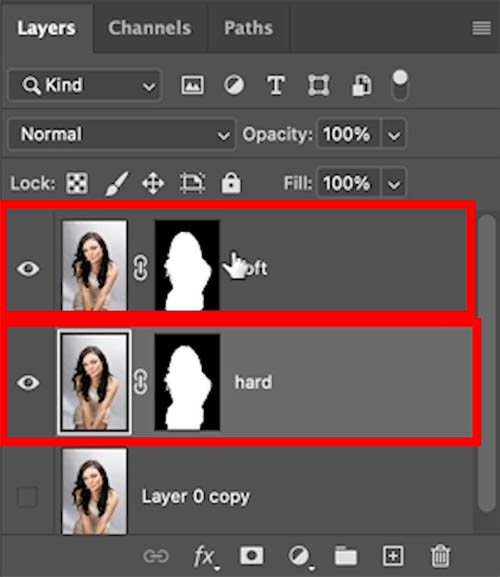
Name the new Layer Hard
Now we have 2 layers
All we need to do now is mix the best of each. This has a challenge because we want to use the existing masks because they contain the selections.
We could apply the masks, but that would be destructive, here is a better way…
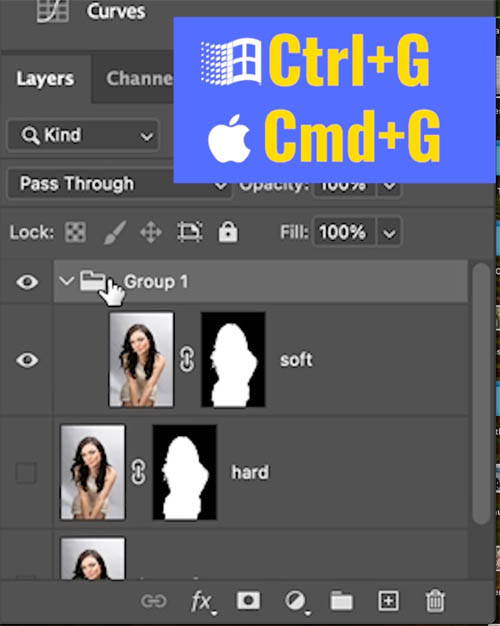
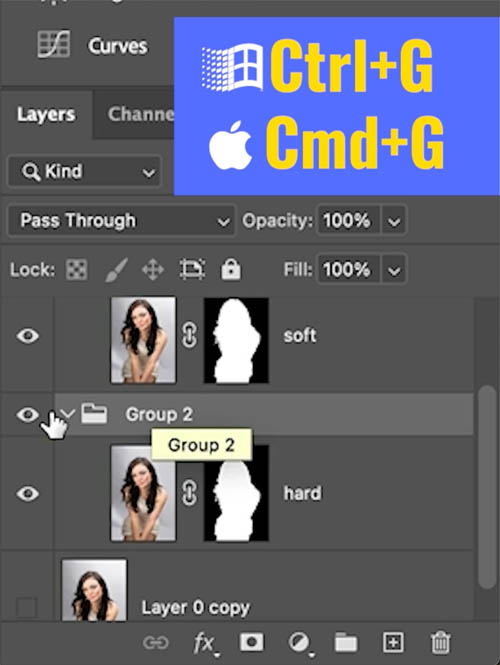
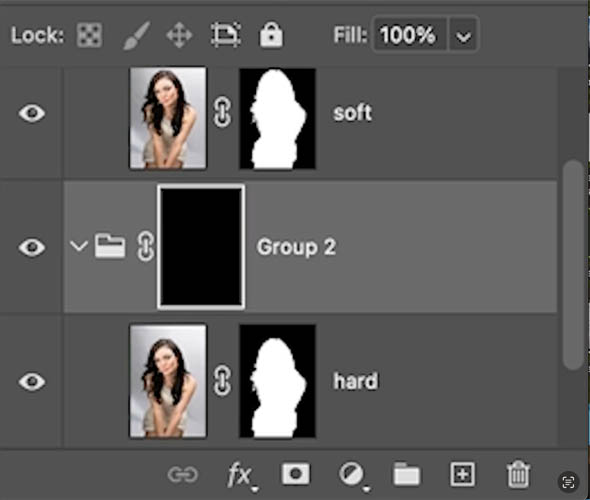
Choose the soft Layer and Press Ctrl/Cmd+G to put it in a group.
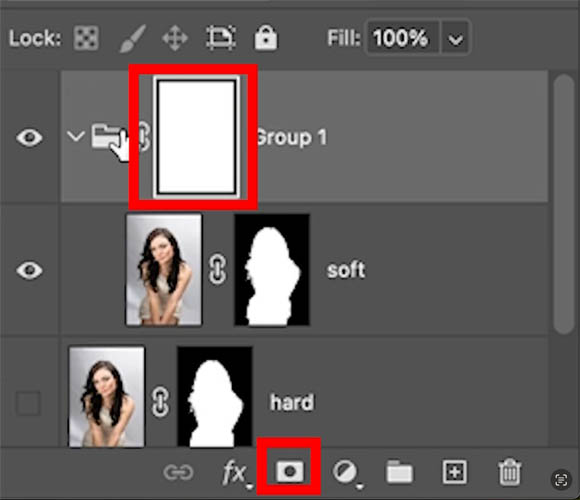
We can now add a layer mask to the group. Brilliant! Now we can mask the layer without ruining the cutout mask we worked so hard to make.
Choose the brush tool (B)
Choose Black as the foreground color. (Black hides pixels when applied to a mask – White reveals pixels).
Click on the on the hair layer group mask “soft”. as shown below.
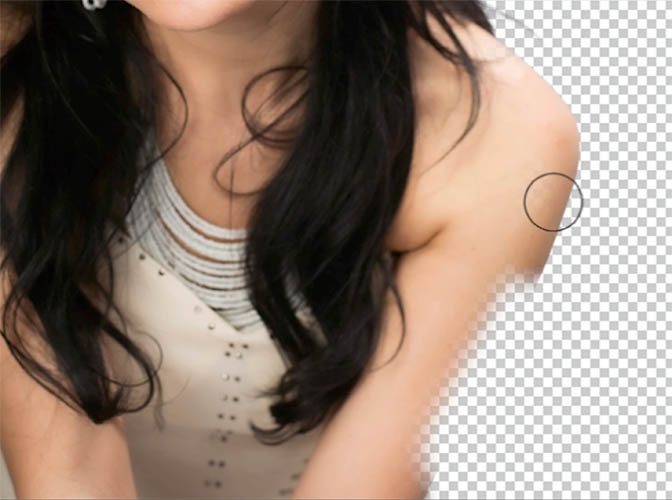
paint away the edge of the arm
Now we want to add the edge of the arm from the hard layer.
Click on the Hard layer and press Ctrl/Cmd+G to make a group.
When you add the mask to the new group, hold down the alt/Option key. This will make a black mask.
The black mask hides everything on the layer
Choose white as the foreground color. White will show the areas we paint on
Paint on the arm to show the better edge from the hard layer
We have now combined the 2 different refinements.
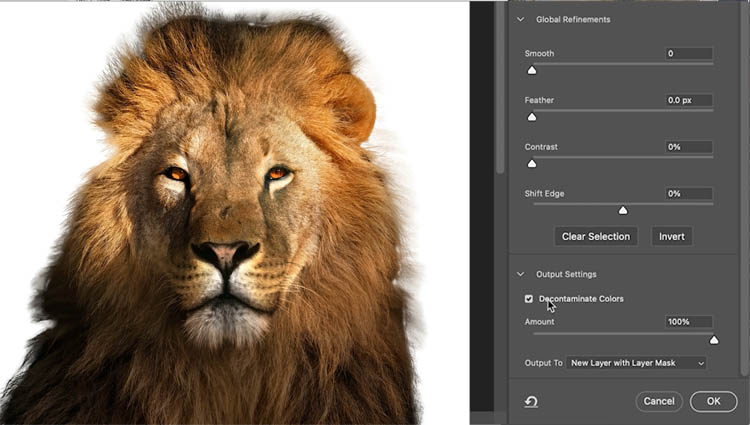
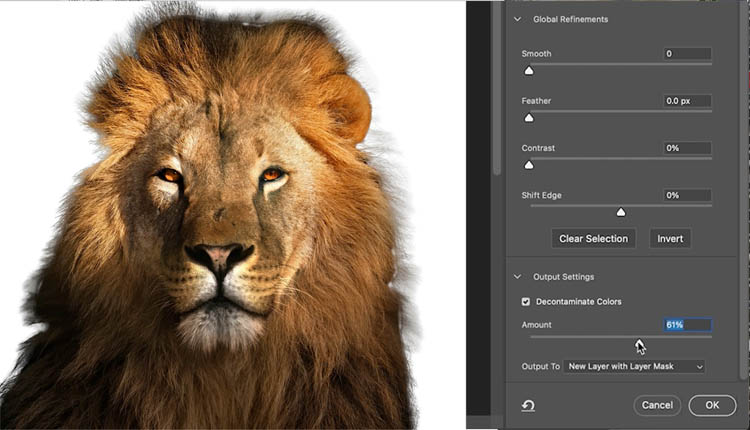
Decontaminate colors
Decontaminate colors is a good way to blend in colored edges.
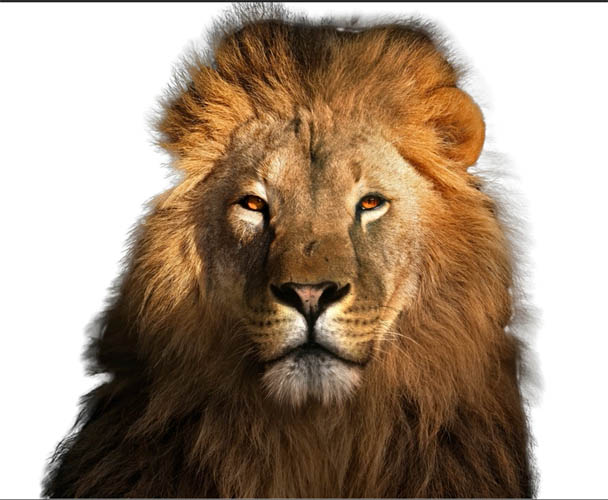
Make a selection around the lion. I used the select subject again.
Click select and mask
See the bad edges
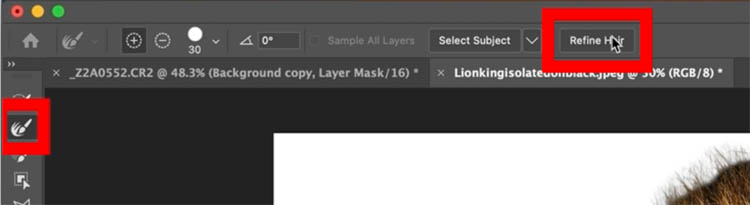
Choose Refine Hair.
If you don’t see it, click on the refine brush.
Its a good start, but there are black edges.
Click Decontaminate colors and it takes the surrounding colors and adds them to the edges.
If it’s too strong, change the amount to suit your tastes.
I hope you found this tutorial useful!
Continue to part 2
Part 2 on smooth edges and the Global Refinements in depth, is here
Here is my course on Photoshop Selection Secrets
Thanks
Colin
If you found this useful, please tell your friends about photoshopCAFE and follow me on social media for Photoshop tips and inspiration.
PS Don’t forget to follow us on Social Media for more tips.. (I’ve been posting some fun Instagram and Facebook Stories lately) You can get my free Layer Blending modes ebook along with dozens of exclusive Photoshop Goodies here
var advanced_ads_pro_visitor_conditions = {“referrer_cookie_name”:”advanced_ads_pro_visitor_referrer”,”referrer_exdays”:”365″,”page_impr_cookie_name”:”advanced_ads_page_impressions”,”page_impr_exdays”:”3650″};
var essb_settings = {“ajax_url”:”https://www.lightstalking.com/wp-admin/admin-ajax.php”,”essb3_nonce”:”ffd597b920″,”essb3_plugin_url”:”https://www.lightstalking.com/wp-content/plugins/easy-social-share-buttons3″,”essb3_stats”:true,”essb3_ga”:false,”essb3_ga_ntg”:false,”blog_url”:”https://www.lightstalking.com/”,”post_id”:”512453″,”internal_stats”:true};
Capturing nature in aesthetic ways is something desirable for photographers for sure. But beyond the required visual taste for achieving such shots, it also requires patience. Nature demands exploration and a sense of adventure, but sometimes those conditions are constrained by financial and physical variables we simply can’t escape from… Thankfully, photography is benevolent and allows us to develop that same patience needed for outdoor photographs in the back yard.
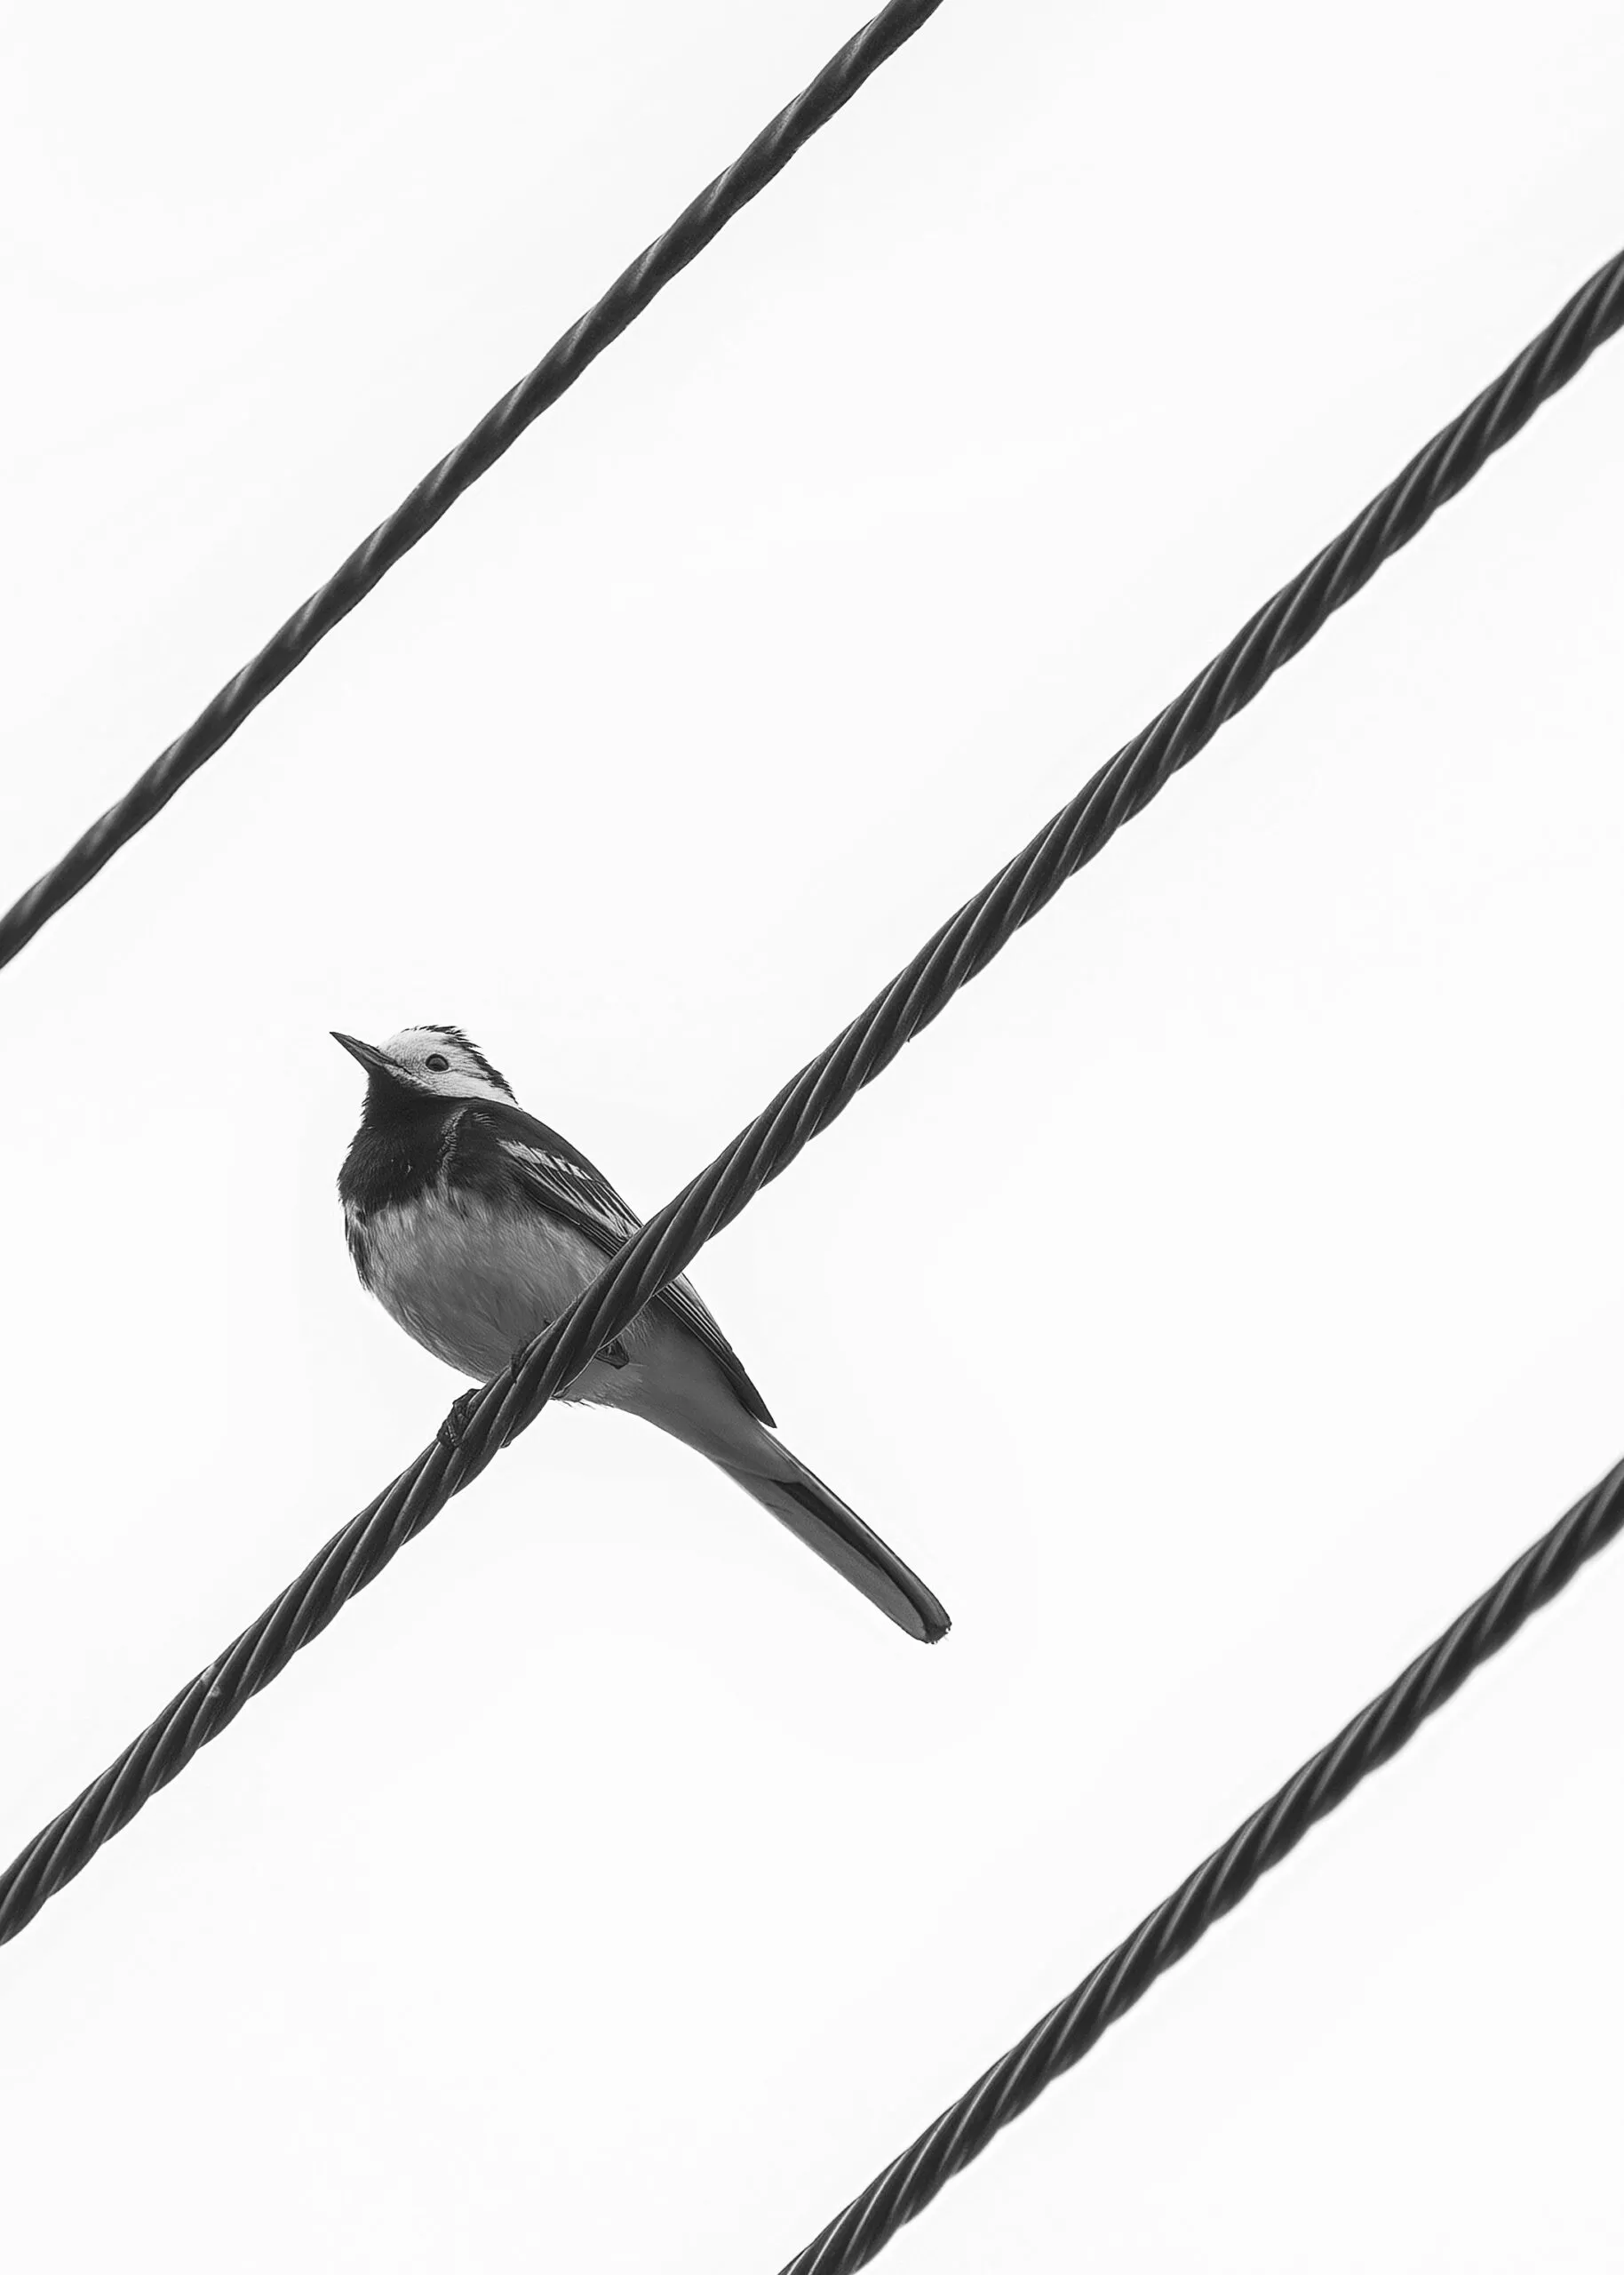
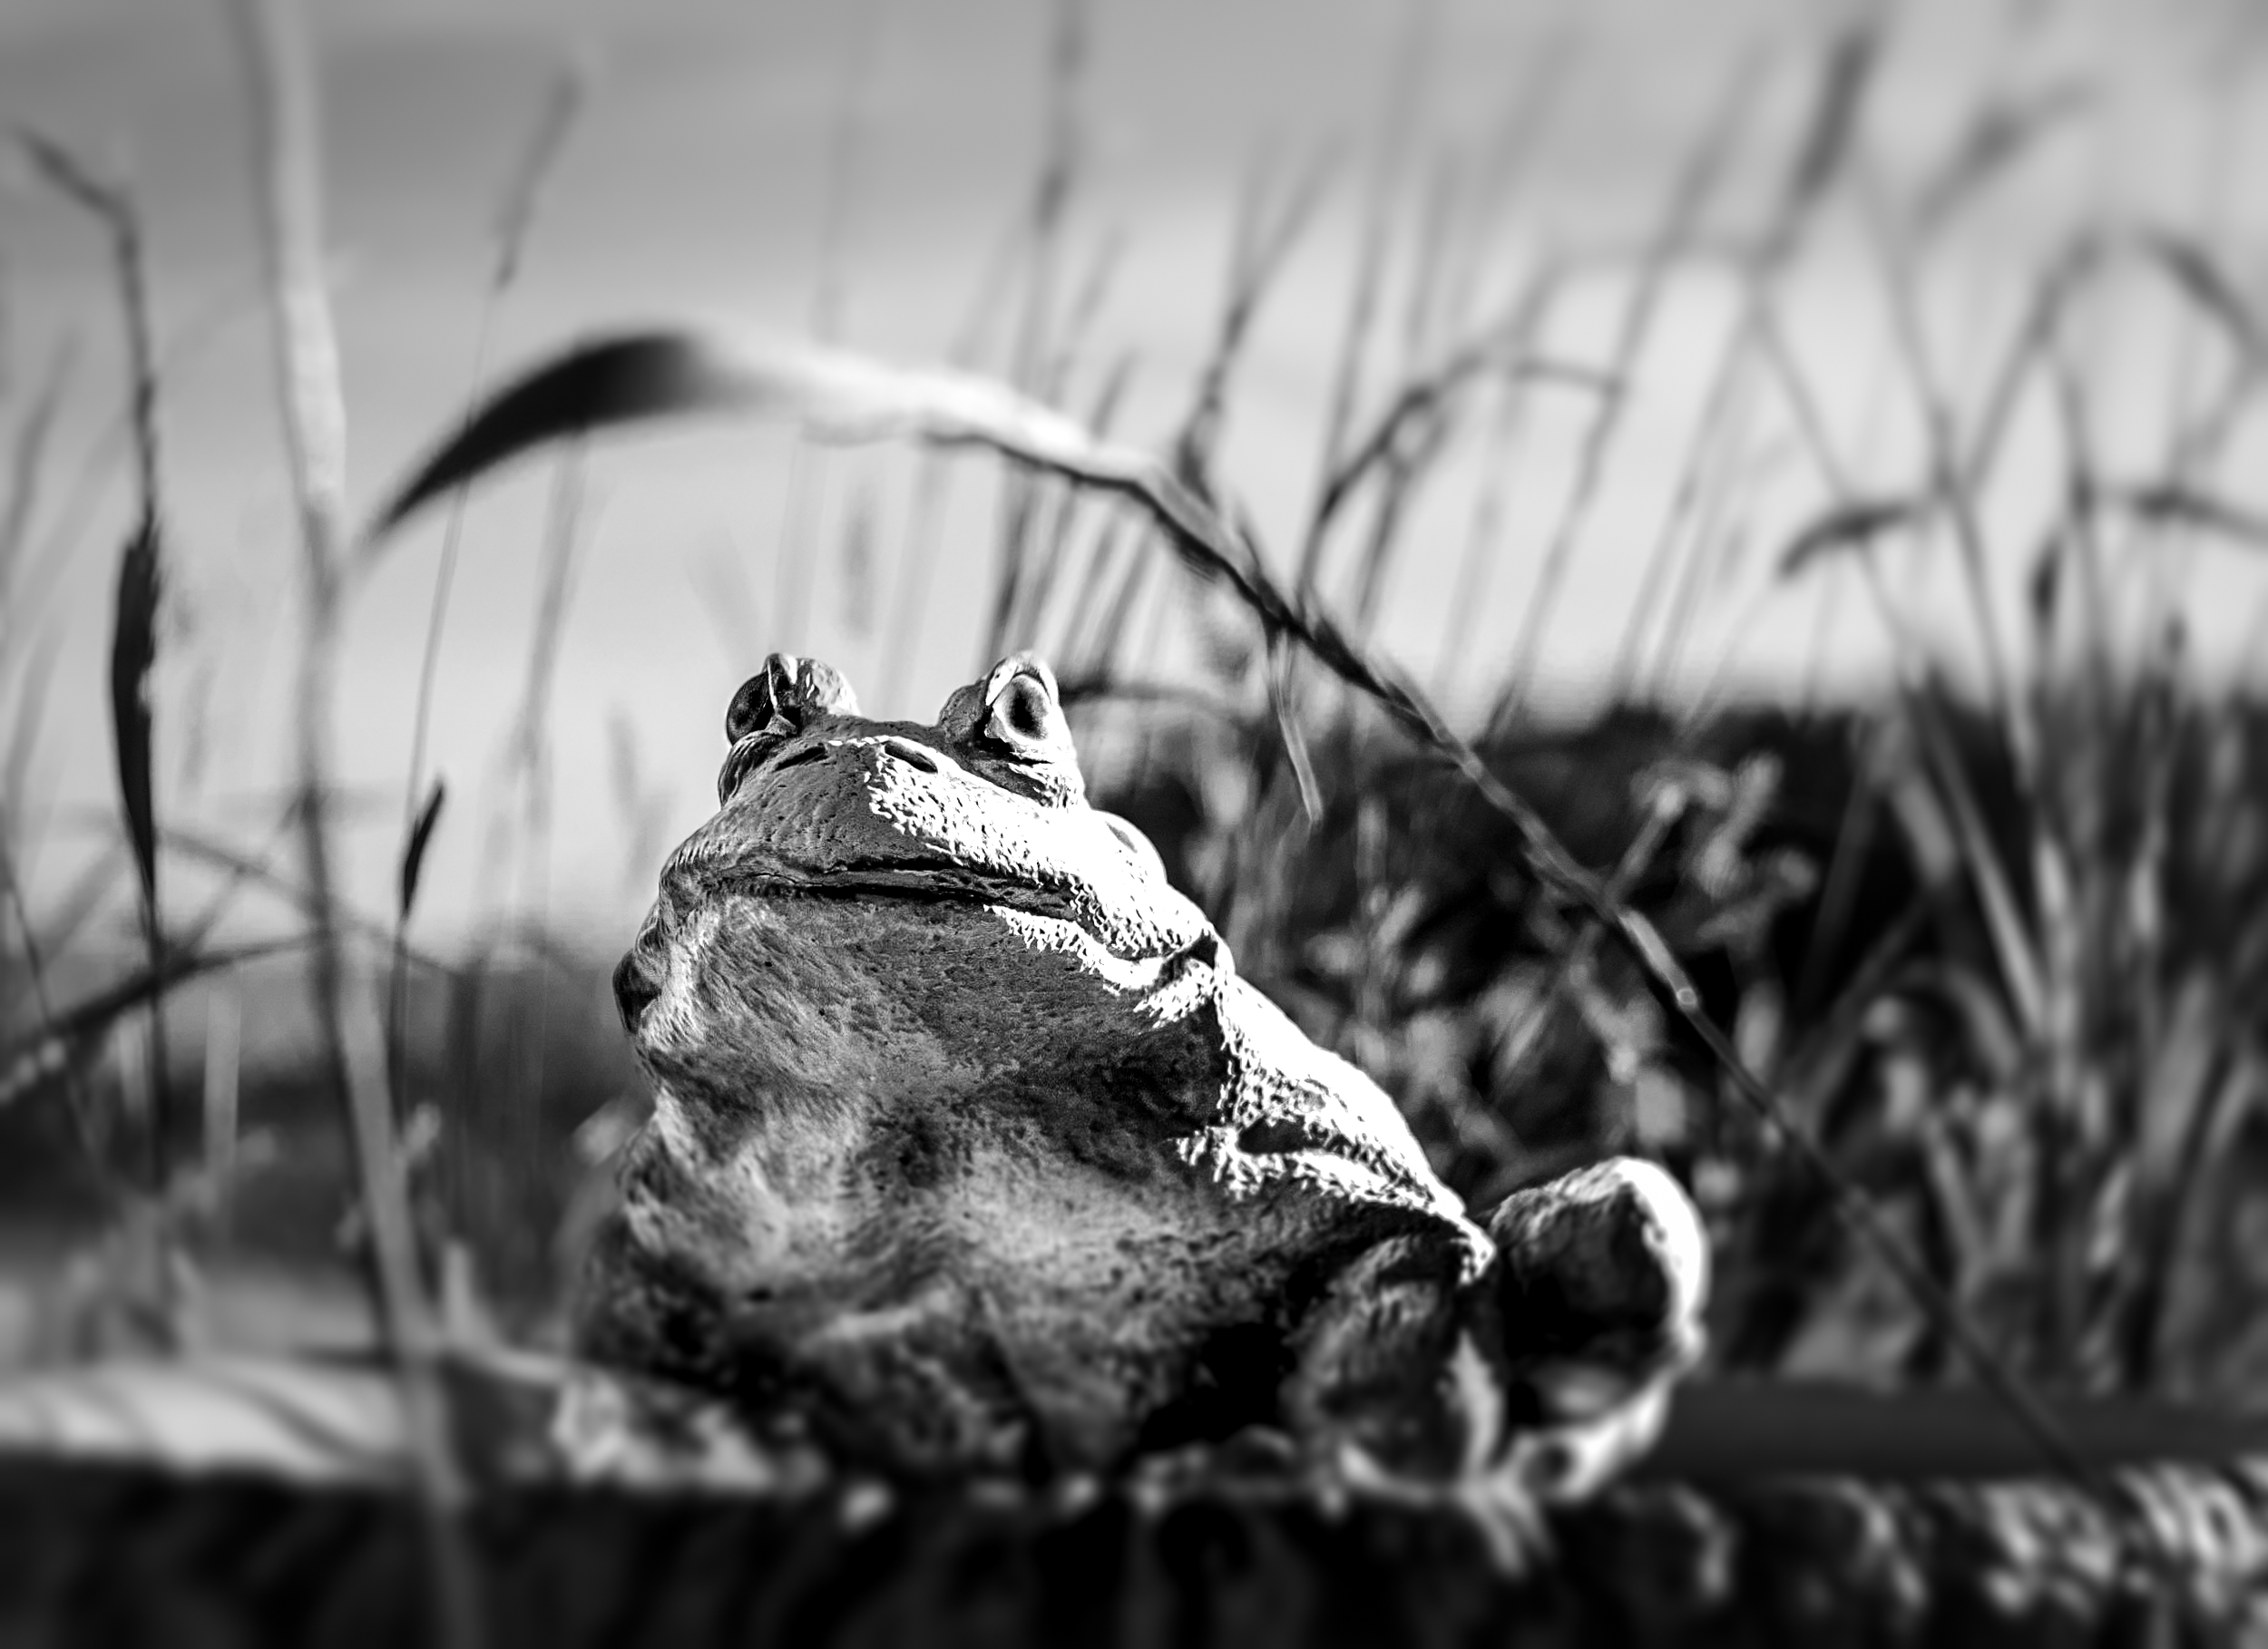
Today we bring you a selection of images from our latest challenge, which this time pushed our community to share “local wildlife” photographs. An idea that resonates with the notion of environmental awareness we all to some degree share.
Forcing ourselves to see life around us, enables us to appreciate biodiversity. I’m sure we all remember squashed insects in our vehicles’ windshields, now that’s something we all have noticed over the years. Noticing stuff is the crucial element behind any photograph. The rest relies on how we register that found stuff to be interesting to us.
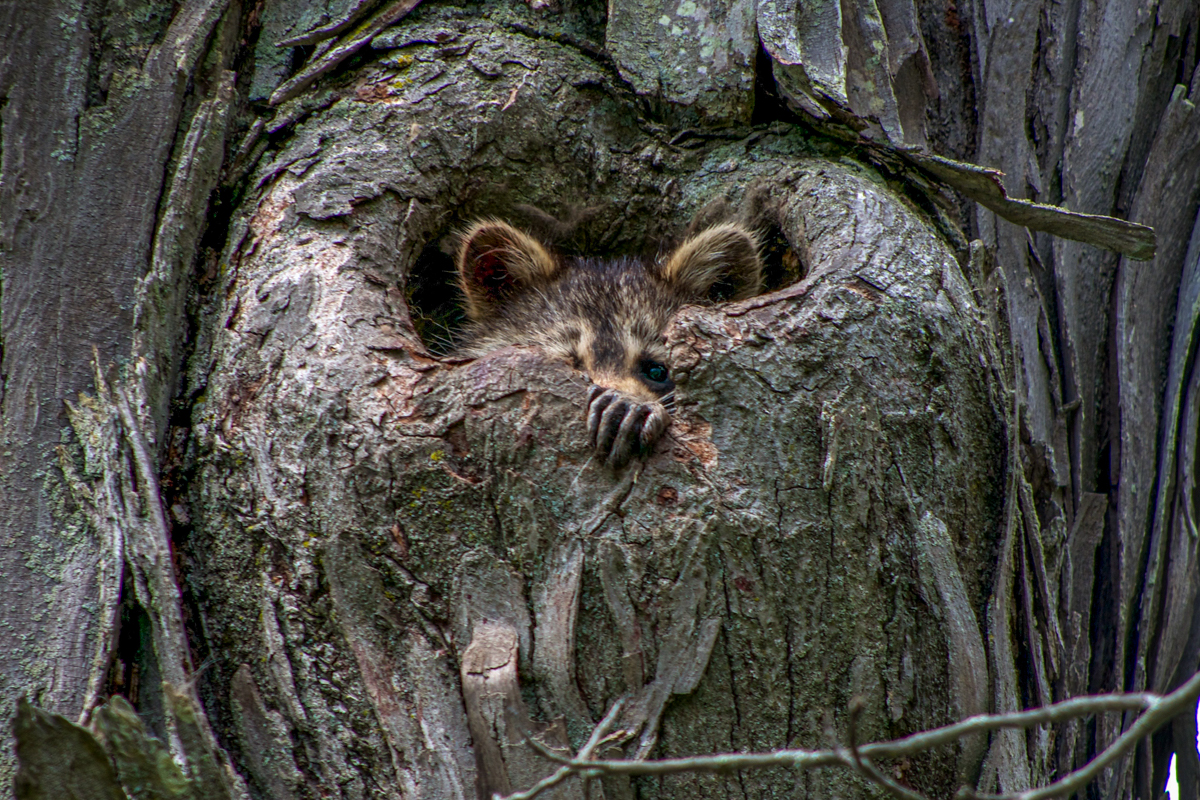
Raccoons are my favorite creatures on earth, so there might be a strong bias pulling my finger on this week’s selection. But you have to admit, it’s an effective analogy of how nature feels about us… It transmits a sense of fear one can’t ignore, even from a distance as lens fringing indicates.
Copyright – Pat Garrett
Congrats Pat, thanks for sharing this compelling portrait with us!
Weekly Photography Challenge Digest
Thanks, Tersha and Dahlia for pushing our creative boundaries one step forward every week!
Honey Bee on a Rosemary Blossom
Copyright – Click
Anna’s Hummingbird
Copyright – Click
A golden praying mantis on a colorful table top.
Copyright – Timothy S. Allen
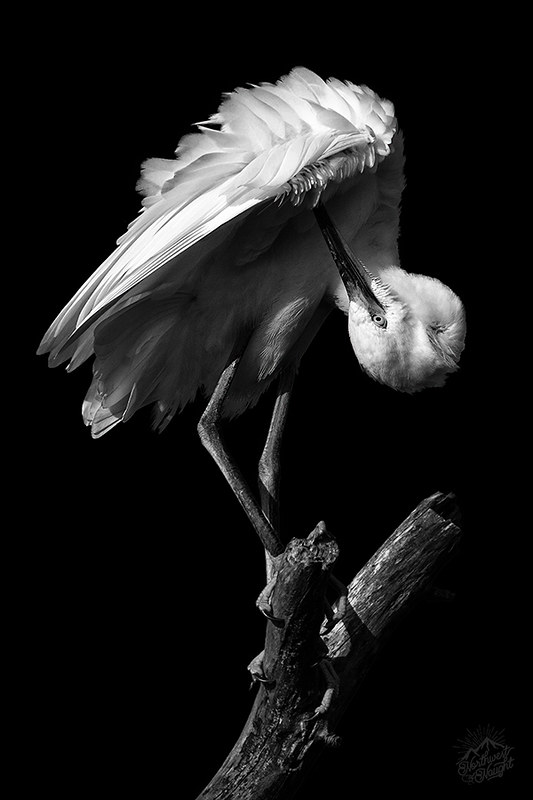
egret in b&w.
Copyright – beth
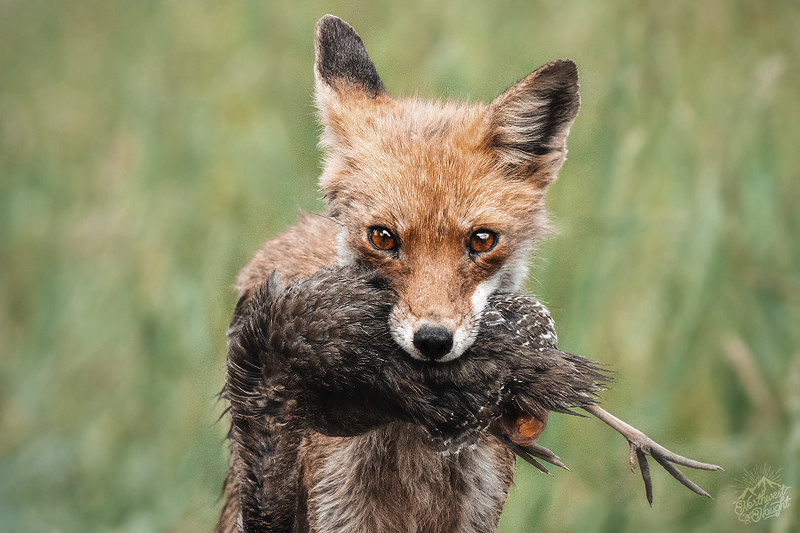
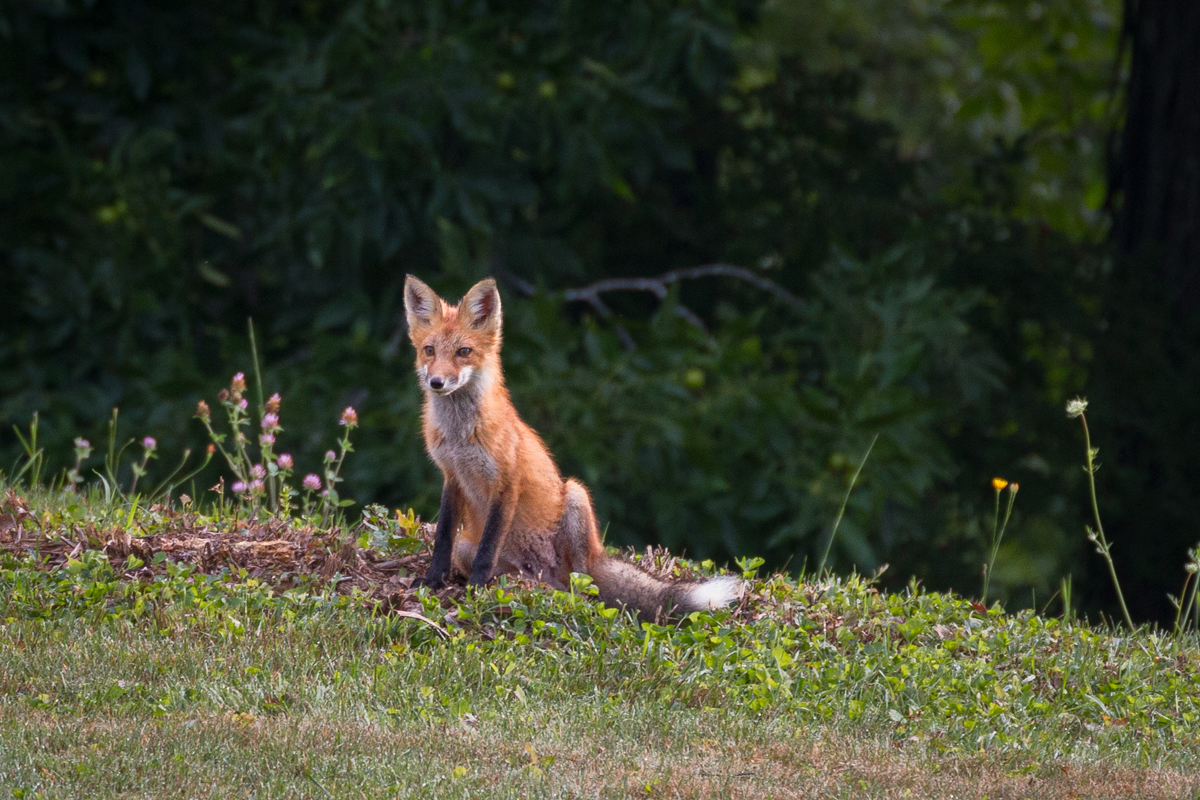
fox & virginia rail
Copyright – beth
Stealing nuts!
Copyright – Tersha
Nest building
Copyright – Timothy S. AllenCopyright – PatrickCopyright – Frogdaily
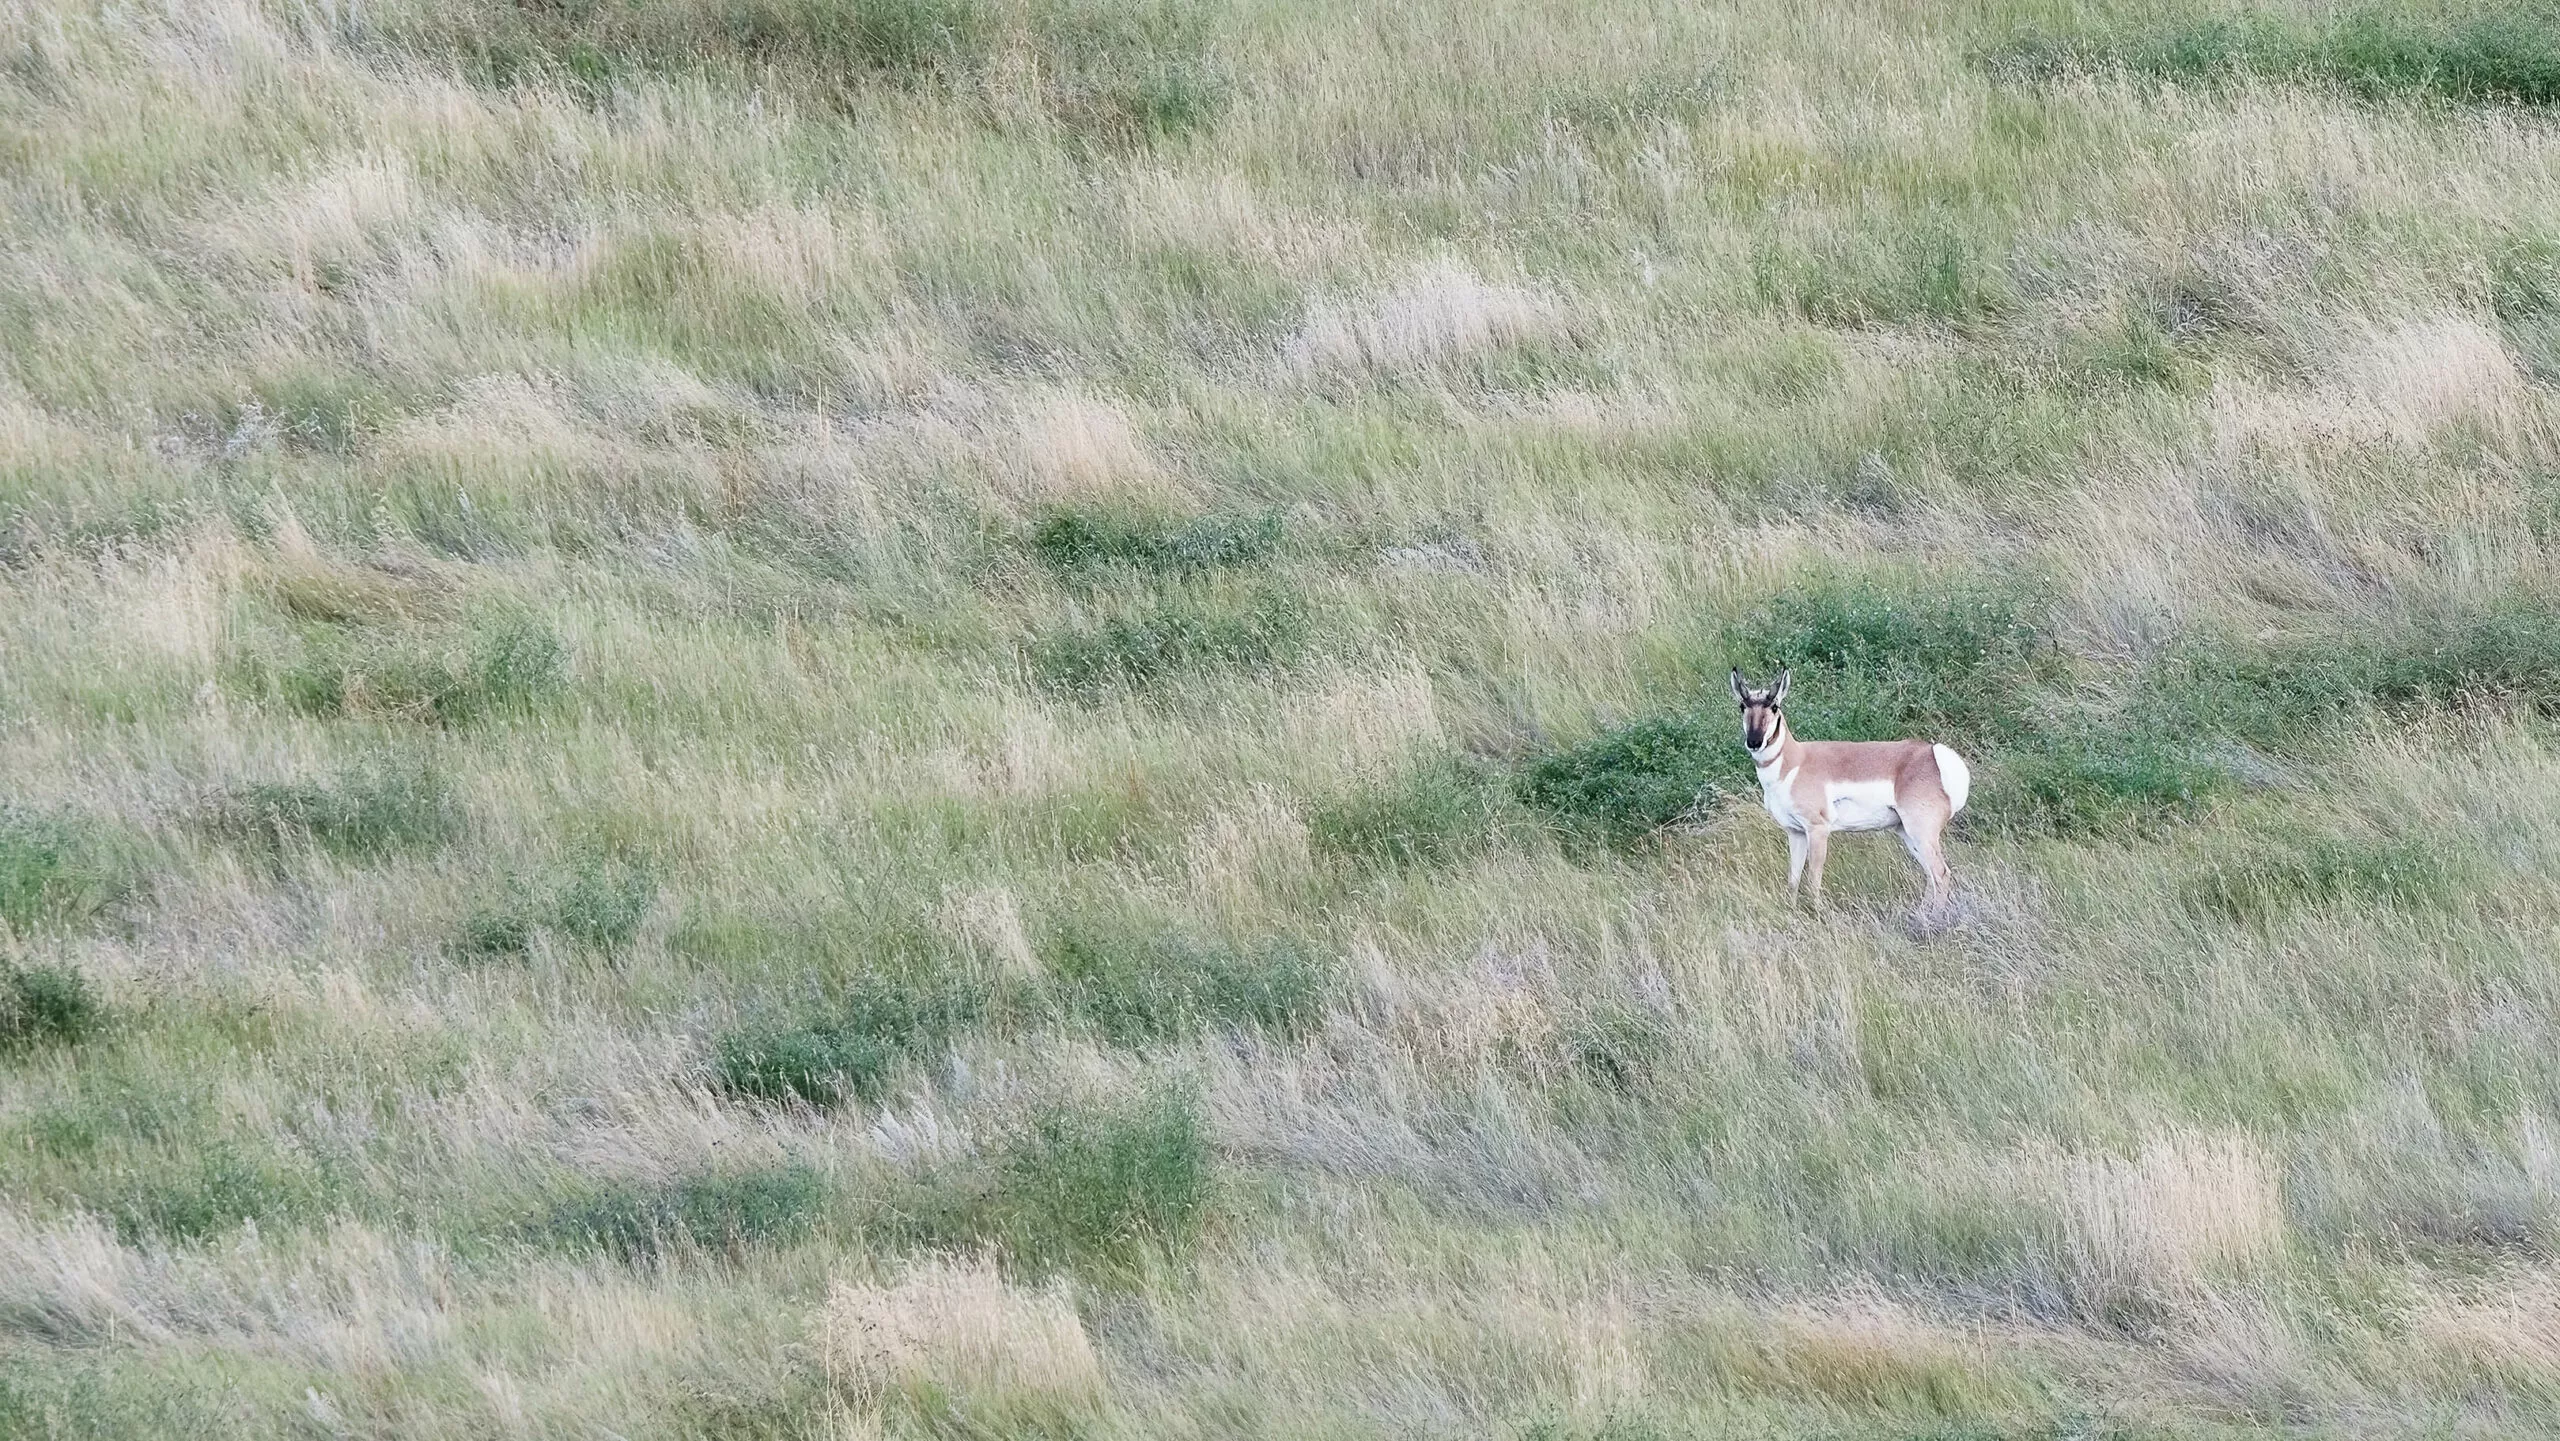
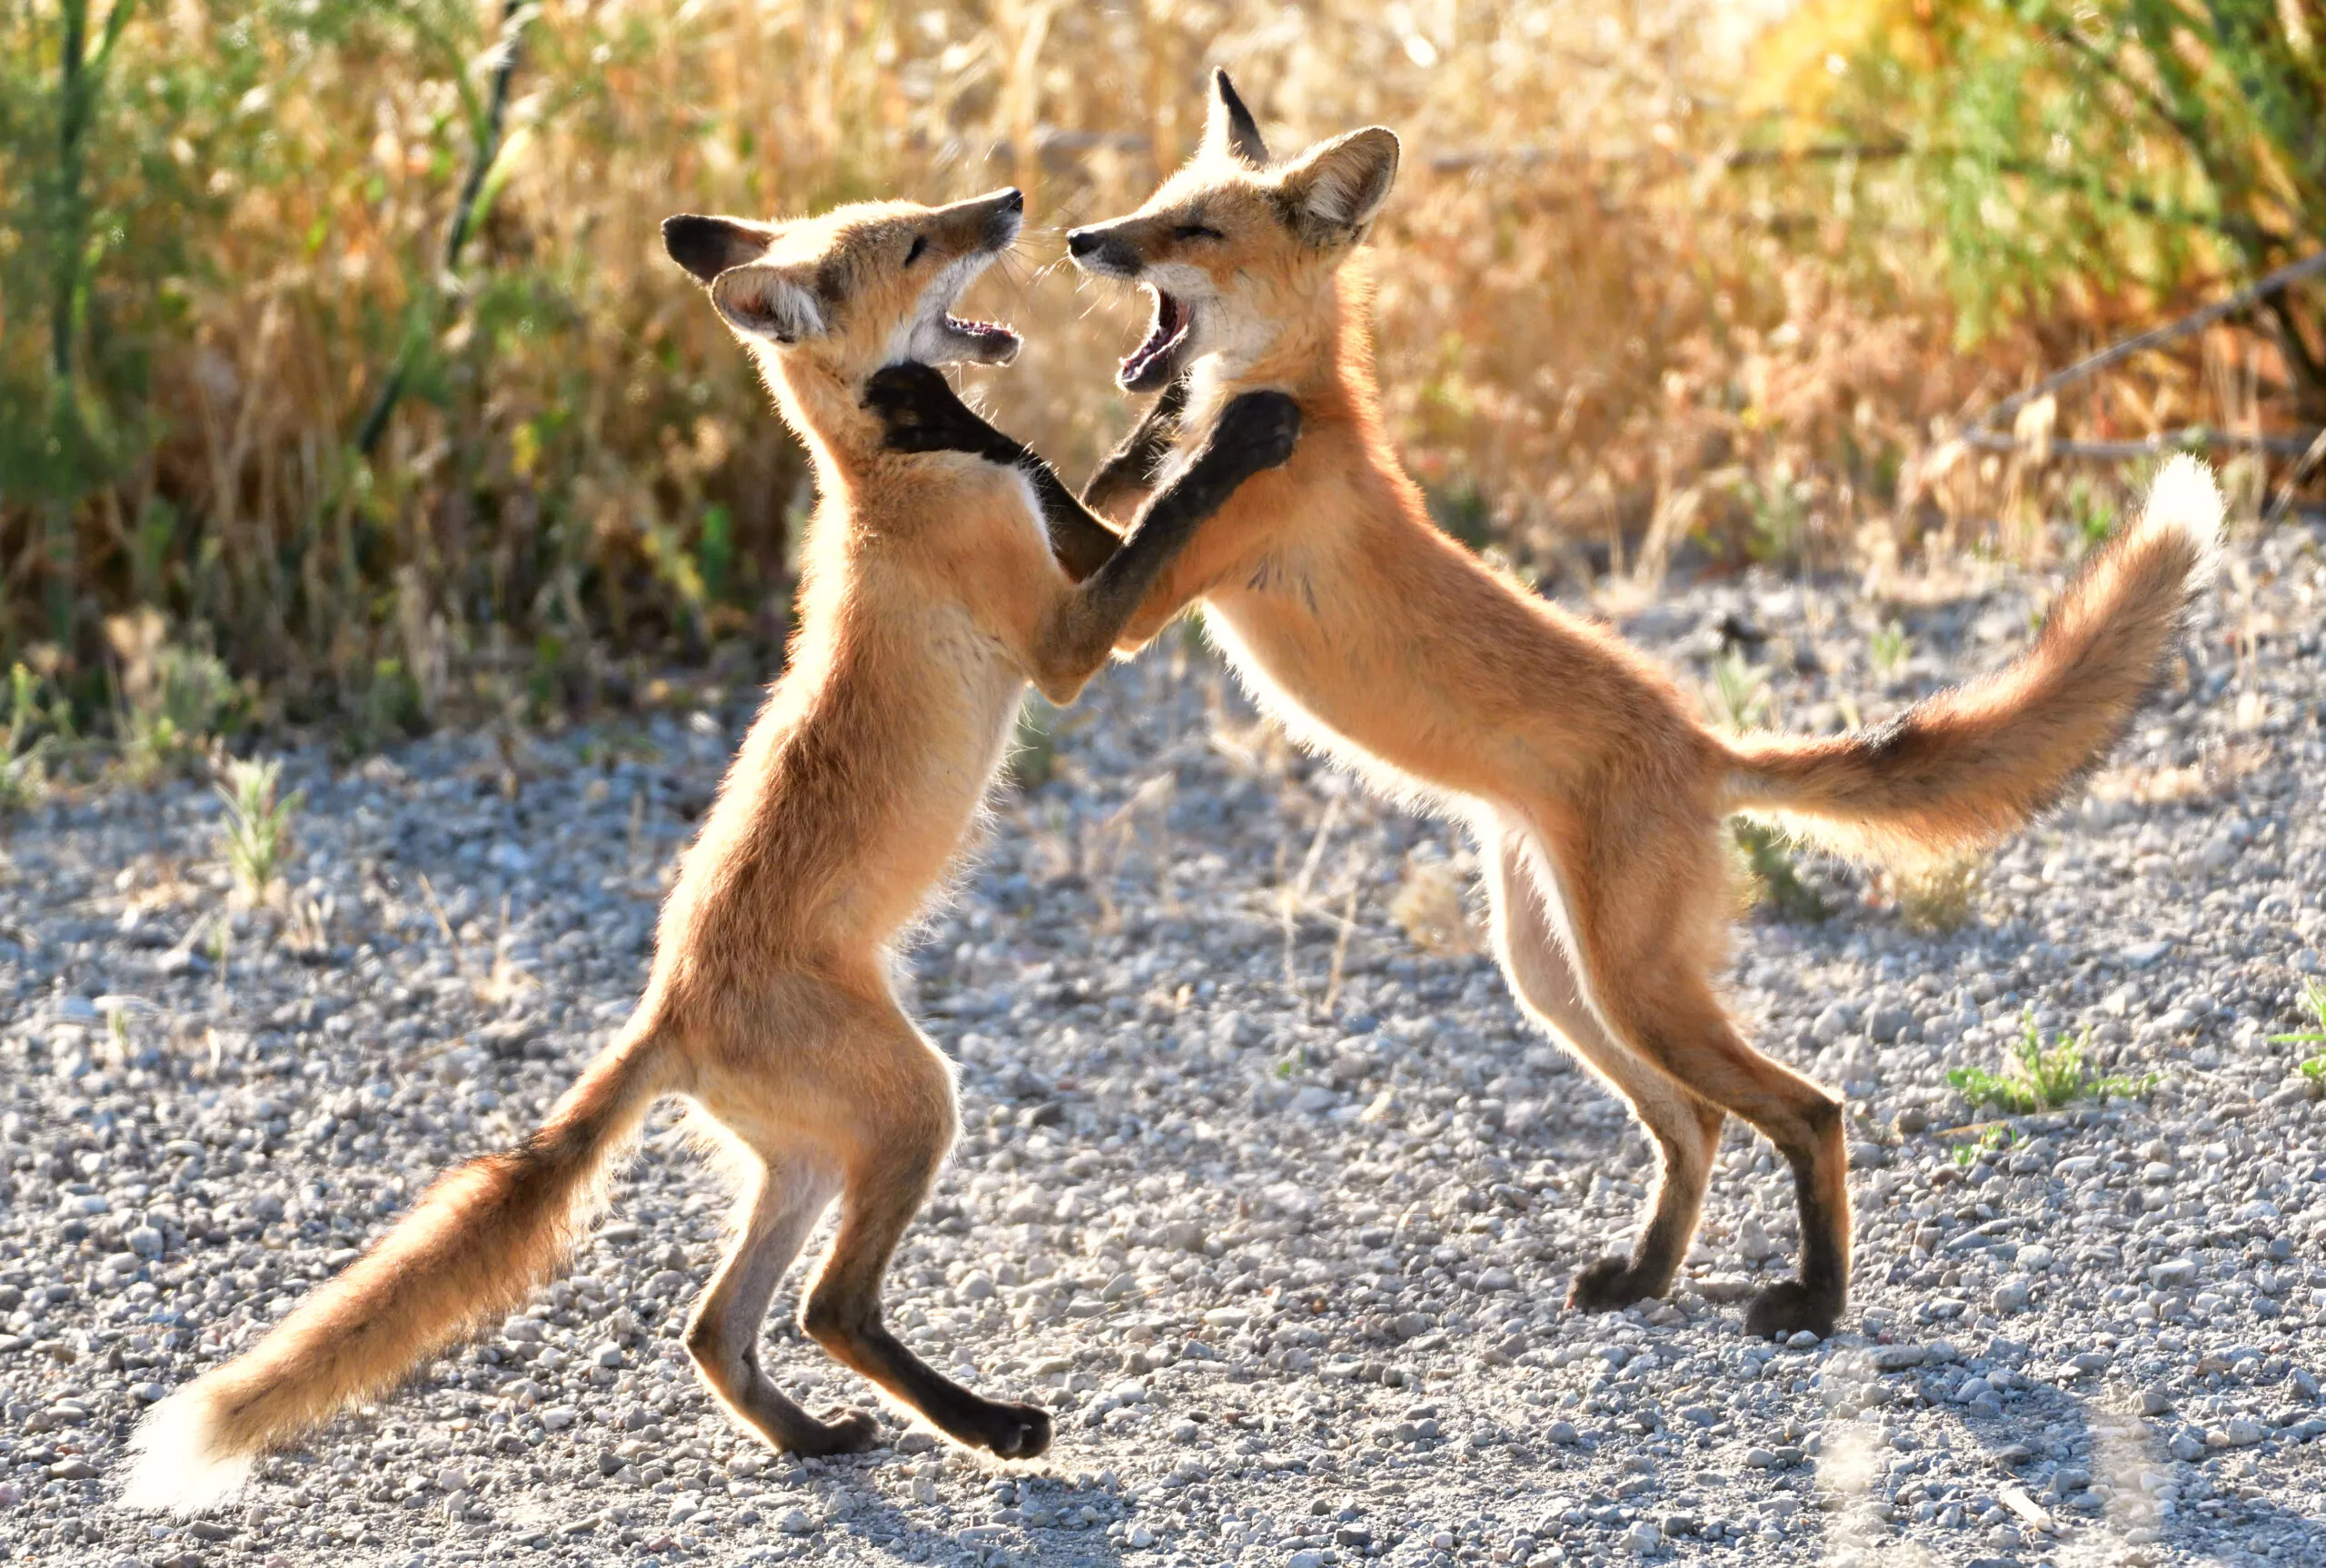
A Longhorn Antelope in the pasture wondering if those dogs are headed that way.
Copyright – Robert AppleCopyright – MichaelCopyright – Wendy PCopyright – Pat GarrettCopyright – Pat Garrett
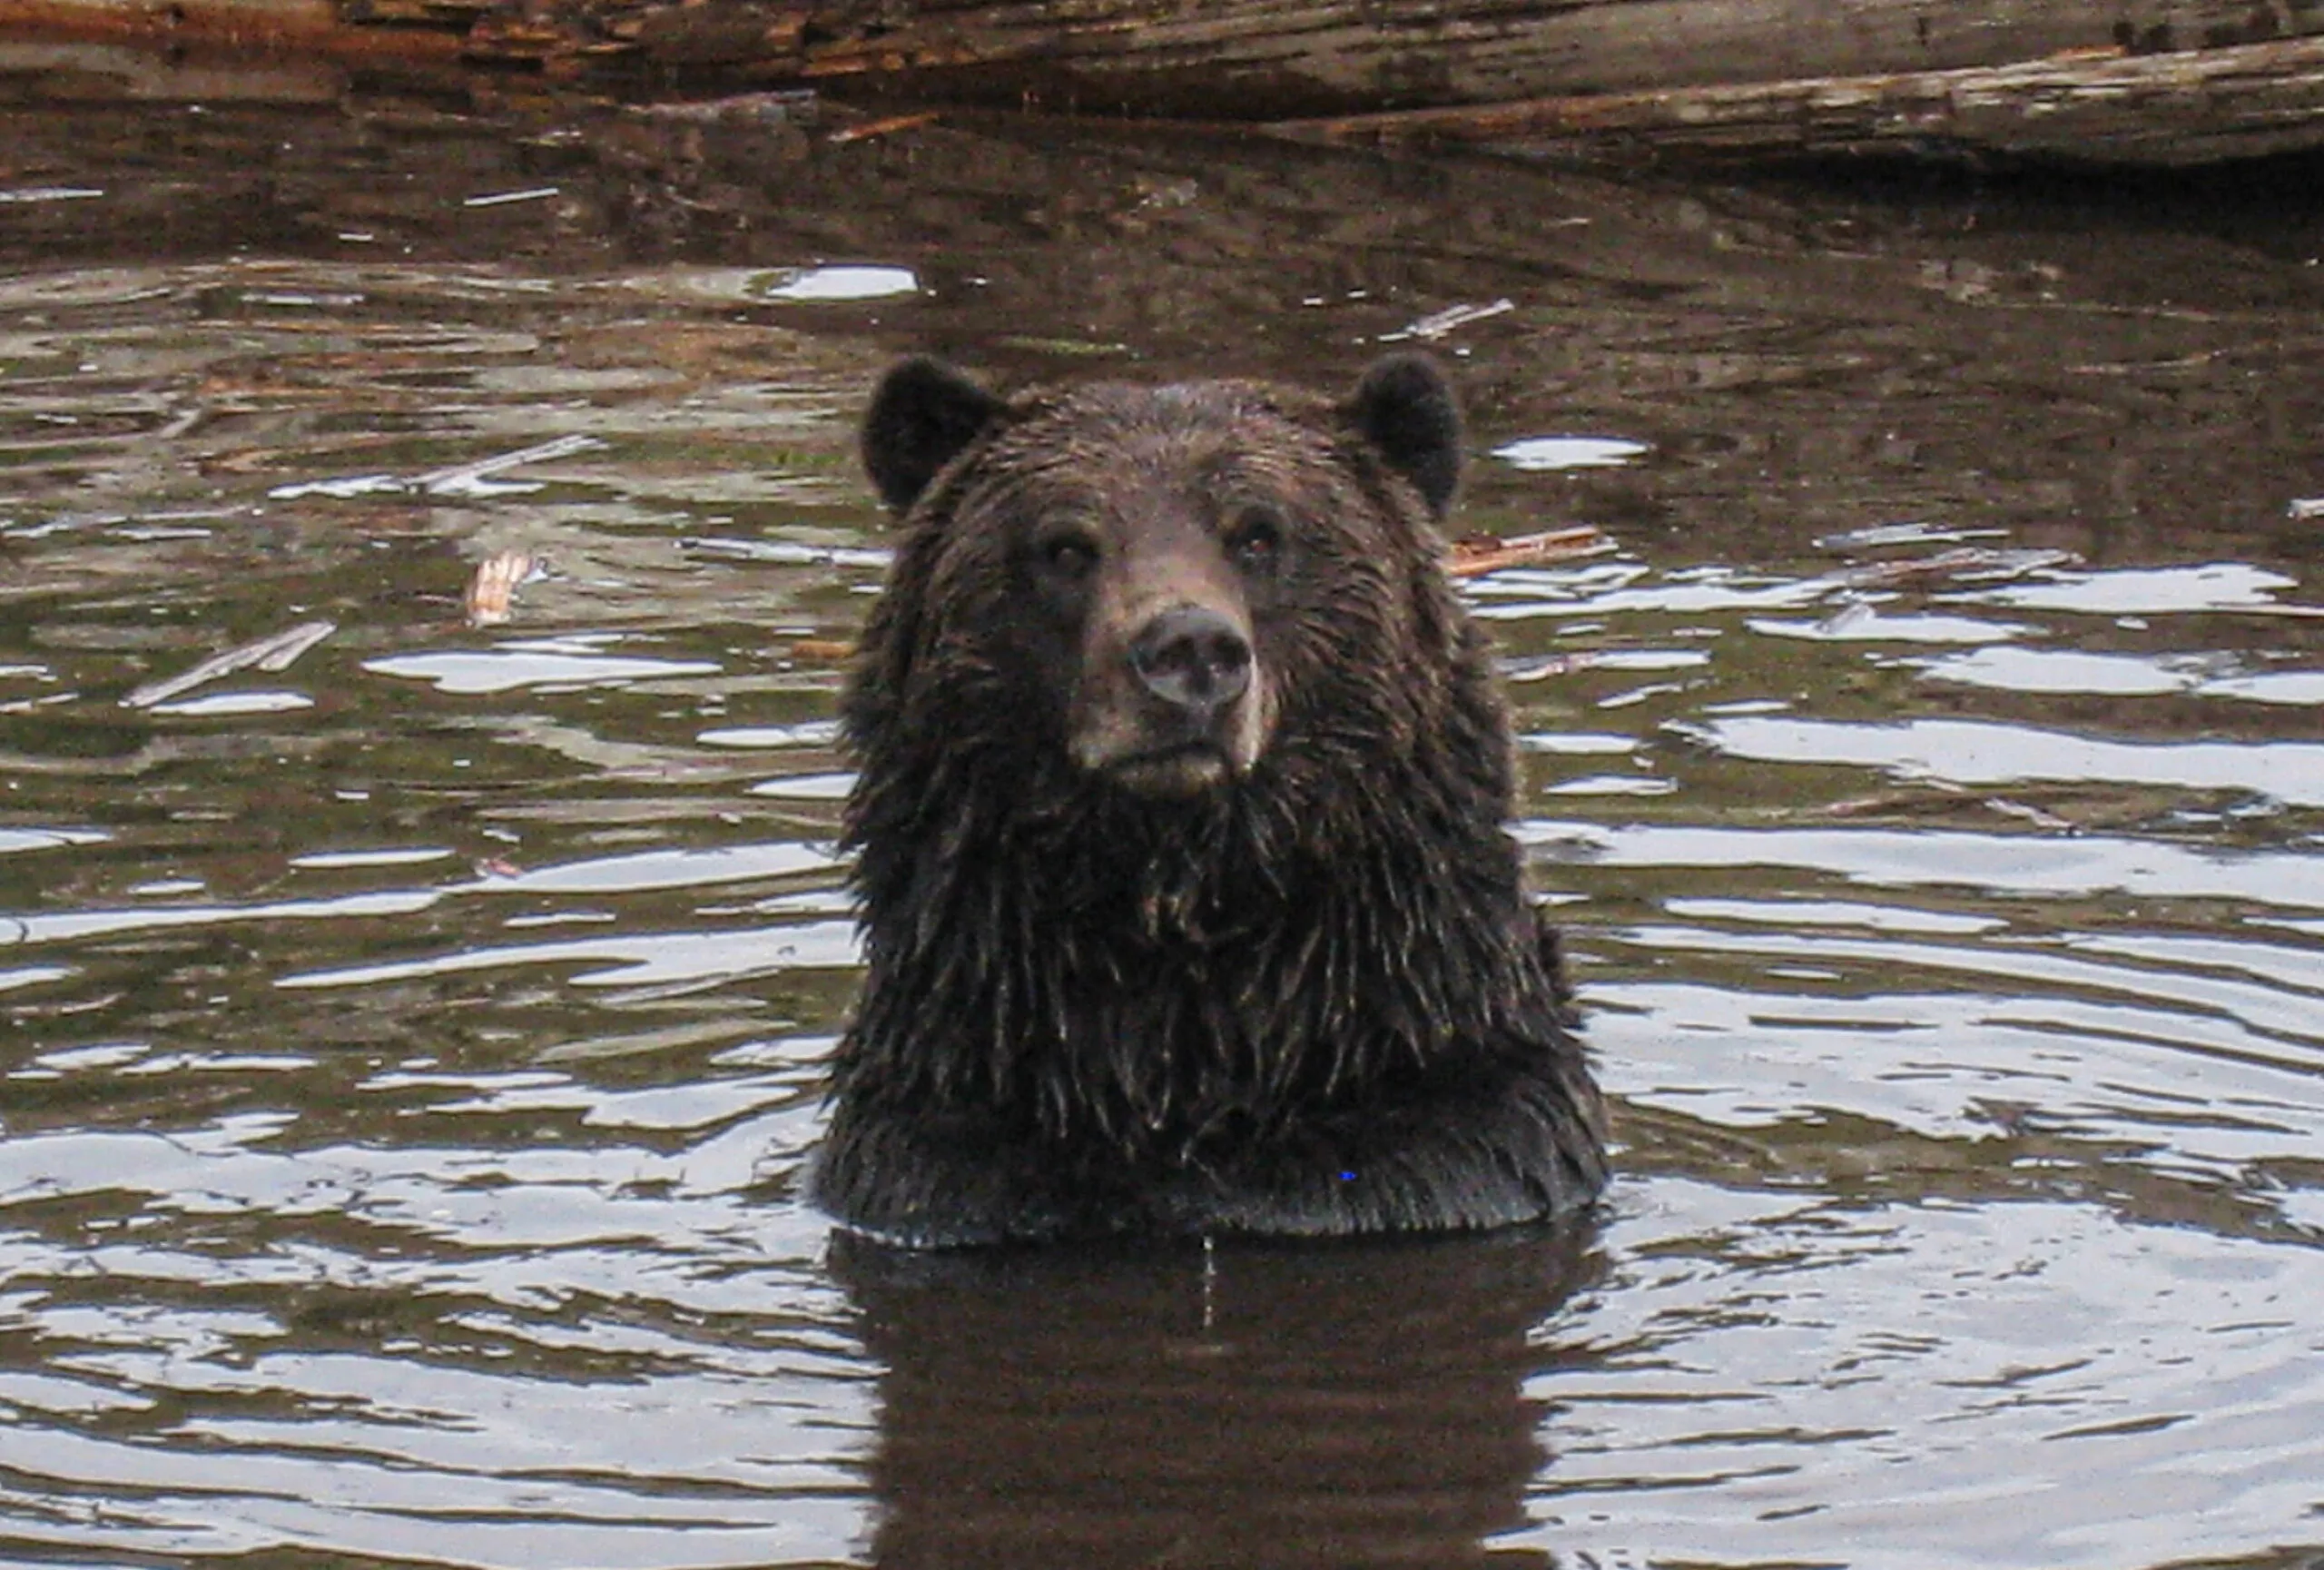
We are visited by this character every year. The birdfeeder attracts her and she had just been caught raiding the feeder on a rainy evening.
Copyright – Pat GarrettCopyright – Wendy P
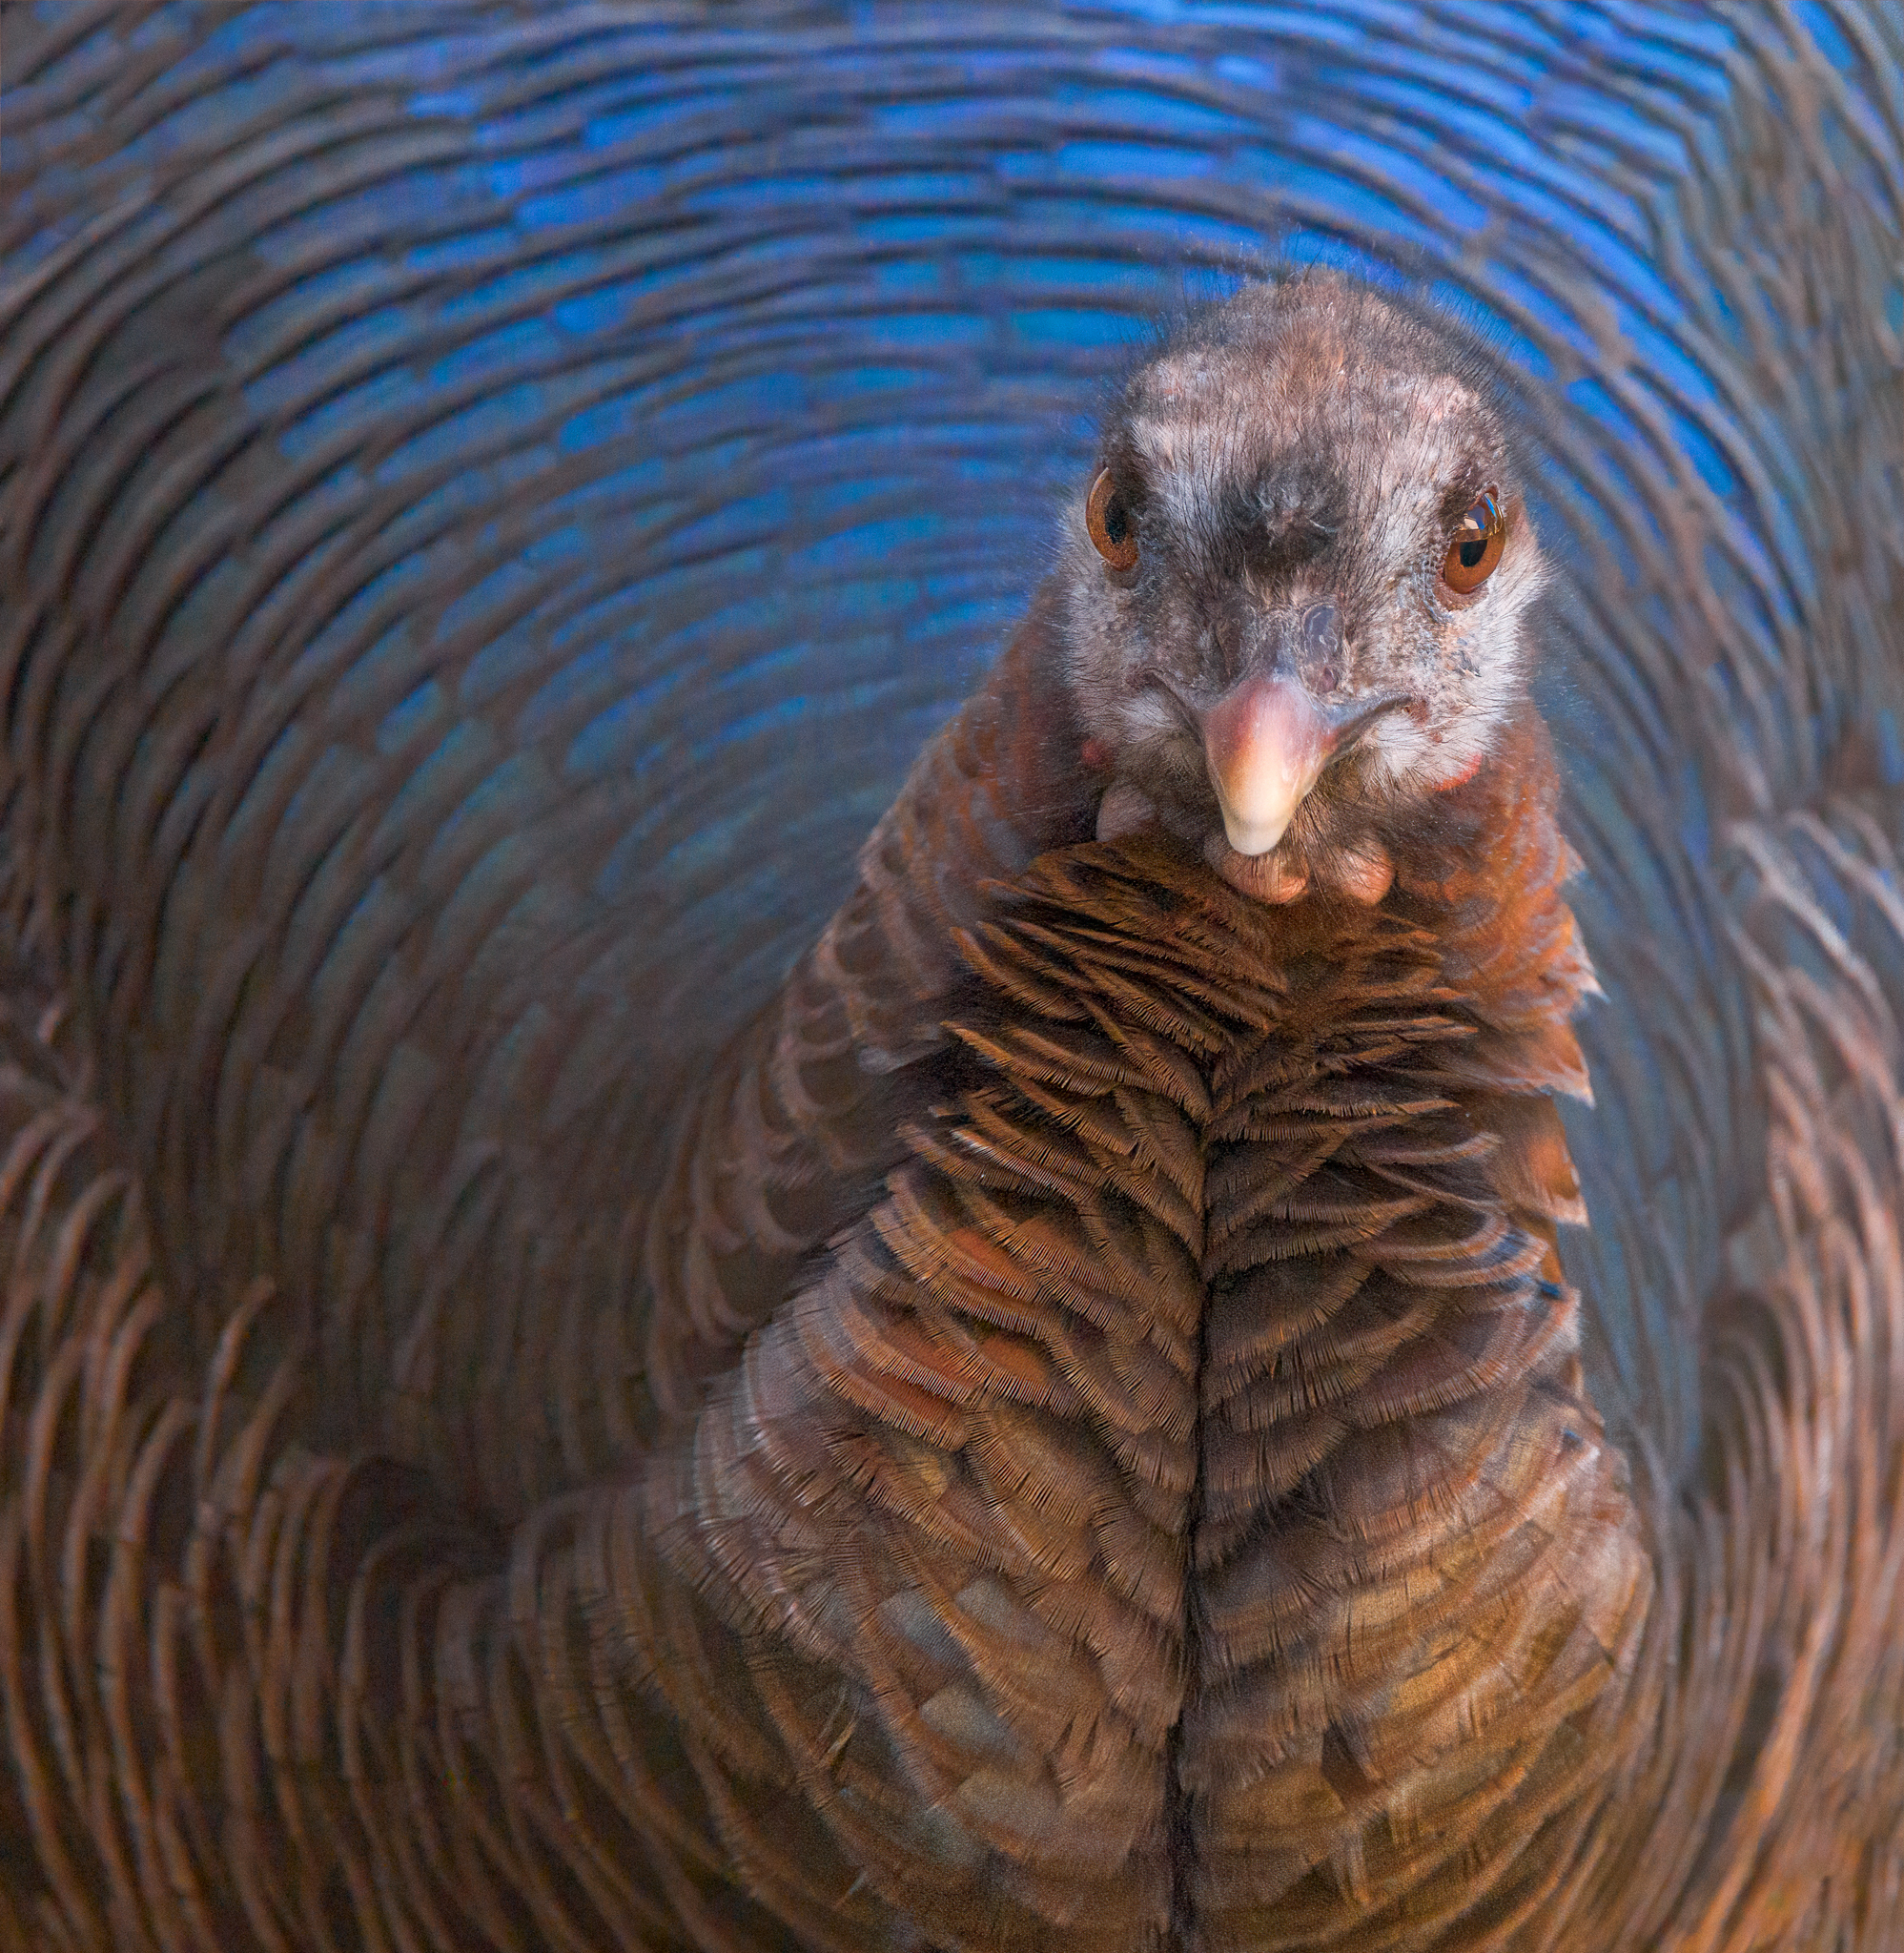
Since the reintroduction of turkeys to our area the numbers have increased dramatically. This “lady” was checking out our bird feeder so I took her portrait.
Copyright – Rob EyersCopyright – Kenneth WongCopyright – Kenneth WongCopyright – Patrick
For more wildlife, check out the687th original challenge post!
A Highlight on the Latest Activity in our Community
Marty shared some great resources for anyone into photography and adventure!
From Robert‘s wife’s garden sculpture collection, shot with a Lens Baby Burnside 35:
Copyright – Robert Apple
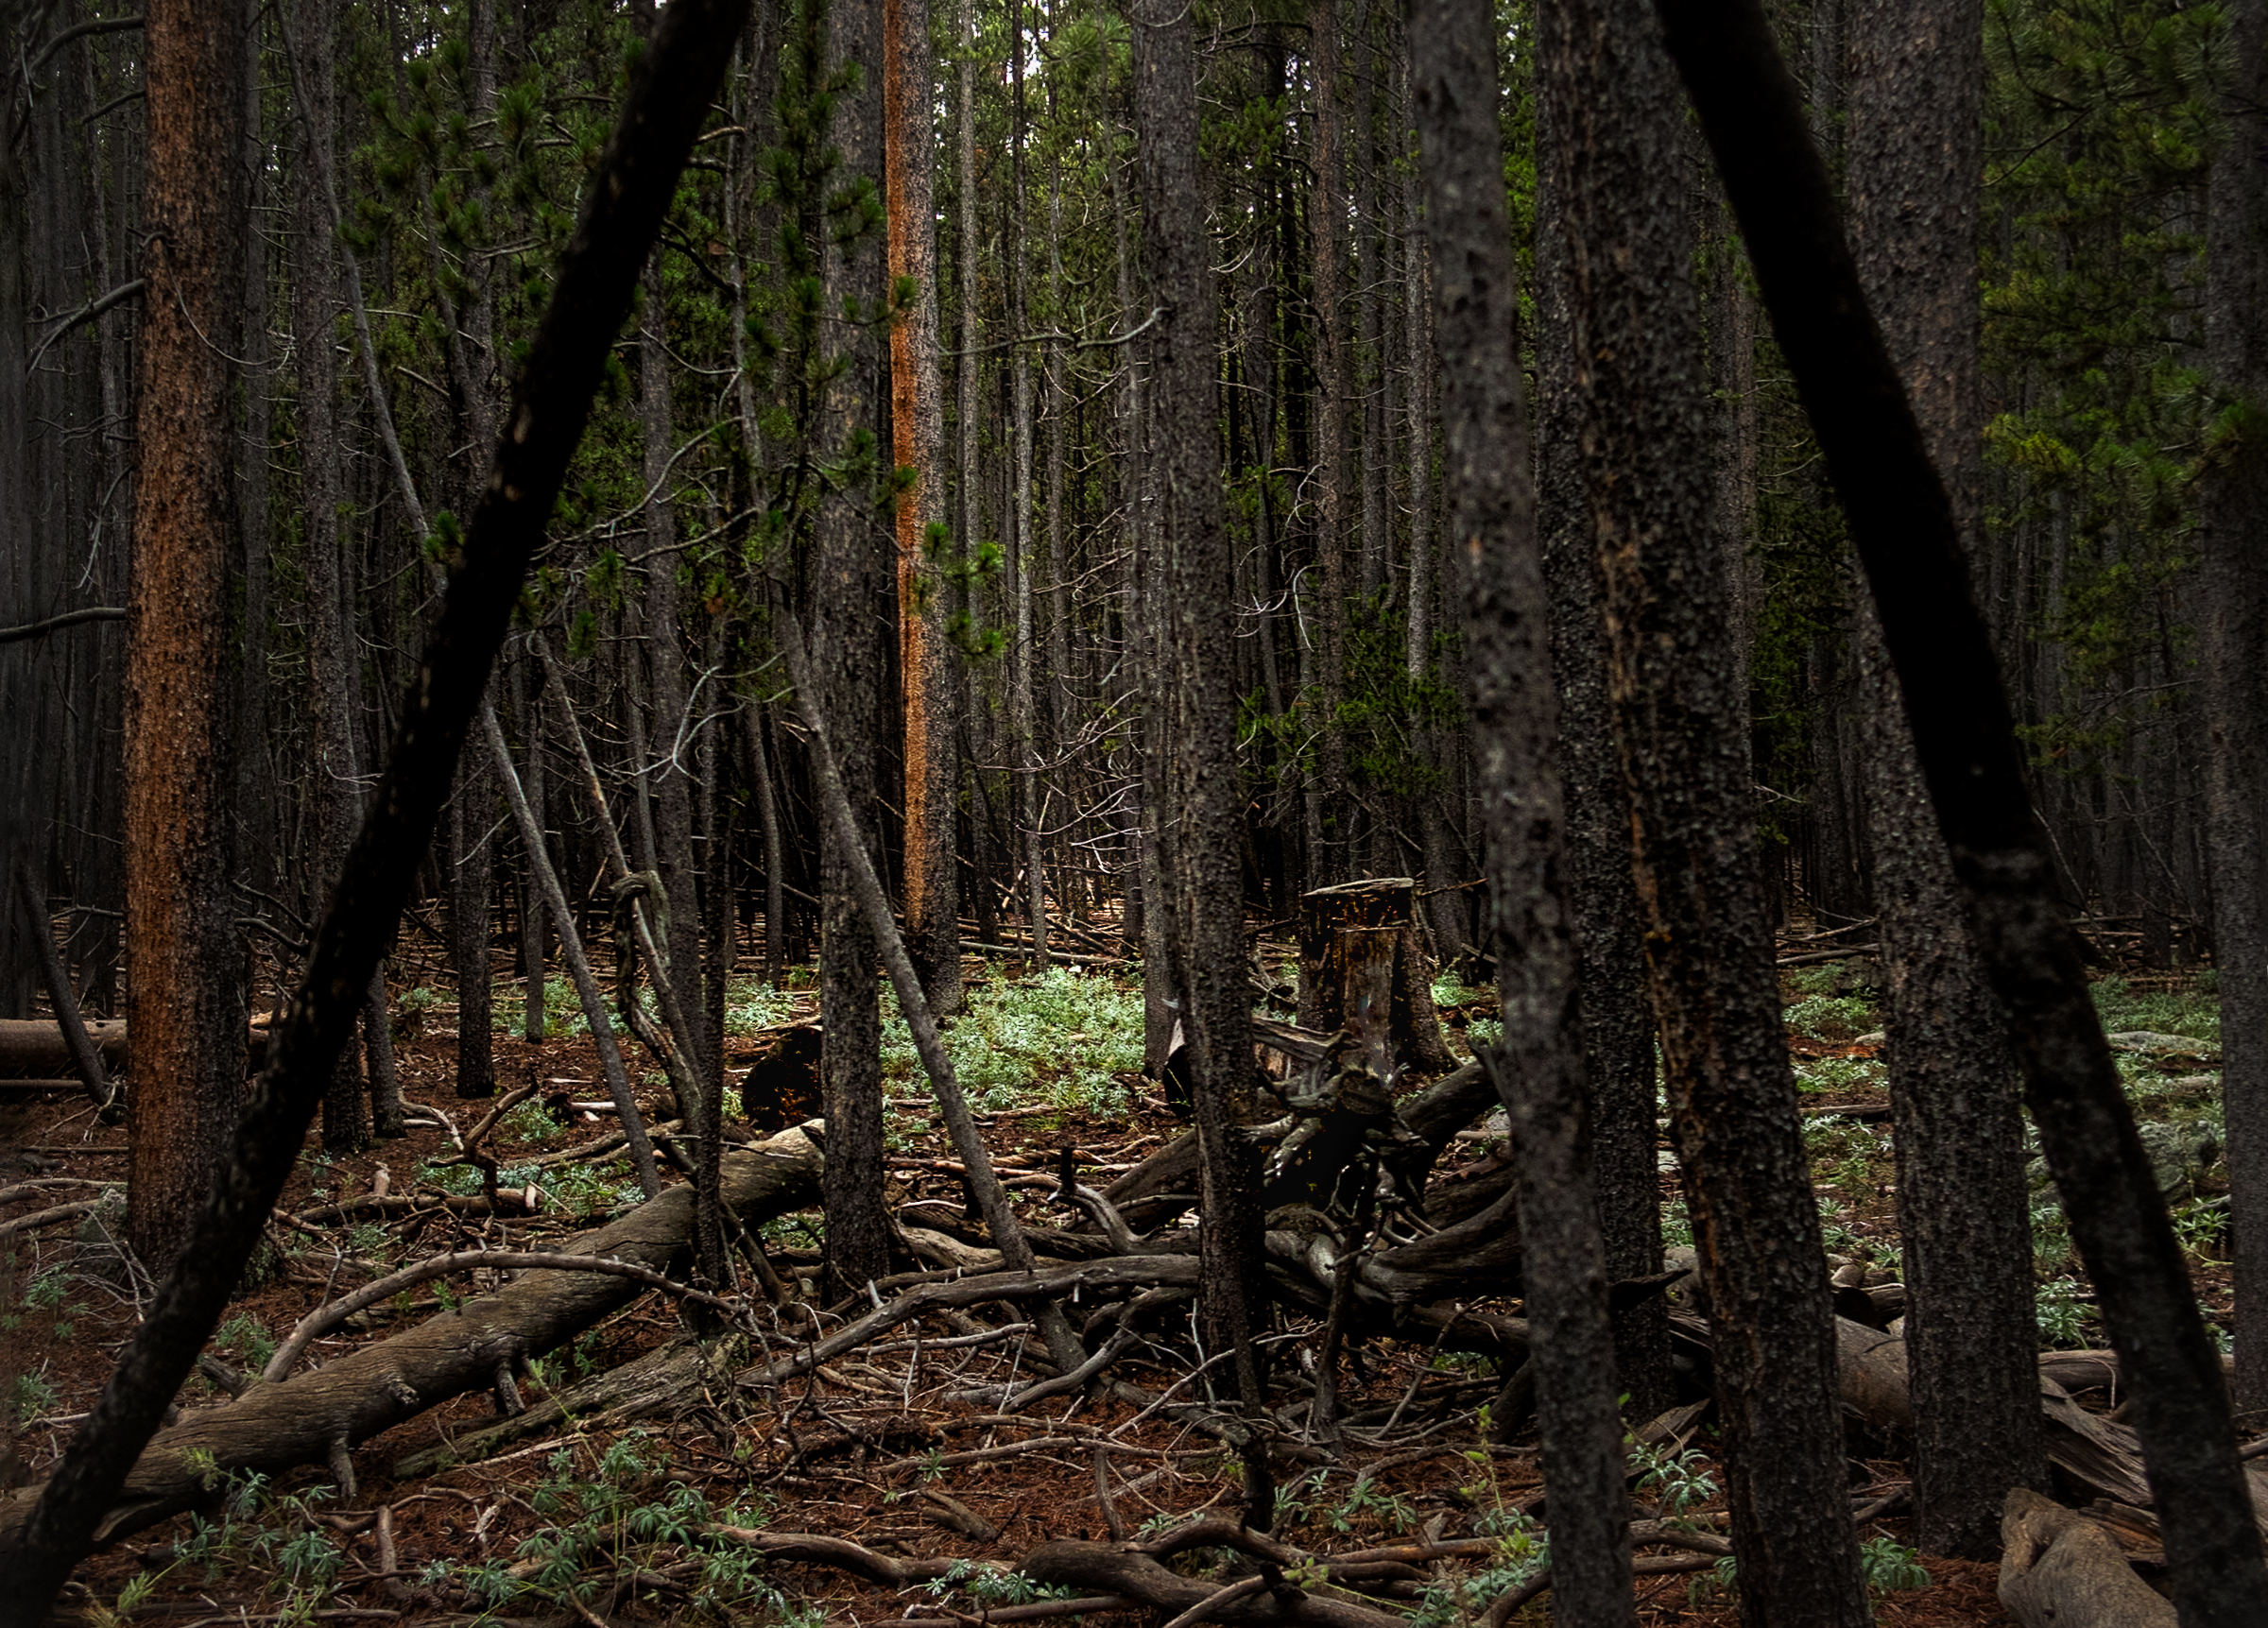
Who also shared a pathway through the woods:
Copyright – Robert Apple
And showed us how different things become when we take a closer look:
Copyright – Robert AppleCopyright – Robert Apple
Remember, our monthly contest is live and is all about Natural Resilience, go check out the guidelines if $250 sounds like an interesting prize! And if you want to make the most of your LightStalking membership, make sure to check the latest posts. Also, don’t forget to swim the Mobile Monday Challenge!
We’d Love To Hear Your Thoughts
Our Feedback Forum is a fine place for all those people wanting to grow as photographers. Here, you’ll get your work reviewed by friendly photographers, but you’ll also have the chance to comment on the work of others. We believe in the power of feedback, and here are the latest shots shared in the pool:
The Shark Tank is a great place to learn and to discuss images, but please read the instructions for the best experience. Share your comments, opinions, and doubts on any or all of the images above. We also would be delighted to see some of your own images. Remember all comments are given to the photographs; not the photographers.
Also, don’t forget to participate in our current challenge, the negative impact of humans on nature…
var advanced_ads_cookies = {“cookie_path”:”/”,”cookie_domain”:””};
var advadsCfpInfo = {“cfpExpHours”:”3″,”cfpClickLimit”:”3″,”cfpBan”:”7″,”cfpPath”:””,”cfpDomain”:”www.lightstalking.com”};
var beloadmore = {“url”:”https://www.lightstalking.com/wp-admin/admin-ajax.php”,”query”:{“post__not_in”:[512453],”category_name”:”photos”,”posts_per_page”:3}};
var tve_dash_front = {“ajaxurl”:”https://www.lightstalking.com/wp-admin/admin-ajax.php”,”force_ajax_send”:”1″,”is_crawler”:””,”recaptcha”:[],”post_id”:”512453″};
var TVE_Ult_Data = {“ajaxurl”:”https://www.lightstalking.com/wp-admin/admin-ajax.php”,”ajax_load_action”:”tve_ult_ajax_load”,”conversion_events_action”:”tve_ult_conversion_event”,”shortcode_campaign_ids”:[],”matched_display_settings”:[],”campaign_ids”:[],”post_id”:512453,”is_singular”:true,”tu_em”:””,”evergreen_redirects”:[]};
(function() { var po = document.createElement(‘script’); po.type = ‘text/javascript’; po.async=true;; po.src = ‘https://www.lightstalking.com/wp-content/plugins/easy-social-share-buttons3/lib/modules/conversions-pro/assets/share-conversions-tracker.js’; var s = document.getElementsByTagName(‘script’)[0]; s.parentNode.insertBefore(po, s); })();(function() { var po = document.createElement(‘script’); po.type = ‘text/javascript’; po.async=true;; po.src = ‘https://www.lightstalking.com/wp-content/plugins/easy-social-share-buttons3/assets/modules/pinterest-pro.min.js’; var s = document.getElementsByTagName(‘script’)[0]; s.parentNode.insertBefore(po, s); })();(function() { var po = document.createElement(‘script’); po.type = ‘text/javascript’; po.async=true;; po.src = ‘https://www.lightstalking.com/wp-content/plugins/easy-social-share-buttons3/assets/modules/subscribe-forms.min.js’; var s = document.getElementsByTagName(‘script’)[0]; s.parentNode.insertBefore(po, s); })();(function() { var po = document.createElement(‘script’); po.type = ‘text/javascript’; po.async=true;; po.src = ‘https://www.lightstalking.com/wp-content/plugins/easy-social-share-buttons3/assets/js/essb-core.min.js’; var s = document.getElementsByTagName(‘script’)[0]; s.parentNode.insertBefore(po, s); })();
let ccwpDOMLoaded=!1;
let ccwp_loaded = false;
let resources_length=0;
let resources =undefined;
let is_last_resource = 0;
ccwpUserInteractions=[“keydown”,”mousemove”,”wheel”,”touchmove”,”touchstart”,”touchend”,”touchcancel”,”touchforcechange”];
ccwpUserInteractions.forEach(function(e){
window.addEventListener(e,calculate_load_times);
});
function calculate_load_times() {
// Check performance support
if (performance === undefined) {
console.log(“Performance NOT supported”);
return;
}
// Get a list of “resource” performance entries
resources = performance.getEntriesByType(“resource”);
if (resources === undefined || resources.length <= 0) {
console.log(“NO Resource performance records”);
}
if(resources.length){
resources_length=resources.length;
}
for(let i=0; i < resources.length; i++) {
if(resources[i].responseEnd>0){
is_last_resource = is_last_resource + 1;
}
}
let uag = navigator.userAgent;
let gpat = /Google Page Speed Insights/gm;
let gres = uag.match(gpat);
let cpat = /Chrome-Lighthouse/gm;
let cres = uag.match(cpat);
let wait_till=300;
let new_ua = “Mozilla/5.0 (Linux; Android 11; moto g power (2022)) AppleWebKit/537.36 (KHTML, like Gecko) Chrome/109.0.0.0 Mobile Safari/537.36”;
let new_ua2 = “Mozilla/5.0 (Macintosh; Intel Mac OS X 10_15_7) AppleWebKit/537.36 (KHTML, like Gecko) Chrome/109.0.0.0 Safari/537.36”;
if(gres || cres || uag==new_ua || uag==new_ua2){
wait_till = 3000;
}
if(is_last_resource==resources.length){
setTimeout(function(){
console.log(“ccwpTriggerDelayedScripts timeout : “+wait_till);
ccwpTriggerDelayedScripts();
},wait_till);
}
}
window.addEventListener(“load”, function(e) {
console.log(“load complete”);
setTimeout(function(){
calculate_load_times();
},100);
});async function ccwpTriggerDelayedScripts() {
if(ccwp_loaded){ return ;}
ccwpPreloadStyles();
ccwpPreloadDelayedScripts();
ccwpLoadCss();
ccwpScriptLoading();
ccwp_loaded=true;
}
function ccwpPreloadStyles() {
let e = document.createDocumentFragment();
var cssEle = document.querySelectorAll(“link[rel=ccwpdelayedstyle]”);
for(let i=0; i <= cssEle.length;i++){
if(cssEle[i]){
cssEle[i].href = removeVersionFromLink(cssEle[i].href);
let r = document.createElement(“link”);
r.href = cssEle[i].href;
r.rel = “preload”;
r.as = “style”;
e.appendChild(r);
}
}
document.head.appendChild(e);
}
function ccwpPreloadDelayedScripts() {
var e = document.createDocumentFragment();
document.querySelectorAll(“script[type=ccwpdelayedscript]”).forEach(function(t) {
var n = removeVersionFromLink(t.getAttribute(“src”));
if (n) {
t.setAttribute(“src”, n);
var r = document.createElement(“link”);
r.href = n, r.rel = “preload”, r.as = “script”, e.appendChild(r)
}
}), document.head.appendChild(e)
}
function ccwpScriptLoading(){
var jsEle = document.querySelectorAll(“script[type=ccwpdelayedscript]”);
jsEle.forEach(function(t) {
t.type = “text/javascript”;
if(t.src)
{
t.src = removeVersionFromLink(t.src);
}
});
}function ccwpLoadCss(){
var cssEle = document.querySelectorAll(“link[rel=ccwpdelayedstyle]”);
for(let i=0; i <= cssEle.length;i++){
if(cssEle[i]){
cssEle[i].href = removeVersionFromLink(cssEle[i].href);
cssEle[i].rel = “stylesheet”;
cssEle[i].type = “text/css”;
}
}var cssEle = document.querySelectorAll(“style[type=ccwpdelayedstyle]”);
for(let i=0; i <= cssEle.length;i++){
if(cssEle[i]){
cssEle[i].type = “text/css”;
}
}
}
function removeVersionFromLink(link)
{
if(ccwpIsValidUrl(link))
{
const url = new URL(ccwpFormatLink(link));
url.searchParams.delete(“ver”);
url.searchParams.delete(“time”);
return url.href;
}
else{
return link;
}
}
function ccwpIsValidUrl(urlString)
{
if(urlString){
var expression =/[-a-zA-Z0-9@:%_+.~#?&//=]{2,256}.[a-z]{2,4}b(/[-a-zA-Z0-9@:%_+.~#?&//=]*)?/gi;
var regex = new RegExp(expression);
return urlString.match(regex);
}
return false;
}
function ccwpFormatLink(link)
{
let http_check=link.match(“http:”);
let https_check=link.match(“https:”);
if(!http_check && !https_check)
{
return location.protocol+link;
}
return link;
}
A tote bag is a cosmos of its own! How many times have you rummaged through your tote bag, only to find more than you’ve bargained for? We keep so many things in our tote bags. Fortunately, that’s exactly what they’re here for.
So if your tote bag sometimes feels like it has its own life, you’re not alone. The things we carry with us define us, and so, what better way to present your designs than on the famed tote bag?
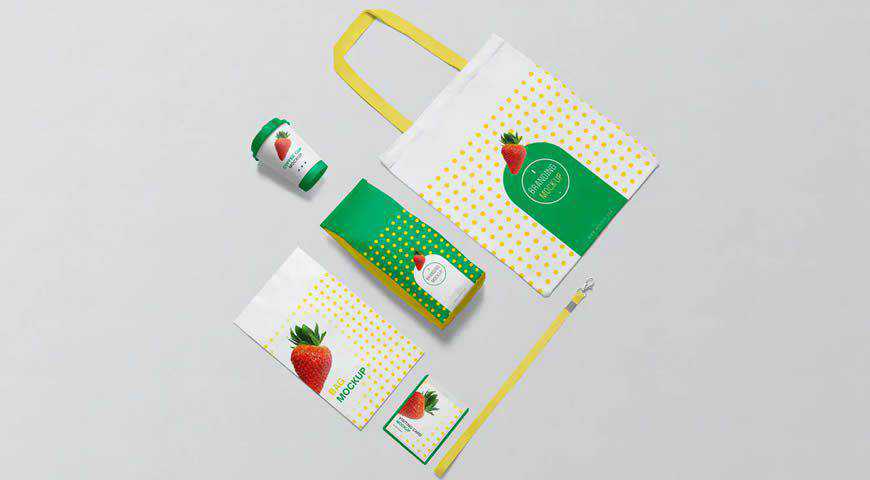
Today, we’re bringing you a fantastic selection of tote bag mockup templates for Photoshop. From paper tote bags perfect for carrying groceries to women’s tote bags that contain everything it takes to cure frustration, scraped knees, and even a heartache or two, you’ll definitely find the right mockup in our collection.
Tote bag mockups work great for a variety of purposes:
Want to showcase your branding work to your clients during a presentation? Use a photo-realistic tote bag mockup with their logo on it!
Want to test the waters before pressing the start button on actual tote bag production? No problem!
And, if you want to promote your own work as an artist, tote bag mockups will help you spread the word.
Let’s be real: it’s a tote bag world, and we’re just living it in. It’s time to find the right tote bag mockup for you!
Tote Bag Mockups for Creatives
Tote Bag Mockup Templates (Photoshop PSD)
Simple and versatile, this tote bag mockup template set is perfect for showcasing your amazing designs or your branding! With four different tote bag presentations and plenty of customization options (adjust the shadows, background, colors, and texture), it’s perfect for testing the tote bag mockup template waters.
Tote Bag Mockup Templates (Photoshop PSD)
Fashion is what you buy, but style is how you wear it. And thanks to these tote bag mockups, it’s never been easier to make your customers stylish with your designs. These seven eco tote bag mockups are perfect for online promotion, and you will even get three filters!
Tote Bag & Christmas Stockings Mockup Templates (Photoshop PSD)
Cozy and warm, this tote bag mockup template is perfect for showcasing your festive Christmas designs. Featuring a tote bag hanging next to a few stockings on a fireplace, it will instantly warm up your customers, making this mockup perfect for promotion. You can even adjust the tote bag color!
Women Tote Bag Mockup Templates (Photoshop PSD)
Gorgeously shot and atmospheric, this women’s tote bag mockup template featuring a woman carrying flowers is perfect for showcasing your stunning designs. You can easily add them to the tote bag in Photoshop and use the photo-realistic results for your presentations, promotion, and even online store display!
Paper Tote Bag Mockup Templates (Photoshop PSD)
These three paper tote bag mockup templates are perfect for showcasing your branding! Featuring three paper totes on a pastel pink background (and with a few summer vacation must-haves on the side), this tote bag mockup template is a phenomenal option! You can showcase different designs, or emphasize the visuals!
Canvas Tote Bag Mock-Up Lifestyle (Photoshop PSD)
These canvas tote bag mockup templates are perfect for launching new marketing campaigns. Featuring 23 PSD tote mockups, all professionally photographed and staged in diverse environments, this tote bag set works perfectly for various designs and helps your customers realize how awesome they are going to look sporting your totes!
Canvas Tote Bag Mockup Over a Woman’s Shoulder (Photoshop PSD)
Tote that tote everywhere! Show your customers how awesome your designs will look with this canvas tote bag mockup, featuring a woman carrying it on her shoulder. You can customize the bag color and easily upload your designs to get photo-realistic results for your social media or presentations.
Canvas Tote Bag Mockup Templates Pack Vol. 3 (Photoshop PSD)
Bring out the adventurers in your customers with these tote bag mockups, showcasing your designs in adventurous locations. From rocks by the ocean to women adjusting the shoulder straps surrounded by flowers, you’ll get ten tote bags and numerous customization options (lighting, colors) for beautiful presentations and campaigns!
Tote Bag Mockup Templates (Photoshop PSD)
Simple and clean, this tote bag mockup template for Photoshop is perfect for highlighting your designs. You’ll get two design options, as well as the ability to change the tote bag and the background color. The best part? It’s all really easy with Photoshop smart objects!
Cotton Tote Bag Mockup Templates (Photoshop PSD)
Perfectly staged to emphasize your design and the branding potential of your totes, this cotton tote bag mockup template set offers plenty to work with. You’ll get four tote bag mockups for Photoshop, all posed differently, customizable backgrounds, as well as photo-realistic results that will amaze your clients.
Tote Bag Mockup Templates (Photoshop PSD)
Promote your tote! This tote bag mockup template is perfect for showcasing your work online or during presentations. Featuring a man and two women sporting totes with your designs on them, this tote mockup lets you customize plenty, from adding different designs to customizing the bag and the strap colors.
Packaging & Tote Mockup Scenes (Photoshop PSD)
Create a phenomenal branding presentation with these packaging and tote mockup scenes! With four different tote PSD mockups featuring customizable and movable coffee cups, tote bags, coffee packaging, paper bags, business cards, and more, as well as changeable backgrounds, this tote mockup will give you everything you need to succeed.
Beige Canvas Tote Bag Mockup Templates (Photoshop PSD)
Keep it simple and effective with this beige canvas tote bag mockup template. Depicting slightly wider tote bags than usual, this mockup allows you to easily add your own designs in Photoshop, as well as customize the tote and background color. They work like a charm for online store displays!
Craft Bag Mockup Templates (Photoshop PSD)
A stunning craft bag mockup template, this graphic asset really highlights your design and branding. Featuring a unique craft texture and three elements you can customize (bag, sticker, tape sheet), as well as a displacement map to make your results photo-realistic, this tote bag mockup template is the full package.
Tote Bag on Flat Surface Mockup Templates (Photoshop PSD)
This tote bag mockup template is perfect for ensuring your clients’ focus stays on your design. This mockup is really simple and comes with plenty of options. In addition to easily adding your designs with just a few clicks, you can also change the tote and background colors.
Shopping Bag Mockup Templates (Photoshop PSD)
Elegant and luxurious, this shopping bag mockup template set will take your audience’s breath away! Perfect for making sure that the purchasing experience is as phenomenal as the shopping experience, this shopping bag set for Photoshop offers 5 PSDs, as well as changeable bag interior and exterior colors.
Tote Bag Mockup Templates (Photoshop PSD)
Simple and effective, this tote bag mockup template features a cream-colored cotton tote bag. Since it’s so minimalist, it’s perfect for showcasing your designs in your online store or demonstrating your branding work to clients during presentations. You can easily customize the tote mockup in Photoshop!
Cotton Tote Bag Mockup Template (Photoshop PSD)
Make your tote work for your brand with this interesting cotton tote bag mockup template. Showcasing a folded tote bag placed over different fabrics, this tote mockup template works perfectly for both minimalist and eclectic designs. You can easily add your own designs to the tote, and change its color.
Canvas Bag Mockup Templates (Photoshop PSD)
Show everyone what makes your designs special with these gorgeous canvas tote bag mockup templates for Photoshop! Featuring models and serene environments in 8 PSD tote mockups, this set is perfect for showcasing your work in promo campaigns. You can easily change the colors of the bags and the T-shirts.
Organic Food Tote Bag Mockup Templates (Photoshop PSD)
Perfect for creating branding and marketing materials for the organic food industry, this tote bag mockup template features numerous elements that will help your design shine. Customize the tote, add two extra designs to the papers, and even add your slogan to the mockup to create a gorgeous marketing asset!
Finshed!
Life is short – download the bag mockup! We might be paraphrasing, but tote bag mockups really are that amazing. Versatile and practical, they allow you to seamlessly present your designs for internal presentations, website display, or (social media) promotion.
And thanks to Photoshop smart objects, you can easily customize these tote bag mockups to your liking. From adding your own designs to tweaking the little details to reflect your brand, not even the sky is the limit. So if you’re ready, it’s time to download the right mockup and get to work!
As a photojournalism professor, one of the questions I get asked most by beginning photographers is, “What camera should I buy?” As if there’s a single, definitive answer to that. The answer I always give is: What do you want to do? There’s a camera out there for everyone, and here’s a guide for what to look for when you’re starting out.
The big question that one had to ask 10-15 years ago was whether you wanted to shoot video or photos with your camera. There was a long period where Canon was the only game in town for serious stills and video capabilities, with its EOS 5D Mark II in 2008 blazing the trail into what is now the cinema lineup of cameras, while Nikon was still trying to figure it out with its wonky motion JPEG codec on its D90, and Sony was barely a blip on the radar. In 2024, almost all the major brands have enough capability on both sides of the equation that for most people, it’s a non-factor.
More important these days is whether a system has enough lenses and flexibility to accomplish the photo and video goals you have in mind. So, the first question to ask yourself is…
DSLR? Mirrorless? Fancy Point and Shoot?
This one’s an easy one. Get a mirrorless camera. If you’re reading on this site, you’re probably well past point-and-shoot cameras, or you’re looking to go past the capabilities of one. Sure, there are really high-end models such as the Sony Cyber-shot DSC-RX10 IV, which features a 1” sensor that’s larger than a smartphone, but still quite a bit smaller and less flexible than a DSLR or mirrorless camera. There are better ways to spend $1,700, if you’re looking for something you can grow into as your skills and needs change.
But why did I open with the hot take of getting a mirrorless camera? I held out until 2023 with my Canon EOS 6D and Canon’s still actively selling many DSLRs, including the successor to my camera, the EOS 6D Mark II. Pentax is out there doubling down on the future of mirror-flippers with its K-3 Mark III DSLR, but again, I think there are better ways to spend $1,700, unless you’re a die-hard fan of the old-school style of shooting.
When I say old-style, I don’t mean the through-the-viewfinder view that is largely the only debatable advantage of the format. I mean that you’re shooting without all of the aids that help you make better photos: live exposure preview in the viewfinder, eye-detection autofocus, and the ability to shoot with all the same capabilities on a flip-out screen that you have in the viewfinder. Many of these same advantages carry over to video as well, which is often higher resolution than what’s available in DSLRs, as most companies have stopped developing their DSLR lineups (except Pentax) years ago.
There are a couple exceptions to this in the very last generation of DSLRs such as the Canon EOS 90D and the Nikon D500, but at this point, those cameras are several years old.
Which brings me to the other issue with DSLRs: There’s no future. The tech has gone as far as it can go and while existing lenses and features are great, there’s no comparison these days.
For instance, the most sophisticated DSLR autofocus systems don’t hold a candle to even a mid-range mirrorless model’s eye-detection and focus capabilities. The new tech has breathed life into my old lenses that I wouldn’t have dare shot wide open before just for focus accuracy reasons.
So, What Should I Buy for $1,700?
Since that number has, inadvertently, come up for fancy DSLRs and point-and-shoots a couple of times already in this article, what’s a good model for someone who knows enough to be dangerous in the world of photography?
Well, the big three camera brands should certainly top the list: Sony, Nikon and Canon. For the money, you can get an EOS R8 for $1,299 or an EOS R7 for $1,399, which leaves a little bit of money for lenses. At Sony, that can get you an a7 III (though without a lens) or an a6700 with a kit lens and some money left over. Nikon’s got the Z6 II and the Z50 with a bunch of lenses. All of these will get you 4K video and all the benefits of an ecosystem under continuous development. There’s going to be some fantastic stuff coming in mirrorless from all of these companies, so your camera will probably be able to do things in the future you haven’t even thought of yet.
That’s not to discount other brands out there. Panasonic makes some excellent video-focused mirrorless models, such as the S5 II and Fujifilm has been out there with the fantastic X-T5 for some time. And against all odds, the Olympus line still exists under the rebranded OM System and has some classics like the OM-5. (RIP my OM-D E-M10 II, one of my favorite cameras I’ve ever owned, but you can still get the newest version, version IV, for $799).
That’s not to say there aren’t lower (or higher) priced cameras that may meet your needs, but any of these aren’t a bad start.
What Are Some of the Downsides?
There are some “dead” mirrorless systems out there, such as the Nikon 1 or Canon EOS M system (that I bought into knowing it was dead), and while they may be great values, the systems themselves will be a dead end, which is something to consider. No new lenses or bodies to build an empire upon.
Every brand will have some of its quirks or downsides. To me, Sony cameras are built for people with gorilla hands and have overly complicated menus, yet are somehow hooked up to the best sensors in the business. Canon doesn’t allow third parties to develop autofocus lenses for the R-mount, which limits lens choices, but its first-party offerings are very, very good. And Nikon, with its recent acquisition of RED, is a bit of a wild card with video at the moment.
What Doesn’t Matter?
In all of the talk above, I haven’t made much mention of sensor size, something you’ll hear gear-heads talk about all the time. It used to matter, with bigger sensors (full frame, medium format, etc.) offering better image quality than smaller sensors (APS-C, Micro Four Thirds) because they were larger and able to gather more light more efficiently.
It doesn’t matter anymore. Advances in sensor technology and better lens design have rendered the differences mostly academic. Any camera produced within the last 4-5 years will produce image quality that’s plenty acceptable for even the most demanding photographer. Buy into the system that has the lenses you want and that fits your budget.
When and Where to Buy?
So, you’ve settled on buying a mirrorless camera. When’s the best time to buy? What’s a good way to buy it?
Unequivocally, the worst thing you can do is Google and buy from the first link you find. There are many fly-by-night operations selling non-existent or gray-market (non-US) models. Buying a gray market camera can mean that you may not be able to get your camera serviced by the manufacturer in the United States, and that features might be region-specific and/or locked out.
Instead, buying from a reputable retailer such as B&H Photo/Video or the manufacturer directly is your best bet. Many times, manufacturers sell refurbs with warranties comparable to new models, and that’s another way to save money on what essentially looks and feels like a new camera. I’ve bought refurbs from the major manufacturers many times without incident.
Finally, timing is very important. You’ll often find the best deals in November-December, around Black Friday through Christmas.
Do you have camera buying advice of your own? Leave your thoughts in the comments below.
Need to brush up on your Lightroom or Photoshop? Having Catalog or Missing File or Folder issues and need help? Using a variety of services, I can help you online with either.

 As part of the Adobe Creative Cloud suite, it gives photographers instant access to all updates once they are made available. While some photographers may opt to stick to earlier versions, improvements to the latest version include the following advantages: