
[ad_1]
How to Use Split Toning in Lightroom
You love the look of your favorite presets, but have you ever looked under the hood to see how they are created? Lightroom is a masterful tool and its split toning panel is one of my favorite elements. Here are the basics of split toning to get you started:

Where is the Split Toning Panel?
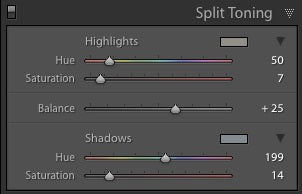
Split toning is located on the right hand side right underneath the HSL panel.
(Tip: right click on any of the panels and select “solo mode” if you prefer to open one panel at a time).
What Does Split Toning Do?
Split toning affects only two parts of your image: highlights and shadows.
- You can use split toning to warm up or cool down the highlights or shadows rather than adjusting the temperature of the entire image.
- You can also use split toning to apply an overall color tint to your image.
- You can adjust just the highlights, just the shadows or both and then select the balance you want between the two.
In other words, you can place a higher emphasis on either highlights or shadows and determining the strength of the effect is as simple as playing with a few sliders.
(Tip: when playing around with various presets, use keyboard shortcut CTRL + N (PC) or CMD + N (MAC) to create a snapshot of your starting point and then you don’t have to keep undoing edits or scrolling through the history panel).
In the example below, the left image is with split toning, the right image is without split toning enabled. (This image is edited with Marrakesh II from the Pretty Film Bohemian Collection). You can see how enabling the split toning (which is the preset’s default state) reduces the warmth and redness slightly.

In this next example, I used Fiji preset from the Dark and Moody Collection. The left image is with split toning and the right image has the split toning disabled. The split toning here is used to warm the highlights and and shadows to give the image a nice glow.
In general, Pretty Presets uses the split toning panel in a very subtle way. The effects added here are generally soft and minimal. However, you can create over-the-top vintage effects with this panel as well.

How Do You Use Split Toning?
Using split toning in Lightroom is easier than you think, I promise!
All you need to do is select your hue and then adjust the saturation slider to determine how strong you want the effect to be. You can also adjust the balance slider as mentioned above to determine the emphasis on either highlights or shadows. Give it a try!
(Tip: pressing the “” key will show you a quick before image so you can see the difference your split toning adjustment just made).
Conclusion
Split toning is utilized in MANY presets as an added layer of customization. I personally prefer it obrt using the temperature slider in the basic panel because I really love how it targets specific areas of an image.
The next time you’re applying your favorite preset, take a peek at the split toning panel and see how the magic works!
Do you have any questions or comments about Split Toning in Lightroom? Leave us a comment below – we would love to hear from you. And PLEASE SHARE this post using the social sharing buttons (we really appreciate it)!


[ad_2]
Source link