my link Thank you notes, invitations, “great met you” notes – write them by hand and send them send and you’ll make a big impression. Anyone you connect with at a residential area event, attempt …
In terms of fitness, for a beginner, joining a gym can seem a little daunting. But if you do make the commitment to start a new exercise routine taking that first step is the hardest …
[ad_1] Camera vs. Computer It’s essential to understand the differences between JPEG and RAW image files and how those differences can affect your final product. There is a big difference between the two file types, …
[ad_1] Legend has it that Heinz Kluetmeier donned scuba gear and dove into the Olympic pool at a long-ago games and set up cameras on the bottom, wiring them so he could fire them remotely. …
[ad_1] This weekend I made a new set of square Photoshop/PSE templates with a minimal circle theme. They come with clipping masks so you can easily add your images. You can remove the decorative lines …
The endless quest for the “perfect” gear often overshadows the art of photography itself. This thought-provoking video delves into this dilemma, providing seasoned and amateur photographers alike with a fresh perspective on equipment choice and the pitfalls of comparison.
Coming to you from Craig Roberts of e6 Vlogs, this insightful video takes a look at the poison of comparison in photography. The video begins with a relatable analogy between selecting headphones for different scenarios and choosing photography gear. It juxtaposes high-end Sony headphones, ideal for stationary use, with more practical, budget-friendly in-ear options for on-the-go activities. This analogy extends to photography, where the allure of top-tier equipment can be tempered by the practicalities of the shoot environment. The primary message is clear: the best equipment is what aligns with your specific needs at that moment, not necessarily the most expensive or advanced.
Further, the video addresses the psychological trap of comparing one’s work with others’. Such comparisons can lead to discontent and self-doubt. However, when used constructively, comparisons can foster personal growth and inspiration. Roberts urges photographers to focus on their own creative journey, embracing their unique style and pace of development. It emphasizes that mastery in photography isn’t about having the latest gear, but about maximizing the potential of the tools at hand. Check out the video above for the full rundown from Roberts.
Icons: they can be logos, symbols, words, and so much more. When designed well, they’re incredibly engaging and memorable. Think of them as visual companions to the stories you have to share with the world.
Icons are easy to create, thanks to powerful software like Photoshop. With Photoshop, you can rapidly design stunning icons to use anywhere. It’s easy to do, and the app makes the process intuitive.
Want to get started? You’ve come to the right place. Below, we’ve gathered 30 of the very best Photoshop icon design tutorials from around the web. They span a vast array of creative designs and capture many learning styles. But they share a flexibility and ease of use that helps you learn and create your own icons quickly.
So, get ready to dive in and explore these fantastic tutorials. From app icons to shadows and business logos, there’s something for everyone. And you’ll see both written and video tutorials, so it’s easy to find guides that match your preferred learning style.
Before reading on, you might also enjoy our companion article, 20+ Tutorials for Creating Icons in Adobe Illustrator. Give it a read now for even more options inside a different Adobe app.
The Best Icon Design Photoshop Tutorials
Turn a Landscape Photointo an Isometric Icon Photoshop
Discover how to create a stunning grid icon using any photo with this comprehensive tutorial. Step-by-step instructions, accompanied by detailed illustrations, make it effortless to replicate and unleash your creativity.
Digital Icon Colorful Logo Template (with Envato Elements)
Here, you’ll find a creative template for effortlessly creating colorful logos. This template features fully-editable vector graphics, ensuring easy customization and scalability.
Create Your Own Icons in Photoshop
Knowledge is power when it comes to icon design. This beginner-friendly tutorial demystifies the process, providing step-by-step guidance to help you create stunning icons.
UICON Weather Icons (with Envato Elements)
Useful for many purposes, these weather-themed icon designs are perfect for a wide range of applications such as forecasts, blogs, newsletters, and beyond. Try them out and elevate your visual content.
Create Flat Pirate Icons in Photoshop
Unleash your creativity with cool and unique pirate icon designs. Learn how to create them using Photoshop with this engaging tutorial. Discover the secrets to crafting personalized pirate icons that will capture attention.
Logo Generator Pack (with Envato Elements)
Short on time, but in need of a stunning icon set? This powerful template pack has you covered. With hundreds of icons to choose from, finding the perfect option for all your projects has never been easier.
Create a Logo & Give Realistic Look to It
Logo icons can set the tone for your brand’s first impression. Ensure you start on the right foot by following the comprehensive steps outlined in this video tutorial. Learn the art of crafting impactful logo icons and make a lasting impression.
Icon Leaf Gradient Logo Template (with Envato Elements)
This gradient logo template streamlines the branding design for your business. You can edit all of the graphics and add your own custom text with free fonts.
Create the Perfect Icon in Photoshop
This is another straightforward tutorial. Here you’ll learn to make icons of assorted styles. Adapt the steps to align with your unique design and style, allowing your creativity to shine through in every icon you create.
Play Button Icon Template (with Envato Elements)
Create Custom Desktop Icons in Photoshop
Here is another tutorial that outlines the steps to build your own desktop icons in Photoshop. With it, you can transform the look and feel of your desktop in just a few quick steps.
Face Icon Logo Template (with Envato Elements)
This logo template features a human face that you can smoothly edit every single element. It uses negative space for an elegant, understated look and feel.
100+ Zoo Animal Icons (with Envato Elements)
Animal icons are fun and easy to create! This template pack includes 100 of them that you can customize easily to suit your personal style.
Create Rounded Corner Icons in Photoshop
A rounded corner icon looks professional and expertly designed. Easily learn how to make your own with this clear and concise tutorial.
Green Lion Head Icon Logo Template (with Envato Elements)
Here is a logo template with a green lion’s head. Every aspect is fully editable and customizable to fit your needs.
Create a Glassmorphism Icon in Photoshop
Glassmorphism is a contemporary design trend often found in logo design. With this tutorial, you can learn how to apply it to your own design work.
Glowing Icon Created in Photoshop
This neat effect lights up your logo with a neon-style effect. Use it for a memorable impact that feels straight out of the late-night hours.
Design 3D Icons in Photoshop
Here, a video tutorial will teach you how to design modern 3D icons. This focuses on background shapes, colors, and more.
Draw Game Icons in Photoshop
Games are built around visuals, and they deserve eye-catching icons. This tutorial shows you how to create gaming logos and other symbol graphics.
Make a Mobile App Icon in Photoshop
Using a school as an example, here you can learn how to build an app icon. They’ll help your app stand out on users’ devices.
Create App Icons with Custom 3D Objects
Icons may be flat, or they can be 3D. 3D is a trend in design because of its stylish look and feel. You’ll learn how to make 3D icon designs in Photoshop here.
Designing the Photos App Icon with Photoshop
Many of us are familiar with Apple’s Photos app icon. This tutorial shows you how to create your own icons by replicating that iconic layout.
Beauty Logo Design in Photoshop
Here is a tutorial focused on logo designs for a beauty spa. The designs you’ll learn can extend to icons and logos of all kinds.
G Graphics Logo Design in Photoshop
In search of a fast and straightforward icon tutorial? With just over 5 minutes duration, this video has you covered.
Create a Game Icon without Painting in Photoshop
Glowing Social Media Icon Effect In Photoshop
Social media often features icons and incredible visuals. Here’s a tutorial focused on icon design for the web and mobile apps. For more social media, check out this collection.
How To Increase Toolbar Size in Photoshop
When you design icons in Photoshop, it helps to have a clear visual interface. This quick video shows you how to optimize your workspace as you build your icons.
How to Make a Pattern Icon in Photoshop
Pattern icons are a great way to make stylish backgrounds, wallpapers, and more. Learn how with this visual tutorial guide for Photoshop.
Photoshop Gift Box Icon Tutorial
Need to make your own gift box icon? You’ll learn how here, in a narrated tutorial example video.
Create a Set of Weather Icons in Photoshop
Weather icons are appropriate for all seasons. Sun, clouds, rain, and more: this illustrated guide helps you build them.
Create a Roblox Game Icon Using Blender & Photoshop
Another game tutorial, this is a way to learn icon design for any purpose. It uses Photoshop’s tools to help you design graphics and visuals.
Design COG or Gear Shape Button in Photoshop
Gear icons are helpful if you want to show how objects fit together. This tutorial gives you the skills to build them in different sizes and styles.
Game Icon Design in Photoshop
Video game icons help your game stand out. They’re a memorable part of your graphics package – one you can start creating with the tips here.
Create Isometric 3D Icons in Photoshop
Isometric 3D logos add depth and dimension to icons. In this video, you’re shown how to make them and handy ways to convert from 2D to 3D icons.
Conclusion
From simple vector-based glyphs to more intricate designs, Photoshop provides the perfect platform for creating icons that effectively convey a meaning or message. Whether a beginner or an experienced designer, mastering icon design in Photoshop is an essential skill for any UI designer.
With this collection of Photoshop tutorials, UI designers will be able to learn the essential techniques for creating professional icons. They cover various topics, from basic shape creation to advanced design tips, and can help you enhance your UI skills and stay up-to-date with design trends.
This article was updated in December 2023 with contributions from John McIntire and Russell Masters.
Lighting can make or break a portrait. In my experience, it’s often what turns an ordinary snapshot into a professional-looking image. Clamshell lighting is a technique that’s simple yet powerful, and it can take your photography to the next level.
But what is clamshell lighting? And how can you master clamshell lighting setups for stunning results?
In this article, I explain the ins and outs of this simple – yet incredibly powerful – two-light portrait setup. From experimenting with different modifiers to playing with light positions and beyond, I’ll explore all the details to help you master this wonderful lighting technique. By the time you’re finished reading, you’ll know how to create clamshell-lit portraits like a pro (no matter your lighting gear!).
So if you’re ready to become a clamshell portrait master, then let’s dive right in, starting with the basics:
What is clamshell lighting?
Clamshell lighting is a simple, two-light configuration: You place both lights facing your subject at a 45-degree angle, one angled up, one angled down. Note that your key light (i.e., your primary, brighter light) should point 45 degrees downward, while your fill light should point 45 degrees upward. Your camera should sit between the two lights, facing your subject.
When viewed from the side, the two lights resemble an open clamshell (imagination may be required!):
A clamshell setup provides beautiful, soft light with faint shadows and glorious catchlights. Clamshell lighting works well on pretty much everyone; I’d say that it’s flattering for men and women of all ages, so it’s a great setup to have in your back pocket.
Note that clamshell lighting is just like butterfly lighting, except that you add the fill light below the subject (which eliminates any heavy shadows caused by the key light). So if you’re already doing a butterfly setup, you can always add in a clamshell look at the end for some variation!
How to create a clamshell lighting setup: step-by-step process
Creating a clamshell lighting setup is simple, and as long as you have two working lights, you’re practically guaranteed to pull it off. Here’s what you do:
Step 1: Select your lights and modifiers
Clamshell lighting requires two light sources, and these can be studio strobes or speedlights, modified or unmodified.
Personally, I’d recommend you use studio strobes. Although speedlights are also fine, they take slightly longer to recycle between shots, so you won’t be able to do rapid-fire portrait photography. (Another benefit to strobes is that they generally include modeling lights, which are low-powered continuous lights that illuminate your subject while you get set up and can help you identify the perfect lighting angles.)
I’d also recommend you use modifiers – these will help soften the light for a more flattering effect – and grabbing a pair of similarly sized softboxes is a great starting point. (If you don’t have softboxes, you could try using an umbrella for the main light, instead.)
That said, if you don’t have any modifiers or you prefer a harder look, then work with an unmodified light! If you really embrace the effect and sculpt it as needed, you may get a great result. Plus, it’s your photoshoot!
Step 2: Position your key light
Grab your key light (i.e., your main light source). The goal is to place it in front of your subject and slightly above; angle it down so it points directly at the subject’s nose.
If you want a softer effect that features fast light falloff, bring the light in close to the subject’s face. If you want a harder effect that lights the subject more broadly, move the light farther away.
Next, meter for your desired aperture (we’ll use a hypothetical f/11) and take a test shot.
If everything is set up correctly, you should produce a decently lit image with deep shadows under your subject’s nose and chin. (If the image is too dim, feel free to brighten your light, and if the image is overexposed, do the reverse.)
Step 3: Add your fill light
Now it’s time to add in the second light; take your fill light and place it directly underneath your key light, pointed upward toward your subject at 45 degrees.
Adjust the light’s brightness until it sits two stops below the key light. (If you wanted to shoot at f/11, you could meter your fill light for an f/5.6 result.) Then take a second test shot.
If the effect is too strong and your fill light is obliterating the shadows, turn down the light power. If the light isn’t doing enough, turn it up. The main thing to look out for is the fill light overpowering the key light, as that would result in a very unflattering image that’s lit from below.
Step 4: Capture your clamshell image!
At this point, you should have two lights sharing the same vertical space, and the light on top should be roughly two stops brighter than the light on the bottom.
Stand behind the lights and shoot through the gap. Note: If there isn’t much of a gap to work with, raise and/or lower both of your lights until you have enough room to shoot in the middle. To be safe, you may want to take another meter reading.
Of course, once you’ve grabbed a shot or two, check your camera’s LCD for exposure issues and other concerns. And if you have the capability, I recommend tethering your camera to your laptop; that way, you can review your images instantly on the big screen.
And that’s all there is to it! Clamshell lighting is really easy to do, and with a bit of practice, you’ll be able to get the two-light setup running in a couple of minutes.
Check out this clamshell setup, viewed from the side. Note that there are three softboxes in the image, but only two – the ones in front of the model – are active.
Clamshell vs butterfly lighting
Butterfly lighting and clamshell lighting are often discussed together, but they’re two very distinct lighting patterns.
A basic butterfly lighting setup uses just one light, positioned above and angled down toward the subject. Since there’s no fill light, the shadows on the nose and chin remain heavy, giving more dramatic and intense results. It’s an effect that can be particularly well-suited for fashion photography.
Notice the strong shadows under the subject’s nose; that’s a result of butterfly lighting.
Now, let’s compare this to clamshell lighting. Clamshell lighting involves placing a second light below the subject, softening the shadows. This produces a gentler, more soothing effect, so it’s often seen in conventional headshot photography or applications with far less drama.
Pro tip: If you’re uncertain about the final look you want, you can always start with butterfly lighting. Experiment with the shadows and angles, then simply add a fill light to achieve the clamshell look if you desire something softer. This way, you can play around with two different lighting styles with very little effort. It’s a convenient and creative approach to portrait lighting.
Clamshell vs Rembrandt lighting
Another classic lighting technique to consider? Rembrandt lighting. The Rembrandt pattern involves placing a light off to the side of the subject – often around 45 degrees – to create a clear triangle of light on the subject’s cheek.
Rembrandt lighting produces a triangle under the subject’s eye.
Because it covers so much of the face in shadows, Rembrandt lighting is known for its dark and moody qualities. It’s a favorite among those seeking a dramatic, theatrical style in their images.
So how does clamshell lighting stack up against Rembrandt? Clamshell lighting is the better choice if you want a more cheerful, detailed shot. By positioning lights both above and below your subject, you can illuminate the face more evenly and reduce harsh shadows. This brings out more of the facial details and gives the image a livelier, more approachable feeling.
In short, if drama and moodiness are your goals, Rembrandt lighting may be the way to go. But for a more uplifting and detailed portrait, clamshell lighting fits the bill. Understanding the nuances of these lighting techniques will allow you to choose the right style for each unique portrait session. Experiment with both, and see what you think!
Clamshell photography setup: a few quick tips
You know how to capture a basic clamshell image. But how can you take your shots even further? Here are a few of my top tips to help you out:
1. Experiment with different modifiers
When you’re first starting with clamshell lighting, softboxes can be your best friends. They provide a gentle touch that’s perfect for beginners. But as you get more comfortable, you might find yourself wanting to explore other options. This is an excellent idea.
Have a pair of strip boxes you want to use? Go for it. Want to use a beauty dish as your key light and an umbrella as fill? Sure. How about a snoot and a small softbox? Absolutely. Use what you have at hand. Pretty soon, you’ll be able to improvise like a pro.
Beauty dishes, for instance, create a harder look that can add drama to a portrait. Their focused light can accentuate textures and details. On the other hand, umbrellas can really soften up the shadows. By throwing around a lot of light, they make everything feel more diffused and ethereal.
By testing out different modifiers, you’ll learn how they affect your images. So don’t be afraid to try something new. Just remember to keep the essence of clamshell lighting in mind: that beautiful, flattering glow that makes portraits shine.
2. Try repositioning your lights
Light position matters in clamshell lighting, and even an adjustment of a few inches can dramatically change the final image.
Move the lights closer to your subject, and the shadows will soften and become more gradated for a gentle and delicate look.
Move the lights farther from your subject, and the shadows will harden and become sharper. This can add a sense of depth and drama to the image.
But it’s not just about distance. You can move your key light higher to create longer shadows or lower to create shorter shadows. You can do the same with the fill light.
Just be cautious not to go overboard. The 45-degree positions that I discussed in my initial step-by-step section are designed to look flattering. Playing with the positioning is great, but don’t lose sight of your original goals!
3. Add more lights
Once you’ve set up your clamshell lighting just right, you might think you’re done. But there’s more you can do to enhance the scene and create striking images.
For instance, you can add rim lights behind your subject, either on one side or both, to create a delicate sliver of light around the head. This effect will help your subject pop off the background and make the image more dynamic.
A hair light can add depth to your photograph. Positioned above and behind the subject, it shines subtly on the hair to separate it from the background.
Don’t hesitate to experiment with background lights, as well. Placing a light behind the subject (that’s pointed at the backdrop) can create a beautiful cone of light that adds extra depth. It’s how many photographers combine a well-lit subject with a well-lit background!
Bottom line: By adding these additional lights, you give yourself more creative freedom and open up a world of possibilities in your clamshell lighting setups.
4. Convert to black and white
Clamshell lighting produces wonderful images that can look stunning in both color and black and white. Converting your shot to black and white will emphasize the interplay of shadows and highlights while potentially adding a layer of three-dimensionality to the photo.
If you shoot in RAW, and I highly recommend you do, you have the flexibility to photograph using your camera’s Monochrome mode and still convert back to color if needed. Or you can start in color and convert to black and white later on.
The black-and-white conversion can make the features of the face stand out in a unique way. It might bring out textures, emphasize contrasts, or even create a mood that color doesn’t capture. Experimenting with this conversion allows you to explore a range of visual expressions within a single lighting setup, which is always a good idea!
5. Watch the catchlights
Catchlight is that magical spot of light in the subject’s eyes, one that’s created by a reflection from the light source. It brings life to the eyes; without a catchlight, the eyes – and the entire portrait – can appear flat and lifeless.
Therefore, it’s important that you always make sure your clamshell photos include catchlights! If a catchlight isn’t present, you may need to ask your subject to angle their head, or you may need to make slight adjustments to your lights. Make sure to review each test shot on your camera’s LCD to ensure that the catchlight is just as you want it.
Note that with clamshell lighting, since it involves two lights rather than one, you might notice a double catchlight. This is a feature some photographers love, while others are less enthusiastic.
If you’re not a fan of the bottom catchlight, don’t fret! It can always be cloned out during post-processing.
Clamshell lighting examples
Now let’s take a look at some clamshell examples. You can use them as inspiration, though don’t limit yourself – these are just a handful of the many clamshell setups you can create!
First, we have a nice black and white portrait. Notice the soft shadows on my subject’s cheeks:
Next, we have a brighter, more upbeat clamshell image with a well-lit background:
Then another black and white with a slightly darker background:
To pull this final shot off, I added a third light, pointed toward the background. Note that you can experiment with different head turns:
Clamshell lighting: final words
If you’ve made it this far, you should understand the power of a basic clamshell lighting setup.
Of course, you can always take your clamshell setups to the next level with additional lights and modifiers, but even the basics are guaranteed to get good results.
So head into your studio and try some clamshell lighting out for yourself!
Now over to you:
What subjects do you plan to shoot using a two-light clamshell setup? Share your thoughts in the comments below!
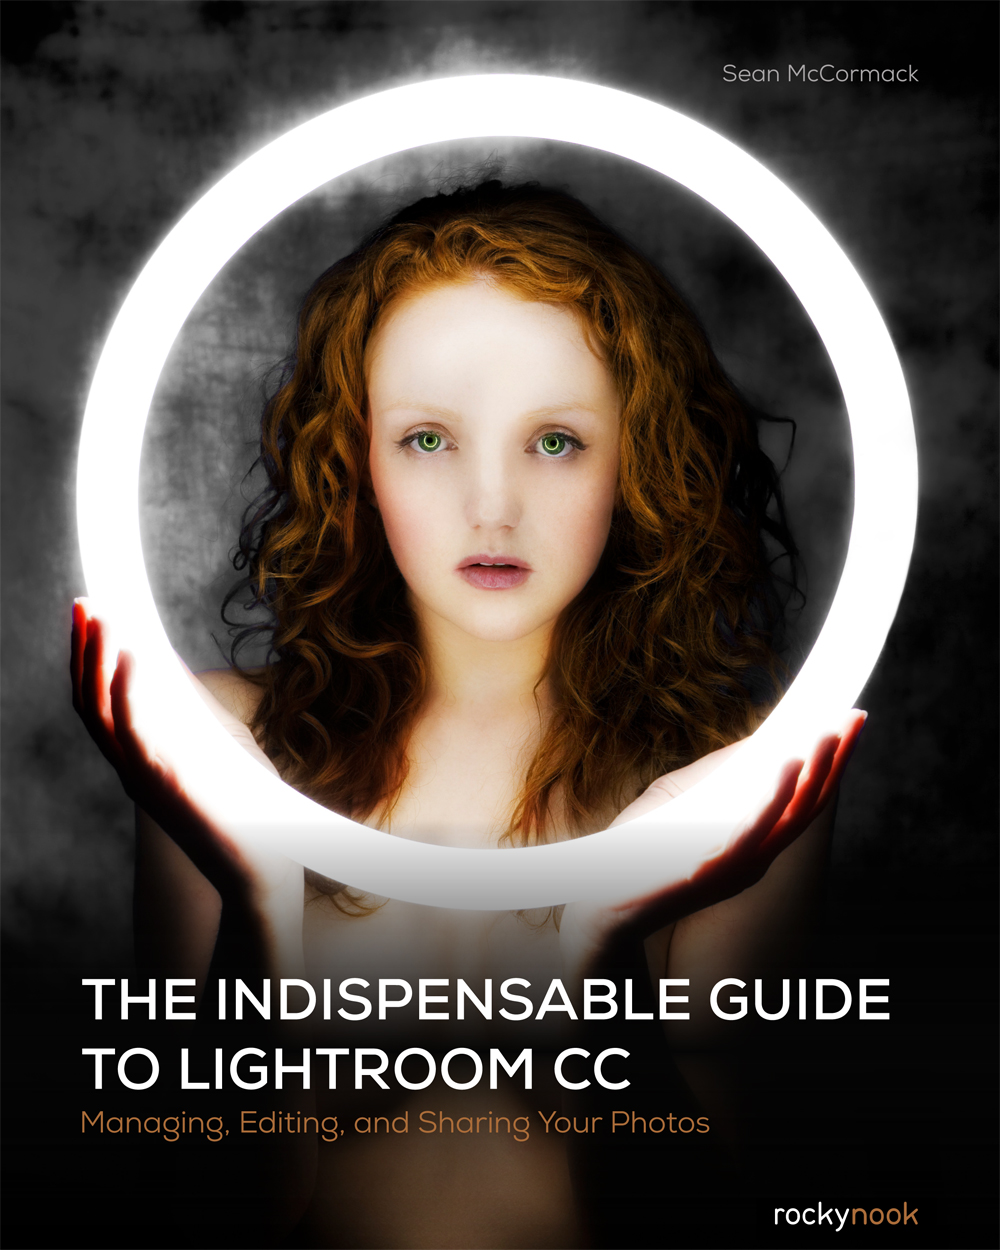
My latest book for Rocky Nook, looking at Lightroom CC/6 including all the new features. Available in both print and ebook forms.
Penny H: A well written and very comprehensive guide that I thoroughly recommend. Stefan47: Even an experienced user will learn a few tips from this book.
Piet Van den Eynde: Beginners get more than enough information from this book, but even an experienced user (like I consider myself to be) can learn more than a couple of tricks.
1:1 Training and Problem Solving
Need to brush up on your Lightroom or Photoshop? Having Catalog or Missing File or Folder issues and need help? Using a variety of services, I can help you online with either.
I am having so much fun creating Valentine photo storyboards to share with you. I am not a huge flowers/chocolate Valentine’s Day kind of gal, but I welcome any holiday that makes you reflect on those in your life that you love. And who hasn’t told their loved ones (people and pets) that you loved them “to the moon and back.” I think many of us are guilty of using that sweet phrase.
This set of Photoshop/PSE templates have clipping masks to make loading your images so much easier. The text is not editable, but you can change its color by clipping a Solid Color adjustment on top or you can turn off that layer and add your own text. The heart is adjustable, both size and color. The templates are 5×7 so they can be printed for the wall, greeting cards, or posted on the web.
Download the CoffeeShop “Love You To The Moon” Photoshop/PSE Photo Template Set!
Do you want to download thousands of professional CoffeeShop PSE/Photoshop actions (including exclusive ones not found anywhere for free), textures/overlays, scrapbooking papers, clip art/design elements, photo storyboards and frames, and Lightroom presets from this site in one convenient zipped file AND help support this one-woman blog?
Just click here for my CoffeeShop Mega Download Pack!
First things first—check out this list of high-profile films and TV shows released over the last two years:
Dune
John Wick: Chapter 4
The Nun II
Stranger Things: Season 4
The Batman
All of these films were shot on digital cameras and created with digital technology. Several of them were even shot with the same camera system. And yet, they all look incredibly different from each other. Ever wonder how filmmakers achieve this? While, of course, production design, costumes, and lighting all play a major role in how footage will look and feel, ultimately, a lot of it comes down to color grading.
Color grading is a process. It’s an art and a science. It’s how a colorist alters certain aspects of an image—the original colors, contrast, saturation, and more—to achieve a desired look. And using LUTs is a significant aspect of color grading.
LUTs are the unsung heroes of video editing and color grading. They’re not just filters—A LUT (Lookup Table) is a predefined array of numerical values that offers a convenient way to streamline a particular computation. In color grading, a LUT converts input color values (typically from the camera) into the desired output values (ultimately reflected in the final footage).
Think of them as a shortcut to achieving a specific visual style, whether it’s the sun-drenched hues of a summer blockbuster or the gritty tones of a noir thriller. However, they’re not just a drag-and-drop fix. Often, your footage must meet specific requirements for them to work.
The Technical Side: Understanding LUTs in Video Editing
At its core, a LUT remaps the colors in your video footage. It’s like a translator, converting the original hues and tones into a new color space. This process can be as simple as adjusting the brightness and contrast or as intricate as altering individual color channels to achieve a desired mood or atmosphere.
However, in the world of LUTs, it’s essential to distinguish between log conversion and creative LUTs. Most modern cinema cameras will film in a log profile. This saturation and contrast-devoid profile allows for greater tweaking in post-production.
This is an example of a LOG image. Image by Lewis McGregor.
Log conversion LUTs are designed to convert this flat, log-recorded footage into a more standard, contrast-rich image, essentially serving as a starting point for color grading.
As every camera unit has its own color science and gamma curve, and most units have multiple color profiles, a specific log conversion LUT depends on the camera and profile you filmed on.
The above image was filmed on a Canon C300 Mk III in C-Log 2. If I apply a Sony S-log 2 conversion LUT, the results look like this:
Not so great.
On the other hand, creative LUTs are all about artistic expression. They’re used to impart a specific style or mood to the footage, whether it’s a vintage look, a cinematic feel, or a particular color theme.
While log conversion LUTs bring footage to a baseline for further grading, creative LUTs are used to infuse the footage with an artistic vision.
Check out the clip below to get an idea of the transformations they can create.
For those venturing into video editing, you might come across terms like “Cinematic LUTs” or “Filmic LUTs.” These pre-designed color profiles emulate the look of film stock or replicate the color grading from famous movies. They’re a fantastic starting point for beginners and a time-saver for seasoned professionals.
Want to start experimenting with LUTs? Good news! Here are 48 FREE LUTS you can download right and start using today:
Now, while LUTs are commonly associated with post-production, they’re also making their way into in-camera applications. It’s a pretty pivotal reason, as this feature is especially beneficial for visualizing the final look on set and making informed decisions about lighting and exposure.
Of course, when shooting in log, you would need a correction LUT to see the footage properly. Still, you can also apply creative LUTs for feedback, which is invaluable for directors and cinematographers striving for a specific visual tone.
Check out this behind-the-scenes video for the children’s TV show Heirs of The Night. Pay special attention starting at 2:13.
The show revolves around vampires and, as a result, the majority of the show takes place at night. However, the producers decided to shoot a day-for-night process in order to maximize shooting time during the day.
As that process is very heavy on color grading, the cinematographer utilized in-camera LUTs to give the filmmakers a clearer sense of how the end result would look. As you can see, the difference between how things looked on set and how things appeared in the final product was significant, to say the least.
With this, it’s crucial to note that in-camera LUTs are primarily for monitoring purposes. The recorded footage still retains its flat, log profile, preserving the flexibility for detailed color grading in post-production.
LUTs in Action: Software and Practical Use
When it comes to applying LUTs, video editing software like Adobe Premiere Pro, Final Cut Pro, and DaVinci Resolve offer seamless integration. Each program has its own way of handling LUTs, but the underlying principle remains the same: You select a LUT that aligns with your creative vision and instantly transforms your footage’s color profile.
For instance, in Premiere Pro, you can apply LUTs through the Lumetri Color panel. While in Final Cut Pro, it’s a matter of a few clicks in the “Effects” browser. DaVinci Resolve’s advanced color grading tools take it even further, allowing for more refined adjustments.
Practical examples of LUT use are abundant. Let’s say you’ve shot a beach scene that looks a bit flat. You can instantly give it warm, vibrant tones by applying a “Summer Beach” LUT.
For a closer, step-by-step look, check out our tutorial from Robbie Janney, who helps you walk through adding LUTs in Premiere Pro.
Exploring the World of FREE LUTs and Making Your Own
The internet is a treasure trove of LUTs, both free and premium. While we have a solid selection of 17 FREE Cinematic LUTS, websites like PremiumBeat offer a variety of LUTs for Premiere Pro, DaVinci Resolve, and Final Cut Pro.
Whether you’re looking for something specific like “LUTs for Sony cameras” or more general like “cinematic LUTs,” there’s a plethora to choose from.
However, it doesn’t stop there. Once you get the hang of using LUTs, you might find yourself returning to a grading setup that works well for you. While not identical in practice, I’ve been using the same Lightroom preset for my photos for the last few years, and I can’t imagine switching to something else.
In this scenario, you can export your grade (with some limitations) to create your own LUT. This can then be used across various platforms, shared with your friends, or even considered for sale!
In the tutorial below, I’ll walk you through the process:
Conclusion: The Transformative Power of LUTs
In filmmaking and video production, LUTs are more than just tools; they are the bridge between vision and reality. As the cinematographer sculpts light and shadow, LUTs add the final touches, transforming ordinary footage into cinematic art.
They are a testament to the power of color and its ability to evoke emotion, set the mood, and bring a director’s vision to life. In a skilled editor’s hands, LUTs are the secret weapon for creating video masterpieces.
coming to the surface: we all have our breaking points and only we know how far we can be pushed before that anger is released. Truth be told, I was having extreme back pains when I took this shot so the emotion in my face is real
Editor’s Note: With Halloween just around the corner, I thought it would be fitting to revisit this 2015 guest post from Mark Rodriguez!
Go Shoot Yourself
Hello, My name is Mark Rodriguez–though some folks on the interwebz refer to me as Godriguez–and I am a self-portrait/conceptual artist from Tampa, Florida. When many people think of self-portraiture the first thing that will usually come to mind is that they are just selfies, and it is a form of narcissism that should be eradicated from the earth. They hear “selfie” and think of dirty bathroom shots with duck lips and shot from a high angle. But a well-crafted self-portrait can in fact be a form of therapy, as has been in my case, and can help tell stories that might only be important to the artist themselves.
Jesus sells: Christmas has become such a commercialized occurrence and it gets worse each year, this shot exemplifies how plastic and far it has gone from its original meaning. This was one of my earliest self-portraits and solidified my nickname of “Godriguez”
Let me step back and give you a bit of history as to how I began shooting self-portraits in the first place.
Back sometime in 2011 I joined what was then a new social media platform called Google+ that was still in its beta phases. It was during this time that I was still searching for my own style in photography in general and G+ was a great vehicle for this with many different themed days that I could explore different types of photography and post them along with likeminded groups of people and get genuine feedback from a really supportive community of artists. During this time a new theme was started by Jeff Smith and Levi Moore called the Selfie Sunday Project where every other Sunday you would post a self-portrait. Sometimes there would be a theme for the week, sometimes not. But always there was an enthusiastic group of photographers that posted and I could not wait to see what they would come up with each week. It was at this time that I finally dipped my toe in and gave it a shot.
are you my mummy?: a bit of fun for one of my hunt shots with the word being “mummy” that we were to interpret. The wall behind me is actually my back patio pavers that I shot and turned on their side to give the appearance of a tomb
I will have to say that at this time I didn’t know anything about self-portraiture and had the misconception that it was some narcissistic thing. So I went about it cautiously and timidly, but soon found a release that I had not known before in doing them and quickly became a regular each time the theme rolled around. To me it was a great exercise in discipline in choreographing the setup, lighting, costume, and at the same time being an actor/model and somehow pulling it all off in a cohesive final shot. It was at this time I also found it to be extremely therapeutic as well.
tears of a clown: a satirical look at depression showing that even though many appear happy on the outside, they might be struggling with larger issues below the surface. It is not a glorification of suicide by any means, rather a way to hopefully start a dialog about mental issues
It was around this same time of year in late October, 2011 that I found out just how cathartic self-portraiture could truly be. I was planning my selfy for the upcoming theme that week, which was to be a Halloween themed shot. I was going to be a swanky devil with a martini glass and looking quite smug. Unfortunately for me something tragic happened in my life the day before I was to do the shot. My mother passed away from complications from a stroke she had suffered earlier that same week. Now, many people might shut down and withdraw from the world when something like this happens–but much in the same way when my father passed away and I threw myself into my artwork in design school at the time–I threw myself into the shot I had planned but modified it into a fitting memorial to both my mother and father
the devil went down to florida: the very moment when I realized just how powerful taking self-portraits could be after the passing of my mother…catharsis incarnate
Instead of a swanky, smug devil, I portrayed myself as a sad devil in a state of remorse holding a portrait of my parents. Both of my parents were huge in my life and they were the most giving, caring people I have ever met. So my interpretation of the shot was that the devil was depressed because these were two loving souls he would never have. To reinforce the symbolism of the shot I am wearing what was once my father’s red sport coat and tie, holding the portrait and frame my mother gave me when my father passed away and I am sitting in a chair that came from the house where I grew up. I pulled from the strength of my parents to make this shot because they always somehow found a way to see a positive in every situation and make the best of it. They always supported my art, and I felt by honoring them with a portrait that celebrated that spirit was the most fitting tribute I could ever accomplish. Each year around this time I create a new portrait sitting in the chair, holding the same frame and photo of them and I will continue to do so for as long as I am able. Self-portraiture as therapy, I highly recommend it.
I miss you: one of my ongoing series of shots that I produce each year in honor of my parents. They were a huge part of my life and I try to honor them every day of my life
I am actually a very shy and somewhat reclusive person, so the thing I truly love about self-portraiture is it can give you an outlet to be many of the things that you might not be. You can be a saint or a sinner, a joker or a gentleman, a loser or a legend and all in the safe confines of an image. I am extremely eclectic in my tastes and self-portraiture also lends to that as well. Having the ability to explore many different styles and themes yet still have a cohesive feel about them is a major draw. The thing about my work is it is created for myself first and everyone else second, and that is a key aspect to self-portraiture. For me as it is a very personal experience.
thank ya vurry much: a hunt shot based off the word “greasy,” the hardest part of this shot was getting the wig to stay up for it
When I create my art, the first and foremost person I have to impress is myself. If I cannot impress myself, how can I possibly think anyone else would like it? I am my own worst critic, and in that am very critical with what I share when it comes to my work. If an image does not fit my own perceived standards of what is a quality finished piece then it will never see the light of day to anyone else. My self-portraiture more often than not tells a story, and if that story isn’t ready to be read then I continue to work on it till it does, or it goes into the garbage bin and I start over once again. I feel too often people worry too much about how others will like their work instead of staying true to themselves. You should always ask yourself this simple question when creating art: “Would I hang this on my wall?” If the answer is yes, then proceed. If not, move on to something different.
I’ll melt with you: we are only on this planet for a short time, some choose to do much with their lives while others are doomed to sit by and watch their own lives melt away right before their eyes
Story is paramount in much of my work, and is most evident in another Google+ themed event I participate in called the Chrysta Rae photography scavenger hunt. In this event you are given a list of 10 words and it is up to you to interpret each word in a photograph anyway you feel fit. It can be literal or abstract and I always like to push the meaning of the words each round. The community involved with this event is one of the most encouraging and supportive group of people I have ever met and truly an anomaly as far as any organized groups on any social media platform is concerned. It is yet another way that I have been able to establish my style via my self-portraiture in a very nurturing environment with no egos or trolls of any kind and if they do pop up they are run out of town quicker than you can blink an eye. It is in this event that I have again used self-portraits to tell stories and it really pushes you creatively in how you go about creating it.
gimme a kiss: a hunt shot for the word “kiss.” For this one I shot myself for each member only in whiteface makeup and then all of the detail makeup was done in photoshop
An example of pushing the meaning of the words I often refer to was in one of the hunts when we were given the word “feather.” While quickly images come to mind of birds, a bird wing, a drop of water on a feather, or just a feather by itself, I pushed the word via some mind mapping until I came up with an image referring back to colonial times and the act of tarring and feathering people around the time of the Boston tea party. For that shot I stood half naked in my garage, pouring dark Karo syrup all over me and then pulling the feathers from a pillow and sticking them into the syrup. The problem was it was a hot summer night and I began to sweat which caused the feathers to begin to slide which made me have to add more syrup and more feathers over and over again. It was one of the most disgusting sensations I have ever felt in my life but you know what? It was totally worth it to get the shot across in my head and tell the story I wanted to tell that maybe this pour soul was totally upset that he got tarred and feathered but at least he still got his cup of tea. I will go to very extreme measures to get the shot in my head and have done everything from covering myself in latex paint, jumping backwards off a ladder onto mattresses on the ground, to making myself physically sick from chain smoking a cigar to get the right amount of smoke in the photo…whatever it takes to get the shot, whatever it takes to tell the story.
birds of a feather: a hunt shot for the word “feather” in which I covered myself in dark Karo syrup and then covered myself with feathers from a pillow…disgusting feeling, but worth it
While still on the subject of the hunt, it was from it that I created a self-portrait that would go on to win the Best in show Guru Award at this past year’s Photoshopworld. The word for that shot was “happy” and again rather than showing a smiling baby, a smiling face or something of that sort, I thought to give it a twist and show something sinister lurking behind that smile. Again story and sometimes hidden elements are key to much of my work as is evident in this one. The choice of t-shirt in this shot reinforces the story for it is the classic “see no evil, speak no evil, hear no evil” done by the amazing artist Carolyn Curtis, however, if you look closely my forearm is covering the “see no evil” face of the trio. I love subtle symbolism and try to weave it in there when I can and it is another level of storytelling that might not always be apparent to the viewer, yet it is there if they look deep enough. I don’t feel you should try to over explain–or explain at all–your work as it should be up to the viewer to interpret themselves and I personally want everyone to get their own emotion or feeling when they view my work. It should be as personal an experience for them viewing it as it was for you to create it.
put on a happy face: like a Trojan horse, there are people that appear pleasant on the outside, yet lurking within is something sinister and altogether different. This shot was selected best in show for the 2015 photoshop world guru awards
I hope this gives you a little glimpse into my world and the world of self-portraiture and maybe shows it in a different light. While there is plenty of badly shot, self-absorbed, narcissistic-type, “selfies” out there, there is a whole other world of self-portraiture that is therapeutic, creative and can be an avenue of imagination that you can explore that is both personal and enlightening. I want to thank Scott Kelby and everyone at KelbyOne for giving me the opportunity to share my story and insights with you and I hope was able to convey just how personal self-portraiture is to me and could be for you…now go shoot yourself…metaphorically of course.
Mark Rodriguez is a Tampa, Florida based artist. Check out his inspirational interview on KelbyOne. You can keep up with him on Instagram and X (Twitter), as well as see some of his behind the scenes videos on YouTube. In addition to photography, He also creates animations and does voice work for the non-profit learning series WhyU.org.
Photography and cinematography equipment company Tilta teamed up with Oscar-winning Director of Photography Claudio Miranda, ASC, to create The X Gift, a holiday-themed short film shot entirely on iPhone 15 Pro.
“X encapsulates the essence of Christmas, representing the notions of surprise and boundless possibilities. Its objective is to communicate that this exceptional gift serves as a guiding light of encouragement for individuals of all ages and professions. The aspiration is to motivate people to capture cinematic moments with their loved ones, seizing life’s beauty at any time and in any place,” Tilta explains. “Beyond being a mere product showcase, this film extends an invitation to spark creativity, spread joy, and cultivate a sense of togetherness during the festive holiday season.”
Alongside working with Miranda, the Chilean cinematographer known for his work on Life of Pi, The Curious Case of Benjamin Button, and Top Gun: Maverick, Tilta also enlisted production designer Yong Ok Lee, known for her work on Minari, The Farewell, and Marvelous and the Black Hole.
Claudio Miranda at work on “The X Gift”
The production team used Tilta’s latest product, the Khronos Ecosystem, designed for filmmakers using the iPhone 15 Pro and iPhone 15 Pro Max. “This cutting-edge technology played a crucial role in completing the entire shoot,” Tilta explains.
The company says its Khronos products enable filmmakers to integrate the latest iPhone Pro models into a high-level, professional cinema workflow. “Leveraging the Khronos ecosystem designed by Tilta, the iPhone has the potential to seamlessly integrate into high-level workflows similar to those found in expert productions. Even as a smartphone, it exhibits capabilities that align with the standards of professional filmmaking, approaching the quality levels of many dedicated cameras,” the company explains.
iPhone 15 Pro and Pro Max incorporate many impressive cinema-oriented features, including recording ProRes RAW footage directly to an attached SSD and fantastic overall video quality.
“I mean nowadays, cameras are so simple, versus when I was starting, it was film and processing. It was a lot more of a deal. Now, people could just pick up phones and create great content,” says Miranda.
Miranda also notes the utility of Blackmagic’s new Camera App, which provides the color and exposure control the award-winning cinematographer requires.
Gene Nagata of the YouTube channel Potato Jet shot the behind-the-scenes video of The X Gift and noted that it is hard to believe the footage produced by the latest iPhone models. “If you’re just looking at the monitor, it’s very hard to think like this is coming off a phone. Really impressive actually. My first time really seeing the ProRes and the Log really pushed the limits by a cinematographer. So, it’s actually really cool to see how capable these little things are. It definitely makes me rethink the camera that I have in my pocket for sure.”
It is really incredible just how far smartphone imaging technology has come. With the aid of new apps and accessories, mobile devices have made professional-quality filmmaking more accessible than ever.
In photography, both vibrance and saturation are terms used to describe the intensity and richness of colors in an image. While they are related, there are some key differences.
In this blog post, we will examine the difference between the two:
Below is our example image, along with its histogram, before applying any changes. We can use the histogram as a reference point for how vibrance and saturation affect our image.
Saturation
Saturation is the intensity and purity of colors in an image. This determines how much a particular color is present compared to its neutral color (gray).
The more saturated an image is, the more vibrant and intense the colors will look.
Conversely, if the saturation is low, the color will be desaturated or muted and may appear dull or lacking in vividness.
Adjusting saturation in post-processing software or camera settings AFFECTS ALL COLORS EQUALLY, regardless of their original intensity.
So when you make a saturation adjustment, you will see a shift in color intensity for the entire image.
Here is our image with saturation increased all the way to +100. Note that increasing saturation makes ALL THE COLORS IN THE PHOTO MORE VIBRANT:
Alternatively, decreasing saturation (or desaturating) makes ALL THE COLORS IN THE IMAGE LESS VIBRANT.
Here is our image with saturation decreased all the way to -100. Note that when saturation is reduced entirely, all color is removed, and the image becomes black and white:
Over-saturation can produce unrealistically saturated colors that do not reflect the original scene and give an artificial or exaggerated look, especially when it comes to skin tones.
So when adjusting the saturation on your image, make sure you do so in small increments to FIND A BALANCE THAT STILL LOOKS NATURAL.
Vibrance
Vibrance is a relatively new feature in many imaging software applications and digital cameras. This was introduced to address some of the limitations of traditional saturation adjustments.
The main difference between vibrance and saturation is that vibrance is designed to SELECTIVELY BOOST the intensity of less saturated colors while preserving the intensity of already saturated colors.
Because of this, vibrance does a much better job of boosting the saturation in the overall image while protecting skin tones from over-saturation.
Let’s look at our example image with the vibrance increased to +100. The reds and oranges are the most saturated colors, so when adjusting the vibrance to +100, those colors will see more of a shift than the greens, which have less saturation:
And here is our example image with the vibrance reduced all the way to -100. Note that lowering the vibrance to -100 does NOT create a black and white picture because vibrance only affects the intensity of the most saturated colors:
This selective approach helps prevent the over-saturation of certain areas of an image, such as skin tones, which can quickly become unnaturally intense when using traditional saturation adjustments.
The advantage of vibrance is that you have better control over the overall balance of colors in your image. It will boost colors that need a boost while leaving already bright colors relatively intact.
This will make colors appear more natural and realistic, resulting in a more visually pleasing image.
Comparisons
Here is a side-by-side comparison of vibrance and saturation at +100 so you can see the difference:
And a side-by-side comparison of vibrance and saturation at -100:
Conclusion
In review, saturation affects all colors equally, while vibrance selectively increases the saturation of less saturated colors while maintaining the intensity of already saturated colors.
This is why vibrance offers a more subtle way to increase color intensity, allowing for better control and a more natural-looking result.
While vibrance is often the preferred method of adjusting color intensity, there are still situations where a saturation adjustment is necessary or desirable, especially for creative purposes or specific artistic effects.
Do you have any questions or comments about Vibrance Vs Saturation? Leave us a comment below – we would LOVE to hear from you! And PLEASE SHARE our tutorial using the social sharing buttons (we really appreciate it)!
Gayle Vehar
Lightroom Instructor
Hi!! I am Gayle. I am a wife to my handsome husband and mom to 4 beautiful kids. In my spare time, I am a photographer and blogger at Mom and Camera. I have a passion for sharing my love of photography with others. I teach local photography classes and regularly share photography tips and tricks on my blog. I hang out there a lot—I’d love you to stop by and visit!
The dispersion effect is a popular photo editing technique that creates a stunning and visually striking look by breaking up an image on one edge to appear as if it has shattered into tiny fragments. This effect adds an element of dynamism and energy to your finished photos, making them stand out from the crowd.
Creating a dispersion effect manually can be a challenging and time-consuming task. However, Photoshop actions make it easy to produce this effect with just a few clicks. These actions allow you to create a dispersion effect quickly and effortlessly, saving time and effort.
We have a collection of the best dispersion effect Photoshop actions available today, which vary in color options, opacity, texture, and other parameters. These actions provide you with various customization options, enabling you to choose the perfect one for your specific needs.
Whether you’re a designer or photographer, the dispersion effect is a great way to add a unique and creative twist to your photos. With the help of our collection, you can take your photography and designs to the next level and produce stunning, eye-catching images that stand out from the rest.
What is the Dispersion Effect?
The dispersion effect is a creative technique that gives your photos a captivating and dynamic look. It simulates the visual impact of an object or subject breaking apart into small, scattered pieces. This effect adds an element of excitement and energy to your photos, making them stand out.
To achieve the dispersion effect, photographers often use Photoshop actions. They work by separating your subject into fragments and spreading them in various directions, creating a sense of movement and fragmentation.
Whether you want to turn a simple portrait into an eye-catching visual spectacle or transform an ordinary object into an explosive burst of color and shapes, these dispersion effect Photoshop actions can help you achieve that. By using them creatively, you can give your photos a unique and engaging look that captures the viewer’s attention and tells a compelling visual story.
Dispersion Effect Actions for Designers
Dispersion Photoshop Action
First up is the Dispersion Photoshop Action. This one is super easy to use. Just brush it over the area of the photo you want to disperse, choose a direction you want the dispersion effect to go, and play the action. That’s it!
Elementum Dispersion Photoshop Actions
Another great option is the Elementum Dispersion Photoshop Actions. It works by breaking up an area of a photo that you select. You can choose from four different directions to point the dispersion effect, and it’s super easy to use and implement. Other features include ten color presets and graphic elements, and it’s fully editable.
3D Dispersion Photoshop Action
You might also want to consider the 3D Dispersion Photoshop Action. It works similarly to the other dispersion effects on this list with the addition of a three-dimensional particle effect. Select the area you want to add the effect, select a direction, and click play.
Diffusion Photoshop Action
This action diffuses rather than disperses but earns a spot on this list because it provides a similar result. With the Diffusion Photoshop Action, you can create a particle diffusion effect with just a couple of clicks. Pick from four directions and click play. And it comes with a written and video tutorial for reference.
Geometric Dispersion FX Photoshop Extension
The Geometric Dispersion FX Photoshop Extension is an excellent addition to this list. This action breaks apart an image into geometric shards, almost like broken glass, with geometric shapes floating off from the primary picture. It can be enhanced with patterns and shapes as well.
Feathers Dispersion Photoshop Action
Another solid choice is the Feathers Dispersion Photoshop Action. With just a few clicks, you can create a dispersion effect that breaks apart a section of your image into feathers. You can select from five dispersion directions and ten color presets.
Dispersion 2 Photoshop Action
Another option you might want to consider is the Dispersion 2 Photoshop Action. This one is super straightforward. Just brush it on a select area of a photo and press play. That’s all there is to it, and the result makes it look like the subject of your photo is disintegrating.
Tornadum Dispersion Photoshop Action
The Tornadum Dispersion Photoshop action is another fantastic selection you might wish to consider. Once applied to your photo, it makes it appear as though a tornado has broken up the object of the scene and sent pieces of it into a direction you specify. It also comes with ten color presets and is fully editable.
Commetum Cosmic Tail Photoshop Action
The Commetum Cosmic Tail Photoshop Action applies the same dispersion effect to your photo as others on this list but adds a fascinating light element to the mix. The dispersion here looks almost like sparks. It comes with ten color presents, graphic elements, and complete instructions as well.
Ashes n Embers Photoshop Action
This is another excellent effect you might want to try on your photos. The Ashes n Embers Photoshop Action works by creating the appearance of an explosion on an area of your photo that you select. The dispersion looks like ashes and embers drifting away from the subject of your photo. Select the dispersion direction from 10 color presets.
Pixelum Digital Pixelation Photoshop Action
Another option is the Pixelum Digital Pixelation Photoshop Action. This one has four different actions that allow you to select the direction of the dispersion, which looks like the image is breaking down into pixels. It comes with ten color presets, graphic elements, well-organized layers, and a text-file user’s guide.
Sand Dust & Powder Explosion Photoshop Action
The Sand Dust and Powder Explosion Photoshop Action offers a really interesting effect to your photos. It adds the appearance of sand or dust exploding out from a segment of your image. The result is professional, and the action comes with a written and video tutorial to help you figure out how best to use it.
The Disturb Photoshop Photo Template creates an interesting vertical line distortion to your photos. You can use it on illustrations as well, and the action itself comes with one PSD file, six shape options, and a guide that walks you through its use.
Pixels Poster Photoshop Action
The Pixels Poster Photoshop Action is another fantastic option that makes it look like your photo has burst into pixels and geometric shapes. The action has editable layers, provides multiple colors and elements, and comes with a video tutorial to help you with getting started.
Bubblum Bubble Generator Photoshop Action
You might also want to consider the Bubblum Bubble Generator Photoshop Action. Select an area of the photo you want to disperse, then play the action. This will make t appear as though a segment of your photo is breaking apart into bubbles. Select from four directions, ten color presets, graphic elements, and more.
Sandstorm Photoshop Action
The Sandstorm Photoshop Action makes it appear as though a part of your photo has disintegrated into sand. Just apply it to where you want it to appear, click play, and you’re good to go. Pick from five directions, and you can customize layers as well.
Destrukt Photoshop Action
Another option is the Destrukt Photoshop Action, which makes it look like a part of your image has exploded. Select the direction you want the disbursement to go and click play. That’s it. It comes with a video and written tutorial as well.
Explode & Shatter Photoshop Action
Explode & Shatter Photoshop Action is another fantastic choice. Once applied to your images, the graphics look like they’re shattering apart. It comes with an action file, brush file, pattern file, and a help file to make getting started with this action easier.
Magic Dust Photoshop Action
You might also want to consider the Magic Dust Photoshop Action. This one adds a sense of whimsy and playfulness to your photos. When applied, this action creates a glitter dispersion effect. The action comes with a video tutorial and a Readme file to help you in using it.
StarDust Photoshop Action
What an impact this action could make! The StarDust Photoshop Action only requires filling in your desired subject with color, selecting the effect’s direction, then clicking play. The result is a final image that appears as though it’s broken apart and left streaks of light in its wake.
Pixelated Photoshop Action
Here’s another pixelated Photoshop action that stands to make an impact on your work. Apply it to an area and play the action. The result is a photo whose subject appears to be breaking apart into pixels. It’s an excellent effect that could easily be used in various tech-focused photos.
Pixels Breaking Photoshop Action
And here’s another pixelated effect Photoshop action. This one takes the effect a bit further, and as the pixels are breaking away from your photo’s subject, they get smaller and smaller. It’s a more all-encompassing effect than some of the other pixelated options on this list.
How to Install Photoshop Actions
Download and unzip the action file
Launch Photoshop
Go to Window > Actions
Select Load Actions from the menu and go to the folder where you saved the unzipped action file to select it
The Action will now be installed
To use the newly installed action, locate it in the Action panel
Click the triangle to the left of the action name to see the list of available actions
Click the action you want to play and press the play button at the bottom of the Actions panel
Conclusion
The dispersion effect can make a bold statement in your photography. Using a Photoshop action streamlines the process, saving you time and effort. Explore our selection of actions to find the perfect customization options to enhance your photography and take it to the next level.
We hope you’ve found this list of Photoshop actions helpful. Good luck!
Instagram photos look best at 1080 pixels wide. Pinterest images shine at around 1000×1500 pixels. A Facebook photo should be at least 1200 pixels wide—1920 if it’s an event photo. In 2003, when 500px launched, the perfect web-resolution was, well, 500 pixels. Now, it’s best to upload your photos with a resolution of at least 2048 pixels.
The web is constantly evolving, and for photographers, that means regular image resizing. While you can resize your photos using a variety of quick online tools, we recommend doing it with care and precision so you don’t damage the quality of your files. Here are our tips for resizing your images without losing any details in the process.
Knowing the vocabulary
First, it’s important to understand the terms that will be used in this article.
Dimension
The dimension of a photo is essentially the measurement of its length and width. Depending on what you’re using your photo for, you may need to see this measurement in pixels, inches, or centimeters. There are many standard sets of dimensions that you’re probably familiar with; for example, your old family photo albums are probably full of standard 4×6 inch prints.
Resolution (Pixel Density)
The resolution of a photo refers to how many pixels there are within those dimensions. (Therefore, the pixel density of the photo.) The smaller those pixels, the more of them you can fit within your dimensions and, in most cases, the sharper your image will appear.
DPI and PPI
DPI (Dots Per Inch) and PPI (Pixels Per Inch) are the two terms that describe your image resolution. Although you may hear them used interchangeably, DPI refers to print resolution (as in, the number of ink dots per inch) while PPI refers to screen resolution (or how many pixels in an inch when your photo is viewed at 100%).
File Size
File size refers to how much space or memory your photo takes up. The more information there is in an image, the more memory it requires, and the bigger the file size. “Information” can refer to pixels, which means a higher resolution may give you a larger file, or it can refer to things like layers if you are saving in a non-destructive file type.
Aspect Ratio
Aspect ratio is often confused with dimension because they’re closely related. Your dimension, as we just discussed, describes the length and width of your image in terms of measurements. Your aspect ratio describes that length and width in terms of—you guessed it—a ratio. Those 4×6 inch family photos we just talked about have an aspect ratio of 3:2.
Why is resizing images important?
Resizing is a daily part of a professional photographer’s workflow. Even if you are not going to print your image, your website or online portfolio will probably have requirements for the file size and resolution that an image must be in order to be uploaded. Depending on where your image will appear, you may want to use a specific aspect ratio (a hero image will require a different aspect ratio than an Instagram post).
If you do not resize to fit those requirements, the hosting site may refuse to upload it altogether, or worse, compress or distort your photo. The process of resizing the dimensions of a photo and/or changing its resolution and file size to prepare it for the web is called image optimization.
How to resize in Photoshop for beginners
Resizing in Photoshop is a relatively simple process. Start by going to Image > Image Size.
Here you’ll see all that vocab we just covered. Your file size (Image Size) is right there at the top. Below it are your dimensions.
If you want to convert pixels to inches or need to do the opposite and convert inches to pixels, simply select a new unit of measurement from one of the dropdown menus on the right. Last is the image resolution, which is measured in PPI or DPI. In theory, you can just set these numbers however you like and click “OK.” In practice, it’s not always that easy.
Above, we’re resizing Forest Sky, a piece by 500px Contributor Kalen Emsley, as an example. You can see the “Image Size” dialogue box we just described.
Say you want to increase the resolution, so you type a new number into the resolution box.
Notice what happens below.
Resolution, resizing, and resampling
Not only has your resolution increased in the image above, but your dimensions have also increased as well. You haven’t actually increased the resolution; you’ve just expanded those pixels out. Imagine you have a stretchy polka-dot shirt. If you lay it flat, the dots are close together. If you stretch it, those dots get farther apart as the edges of the shirt extend further out. That’s how it works with pixels and resizing.
Because the resample button is checked in our dialogue box (it will usually be this way by default), Photoshop filled in those pixel gaps for us. But because your computer does not have the actual scene to compare your image to, it can only make an educated guess at what the new pixels should look like. When you resize without resampling, Photoshop will not fill those gaps; it will simply change the resolution to match your resizing.
That’s how issues like fuzziness occur when you enlarge what was originally a razor-sharp photo and because of that, it’s easier to retain good quality when you’re making an image smaller than when you are making it bigger. However, when you make an image smaller, you may be inadvertently deleting some of that pixel information, which means you might still experience a loss of quality if you try to size back up again.
Preserving image quality
In the case of this particular photo, the loss of image quality would barely be noticeable since it had a healthy number of pixels to start with. You may find yourself in a position where you have to make changes like this in order to meet an upload or printing requirement with an image, so do two things to keep image degradation from becoming noticeable to the naked eye:
1. Shoot at a high resolution This way, you give yourself plenty of information to work with in case you ever have to “fudge” the numbers on your resolution in post-processing.
2. Keep a copy of your original If you ever make a change and later discover that the quality doesn’t hold up the way it appeared to on your editing screen, you can go back to the drawing board with your original pixel density.
How to choose the right image size
When you are determining how to size your image, start with the dimensions. The first step is to use the correct unit of measurement. If you will be printing your photo, measure in inches or centimeters. This will be especially helpful if you want to mat and/or frame it, as you can simply choose a standard size like 5×7, 8×10, or 11×14 and go from there.
Remember that different standard sizes have different aspect ratios. So if your image has an aspect ratio of 3:2 (remember, that’s a 4×6 inch photo), you will experience some cropping if you resize it to an 8×10, which has an aspect ratio of 5:4.
How to choose the right image resolution
After your in-camera focus settings, your resolution is what ultimately determines the sharpness of your image. The standard for web-based images is 72 PPI (or DPI, depending on who you speak with about it), although many photographers choose to go with 300, which is the standard for a high-resolution print image.
Now that you’ve learned what to do in Photoshop to resize your images, and how to do it without sacrificing quality, you can easily resize your photography for use on the web or in print. Remember to use the correct resolution for your medium and shoot at a high resolution to allow yourself plenty of flexibility when you are ready to resize.
Not on 500px yet? Sign up here to explore more impactful photography.


 Penny H: A well written and very comprehensive guide that I thoroughly recommend.