my link Thank you notes, invitations, “great met you” notes – write them by hand and send them send and you’ll make a big impression. Anyone you connect with at a residential area event, attempt …
In terms of fitness, for a beginner, joining a gym can seem a little daunting. But if you do make the commitment to start a new exercise routine taking that first step is the hardest …
[ad_1] Camera vs. Computer It’s essential to understand the differences between JPEG and RAW image files and how those differences can affect your final product. There is a big difference between the two file types, …
[ad_1] Legend has it that Heinz Kluetmeier donned scuba gear and dove into the Olympic pool at a long-ago games and set up cameras on the bottom, wiring them so he could fire them remotely. …
[ad_1] This weekend I made a new set of square Photoshop/PSE templates with a minimal circle theme. They come with clipping masks so you can easily add your images. You can remove the decorative lines …
Photoshop offers a variety of selection tools which are all incredibly versatile and potent. However, none of these tools possess magical capabilities.
When dealing with complex or intricate subjects, achieving a PERFECT SELECTION often demands a significant amount of time and energy, regardless of the tool you use.
To help with this task, Photoshop has included a tool for this exact purpose called the Refine Edge Tool.
When to Use the Refine Edge Tool?
The Refine Edge Tool is helpful whenever you need to make intricate selections—for example, animals, people, or trees.
Whenever the edge of your subject has small details, the Refine Edge Tool will help you to do more precise work in less time.
Even for more straightforward selections, you can use the Refine Edge Tool. For example, to remove the fringe that often remains on selected subjects.
This type of work is needed whenever you want to make a cut-out, a collage, or a photo composite.
Where to Find the Refine Edge Tool?
If you use Photoshop CS6, you can find the Refine Edge button on the Options bar (at the top of the canvas) whenever you use a selection tool. Alternatively, you can go to the menu Select>Refine Edge or use the keyboard shortcut CMD+Opt+R (Mac) or CTRL+Alt+R (PC).
If you use a CURRENT VERSION of Photoshop, you will need to enter the Select and Mask Workspace. To do this, click the Select and Mask button on the Options bar of any selection tool. You can also access it through the menu by going to Select>Select and Mask.
From there, go to the toolbar on the left and click on the second icon, the Refine Tool. You can also click the “R” key on your keyboard as a shortcut.
Quick tip: If you want to open the Refine Edge panel like the one from CS6 while using a CC (Creative Cloud) version, go to Menu>Select. Then, hold the Shift key while you click on the Select and Mask option from the menu.
What are the Refine Edge Settings?
The Refine Edge Tool has multiple settings that will help you to make a more precise selection. Let’s review some of the important settings:
View Mode
The first setting you can change is the View Mode. This will help you to see more clearly what your selection looks like and the adjustments you make with the Refine Edge Tool.
Here are some of the Refine Edge View Modes you can select:
Marching Ants: In this mode, the selection shows the standard animated dashed line border that appears around the selected area with the image still visible.
On White: This mode displays the selection against a white background. It helps you assess the edges of your selection more clearly, especially if your subject has dark or complex edges.
On Black: Similar to the “On White” mode, this mode presents your selection against a black background. This mode can be useful for evaluating light or intricate edges.
Overlay: The Overlay mode superimposes a red overlay on your image, indicating the areas that are included in your selection. This mode can help you identify areas that need further refinement.
On Layers: In this mode, the selection is displayed against the original layers of the image. This is helpful for understanding how your selection interacts with the rest of the composition.
Depending on the mode that you choose, there may be additional options. For example, you can change the color and adjust its opacity if it’s a view that includes an overlay mask.
Refine Modes
These edge Refine Modes are ONLY available when using the Refine Edge Tool INSIDE the Select and Mask Workspace and are used by Edge Detection, Refine Hair, and the Refine Edge Brush Tool.
Color Aware: Use this option for simple and contrasting backgrounds.
Object Aware: Use this option for hair and fur on busy backgrounds.
Edge Detection
Within the Edge Detection settings, you can adjust the Radius. This defines how many pixels around the edge will be considered by the Refine Edge Tool.
Keep in mind that enabling the Smart Radius option gives Photoshop the autonomy to decide the radius. It will use a bigger radius for complex edges and a smaller radius for simple edges.
When you enable or disable this option, you won’t see any changes unless you start brushing over the selection with the ACTIVE Refine Edge Tool.
Global Refinement / Adjust Edge
Inside the Select Mask workspace from Photoshop CC, you will find these settings on the Global Refinement Panel.
In Photoshop 6’s Refine Edge panel, this section is called Adjust Edge. They work in the same way regardless of which panel you are using.
These settings will affect the selection as you move the sliders WITHOUT manually going over the edge.
Smooth: As the name indicates, this slider makes the selection edges smoother or sharper.
Feather: This slider softens the edges making a smoother transition.
Contrast: This slider increases the contrast of the selection creating harder edges.
Shift Edge: This slider expands or contracts the edges of the selection.
Output Settings
The Refine Edge Tool provides various output settings that allow you to select how you want to use your refined selection. For example, how the selection is displayed, saved, or applied within your workflow.
Here are some of the more common Output Settings:
Output To: Here, you can tell Photoshop how to apply the selection you just made. You can have it on a different layer, as a layer mask, etc. Use the drop-down menu to select the option that works best for you.
Decontaminate Colors: Enabling this option helps eliminate any color cast caused by the background. If enabled, you can use the slider to determine its strength.
How to Use the Refine Edge Tool
Now that you know what the Refine Edge Tool is, where to find it, and are familiar with the various settings, let me show you how to use the Refine Edge Tool on an example subject:
1. Select the Subject
For your initial selection, you can use the selection tool of your choice, including the Quick Selection tool, Lasso tool, Magic Wand tool, Marquee tool, Object Selection tool, etc. The choice should depend on your skill level and the type of selection you want to make.
For this example, I used the Object Selection Tool. It successfully isolated the tree, but the edges were far from perfect, not just around the tree but also between the branches and leaves.
This is a situation where the Refine Edge Tool can save you a lot of time and effort. So, click the Select and Mask button on the top to launch its workspace.
2. Choose the Refine Mode
Next, choose the Refine Mode you want to use. I chose the Object Aware mode for this example, despite Photoshop’s recommendation to use it with hair and fur. This is because the leaves in this image create an intricate pattern that’s just as complex for the algorithm as hair would be.
Step 3. Choose the View Mode
Next, choose the View Mode that’s more comfortable for you or the one that works best for your particular image. I like to use the Overlay to see where I need to brush over with the Refine Edge Tool.
Then, typically switch to Black and White mode to check my work and adjust the settings. But these are personal choices.
You can cycle between View modes by pressing the F key on your keyboard and choosing the View Mode that works best for you.
Step 4. Apply the Refine Edge Tool
Next, we will use the Refine Edge Tool. Make sure the tool is active by clicking on the second icon on the toolbar. You can also activate it by pressing the R key on your keyboard.
Define the number of pixels using the Radius slider. You may also enable the Smart Radius option if you want.
Then, click and drag the mouse around the edge of your selection to refine it. I find it’s better to do small bits at a time. However, this depends on the complexity of your selection and how powerful your computer is.
Step 5. Adjust Global Refinements
There aren’t any precise instructions for this step, as it will be different for each selection you make.
Simply drag the sliders until you find the right balance. I like to use the Black and White View Mode to make these adjustments. Then, I review them in two or three DIFFERENT View Modes to ensure the selection is as precise as possible.
You can also enable and disable the Decontaminate Colors option to see if it improves your selection.
Step 6. Choose the Output
When your selection is ready, you can decide how you want Photoshop to output it from the Select and Mask workspace into the standard workspace.
Your selection will depend on the editing work you are doing. For example, outputting the selection on a new layer is helpful if you want to add a new background. Also, using a mask allows you to work non-destructively.
For this example, a New Layer with a Layer Mask is best.
You might also want to use it in a different document or just as a selection. The choice is yours.
Once you’ve chosen your output option, click OK, and you are DONE.
Conclusion
Doing precise selection work on intricate subjects is one of the most challenging skills to master. Thanks to the Refine Edge Tool, you can do them so much easier!
You will likely need some practice to get the hang of this tool, but it’s totally worth it. Give it a try, and let us know how it goes!
Do you have any questions or comments about How to Use the Refine Edge Tool in Photoshop? Leave us a comment below – we would LOVE to hear from you! And PLEASE SHARE our tutorial using the social sharing buttons (we really appreciate it)!
Game-changing AI Hacks Every Portrait Photographer Should Know
There’s a ton of buzz out there when it comes to AI infiltrating the photography industry. Some photographers are adamantly against using AI in their work, calling it fake or cheating. But the truth is, this disruptor is here to stay, and while it might feel nice at the moment to side with the ‘never-AI-ers,’ you’ll end up regretting your resistance to it in the long run.
I, too, was cautious in the beginning since I’m primarily a portrait photographer, and no photographer can compete with an AI generated corporate headshot for $30 bucks. So I definitely understand both sides. But in this article I’m going to highlight some of the amazing ways photographers can use this new tech to their advantage, in their portrait sessions.
Adobe has officially released their AI image generating engine (Adobe Firefly) into Photoshop. In my other business, I teach Photoshop. This allows me to beta test for the company, so I’ve been exploring this new tech for a few months now. And… it’s amazing. Tasks that used to take me half an hour to complete now take a few seconds.
Tip 1: The Dreaded Fly-Away Hair Cleanup
Gone are the days when I used to have to spend hours painstakingly retouching out each individual stray hair from a portrait. Now, I let Photoshop’s AI do that grunt work. I start by making a selection around the edge of the hair, and then use the prompt area in the Contextual task bar to input a phrase like “remove fly away hairs, clean polished hairline.”
The generative fill then gives me three variations to choose from (within the Properties window) and all I have to do is simply pick the one I like best. Here is the before and after of the one I chose as the final.
And the magic doesn’t stop there. I wanted to see if the AI could reduce cross hairs which make hair look frizzy in some instances. So I tried it and to my astonishment it worked. I circled the affected area, imputed the prompt “remove frizz,” pressed the generate button and was astonished by the results.
This type of work used to consume my time worse than mistakenly stepping through the Narnia wardrobe portal. And now it can be done within seconds. These are the types of tasks you can easily use AI for when you’re a portrait photographer.
Tip 2: Reconstructing Parts of Your Subject
Often, in an effort to make my subject feel closer to the viewer, I’ll slightly crop off the top of their heads in the images. This gives the viewer the feeling that the subject is closer to them than if their head were intact. It’s a tried and true method many headshot photographers have used over the years. But every so often I get a reply from a client asking me to put the top of their head back in. In the past this would have required me to go back to the files in my archives, find the certain look/outfit that client was wearing in the chosen frame, find a nearby shot that had the top of their head in the photo and then manually try to align both images and blend them.
Now, thanks to AI, it’s as easy as using Generative expand.
All you need to do is activate your crop tool, then make sure your Fill option in the top settings bar is set to “Generative Expand,” drag the canvas out, hit the crop check mark, and viola! The top of the head has been constructed for me within seconds. Another instance where AI has saved me 20 minutes of work.
This also works for arms and shoulders that may have been inadvertently cropped out of the shot during a headshot session. Reconstructing these parts of a body is easy-peasy for Photoshop’s Adobe Firefly.
Tip 3: Easily Remove Glare from Glasses
This is something I’ve learned how to avoid over years of trial and error in camera. But trust me when I tell you these techniques were not learned overnight. Thankfully generative AI can help with this too, and with a much faster learning curve.
Make a selection around each set of reflections, and simply click generate. The AI will do it’s best at matching the color, contrast, lighting and surroundings of your image while generating your fix.
For this, you can either choose to leave the prompt field blank, or input what would be generated behind the reflection.
I find that doing this in chunks gives you a better result. So do one section of the reflection, then repeat the same steps until all the reflections are gone.
Remember that you have three options to choose from each time so make sure you choose the best result for each area. Here are the results after I completed three generative fills to remove all the reflections:
WARNING: Make a note NOT to select the subject’s iris in your selection. If you do so, you’ll generate a new iris which will not represent the person you’re photographing and will make the portrait unauthentic.
In closing, AI doesn’t have to be scary… at least not yet. So why not use it to make your life easier as a photographer. Using these tips while you retouch your portraits can save you tons of time and increase your productivity tremendously.
For more Photoshop training, please visit Kristina’s YouTube and Instagram pages. And for more of her portrait work, visit KristinaSherk.com.
As part of completing our Nikon Zf review, we’ve run the camera through our standard test scene, to see how it performs.
As usual, this means it can now be selected from within other reviews, so you can compare it to the cameras of your choosing.
The Zf is based around a 24MP full-frame BSI CMOS sensor which has to crop in to a 1.5x crop to deliver its highest-speed 4K/60p video footage. Those are very familiar specs, shared with the existing Z6 II and the likes of Panasonic’s S5 models, so it probably shouldn’t come as unexpected that the Zf’s image quality holds no great surprises.
It captures a good amount of detail and, with its dual conversion gain sensor, the performance both at moderately high and very high ISO is very good.
Nikon’s default JPEG sharpening is very large radius, so it appears to be capturing less detail than its peers (even though we know from the Raws that this isn’t the case). Color exhibits standard Nikon response with lots of punch and saturation. Yellows are vibrant with no green or orange tint but the pink closest to a generic caucasian skintone is notably brighter and more pink than either the Sony or Canon renderings.
The Zf’s noise reduction at high ISO smooths away noise pretty well but takes a lot of the fine detail with it. Up against the likes of Sony, which applies context-sensitive noise reduction, the Nikon’s output can seem a little soft in low light.
Buy now:
Gear in this story
DPReview Silver Award
90%
DPReview readers have spoken: after two rounds of voting, it’s time to announce the winner of our 2023 Reader’s Choice Product of the Year award, along with a couple of honorable mentions. Find out which cameras and lenses topped the list!
Plenty of amazing cameras, lenses, accessories and other products came through our doors in 2023. After careful consideration, healthy debate, and a few heated arguments, we’re proud to announce the winners of the 2023 DPReview Awards!
What’s the best camera for travel? Good travel cameras should be small, versatile, and offer good image quality. In this buying guide we’ve rounded-up several great cameras for travel and recommended the best.
‘What’s the best mirrorless camera?’ We’re glad you asked.
What’s the best camera for around $2000? This price point gives you access to some of the most all-round capable cameras available. Excellent image quality, powerful autofocus and great looking video are the least you can expect. We’ve picked the models that really stand out.
Sony updates the ZV-1, giving the vlog-centric compact camera a 18-50mm equivalent F1.8-4.0 lens that’s now wide enough for less cramped selfie mode videos.
OM Digital Solutions has updated its flagship high speed camera just two years after launch. The latest version includes more memory and some performance and handling tweaks.
The Fujifilm XF 23mm F2 R WR delivers a 35mm full-frame equivalent field of view and stands out due to its small size and weather-resistant build. However, it faces stiff competition from lenses with faster F1.4 apertures. In this review, we tell you what you need to know about this popular lens.
The EOS R100 is the cheapest way to get into Canon’s RF-mount system. But, as the saying goes, you get what you pay for, since its older components make the R100 feel dated.
The Sony a9 III is the world’s first full-frame mirrorless camera to feature a global electronic shutter with simultaneous readout. We’ve been using a full production version of this 120 fps sports camera, to see what you gain (and, perhaps, lose).
If you want a compact camera that produces great quality photos without the hassle of changing lenses, there are plenty of choices available for every budget. Read on to find out which portable enthusiast compacts are our favorites.
What’s the best camera for travel? Good travel cameras should be small, versatile, and offer good image quality. In this buying guide we’ve rounded-up several great cameras for travel and recommended the best.
‘What’s the best mirrorless camera?’ We’re glad you asked.
What’s the best camera for around $2000? This price point gives you access to some of the most all-round capable cameras available. Excellent image quality, powerful autofocus and great looking video are the least you can expect. We’ve picked the models that really stand out.
Above $2500 cameras tend to become increasingly specialized, making it difficult to select a ‘best’ option. We case our eye over the options costing more than $2500 but less than $4000, to find the best all-rounder.
Procreate is a powerful digital art tool designed specifically for the iPad. It offers a range of creative features that allow artists and designers to create professional-level artwork on the go. One of the key features of Procreate is its brush engine.
Brushes are digital tools that mimic traditional brushes used in various mediums, such as paint, ink, markers, and pencils. These brushes can be customized to mimic various textures, shapes, and patterns, allowing artists to create unique effects in their artwork.
Procreate’s brush engine, called Brush Studio, allows users to create and customize their own unique brushes. This feature allows artists to create brushes that fit their individual style and workflow, making Procreate a powerful tool for creating professional-level artwork.
Using brushes in Procreate is easy. Simply select a brush from the brush library and start drawing or painting on the canvas. The pressure sensitivity of the Apple Pencil allows for natural-looking brush strokes and a more tactile experience. Additionally, brushes can be resized, rotated, and adjusted for opacity and flow to achieve the desired effect.
Procreate brushes can be used to create a wide range of artwork, including illustrations, comics, and concept art. Artists and designers in various fields, such as graphic design, fashion design, and product design, can benefit from using Procreate brushes to create digital mockups and designs.
We’ve curated this collection of free Procreate brush sets to help artists and designers add even more complexity to their digital artwork. The best part about these Procreate brushes is that they’re free, so you can experiment with different styles and techniques without any financial risk.
If you’re new to Procreate, you might like this collection of tutorials to help you get started.
What Are the Benefits of Using Procreate Brushes?
Using Procreate brushes offers several benefits that can enhance your digital art and illustration workflow. Here are some advantages:
Diverse Styles: Procreate offers a wide variety of brushes, each designed to replicate various traditional art materials and styles.
Creative Flexibility: With a diverse range of brushes, you have the creative freedom to experiment with different textures, strokes, and effects.
Time Efficiency: Procreate brushes save time by providing ready-to-use tools that mimic real-world media. You can achieve complex textures and effects with a single brush stroke, reducing the need for extensive post-processing.
Customization: Many Procreate brushes are customizable. You can adjust settings such as brush size, opacity, spacing, angle, and more to create brushes that suit your specific needs and artistic preferences.
Consistency: By using a consistent set of brushes across your artwork, you can maintain visual coherence and create a portfolio with a unified aesthetic.
Detail & Realism: Specialized brushes can add intricate details and realistic textures to your artwork, enhancing the quality and depth of your digital creations.
Expressive Strokes: Procreate brushes respond to pressure and tilt sensitivity, allowing you to create expressive and dynamic brush strokes that add depth and emotion to your art.
Layering & Blending: Brushes with unique blending properties can help you achieve seamless color transitions, shading, and blending in your digital paintings.
Community Sharing: Like the collection we have for you above, many artists share their custom Procreate brush sets. This community-driven sharing allows you to expand your brush library and learn from other artist’s techniques.
Procreate brushes offer a versatile and efficient way to create digital art with various styles and effects. They save time, enhance realism, and provide endless opportunities for creativity and artistic expression.
Texture Effect Procreate Brushes
Texture brushes add texture and depth to artwork, simulating various surfaces like watercolor paper, canvas, or sandpaper. They can be used to create realistic textures in digital art.
Procreate Grain Brushes (Free)
These free Procreate brushes are precisely what they sound like: brushes that add graininess to your work. These speckled, dusty-looking brushes can be used to add texture or age to a project.
Very Dry Gouache Brush for Procreate (Free)
The Very Dry Gouache Brush lives up to its name. This brush offers a super dry texture that makes every single brush stroke visible. This can be a great thing if that’s the artistic style you’re going for. Plus, it reveals different textures depending on how hard you press.
Geometry Brushes for Procreate
This collection of geometry brushes includes 34 different brushes that make it easy to add shapes, design motifs, and patterns to your work. They could even be used creatively for shading.
Cardboard Procreate Brush (Free)
This free cardboard Procreate brush has a semi-streaky look that can be used for various lettering projects, from signs to business cards to logos.
Distressed Wall Procreate Brushes (Free)
Distressed Wall is a free Procreate brush for adding a chalky-style texture to your designs. Perfect for illustration backgrounds.
Hair & Fur Procreate Brushes
Hair and fur brushes can help artists and designers create realistic textures in their digital artwork, such as animal fur, human hair, and other textures. By using these brushes, artists can achieve a more organic look in their designs and illustrations, bringing their creations to life.
HairBrush Set for Procreate (Free)
If you want to draw realistic hair in Procreate, you will greatly benefit from this free brush set. With them, you can create straight or curly hair and achieve a variety of textures.
Fur Brushes for Procreate (Free)
In this collection, you will get four free Procreate brushes (including thin, harsh, ski, and ranged) that you can use to create fur or hair and also add texture to other types of art.
Stipple Effect Procreate Brushes
Stipple effect brushes enable you to add shading, depth, and intricate textures to your digital art. Perfect for portraits, backgrounds, textures, and unique effects.
Stippling Brush Set (Free)
This Stippling brush set consists of 17 brushes, including nine stipple brushes, three liner brushes, and five texture brushes. These multi-faceted brushes can be used for just about any project you work on.
Eclectica Stipple Brushes for Procreate
The Eclectica brush set has been inspired by the retro style from the 1970s and added a touch of pop art to give you a collection of Procreate brushes you can use to create something unique. There are a total of 18 stroke and stipple brushes in the pack.
Stipple Procreate Brush Pack (Free)
This free stipple brush set for Procreate can be used for generating an authentic stippling effect, making it ideal for enhancing shading.
Cloth & Textile Texture Procreate Brushes
These cloth brushes mimic various fabrics, helping to add texture and depth to your digital art by giving them a more tactile and organic look. They can be especially useful in creating clothing designs, home decor designs, and other projects that may involve fabric.
15 Textile Factory Procreate Brushes (Free)
This free set of Procreate brushes includes 15 swatches of varied cloth or textile patterns that you can use to add texture to your paintings.
Bristle Brush Linen (Free)
This free Procreate brush features a natural bristle brush for creating the look of brushstrokes on a linen canvas. It also uses the wet blending feature in Procreate to mimic a realistic painting experience.
Watercolor Procreate Brushes
Embrace the fluidity of traditional painting techniques, and awaken your artistic spirit and craft masterpieces effortlessly, with the touch of these free watercolor brush.
Wet Media Brushes for Procreate (Free)
Here’s a collection of 48 (yes, you read that correctly) brushes for Procreate that let you mimic wet media. There are too many watercolor effects to name here, so you’ll definitely want to download it for yourself.
Collection of Procreate Brushes (Free)
A small collection of Procreate brushes that will add texture and personality to your artwork. This set includes six brushes, including two Gouache, two oil paint, and two watercolor brushes. Each performs beautifully and are solid brushes to have in your kit.
Painting Effect Procreate Brushes
Painting brushes simulate the look and feel of traditional paintbrushes and can be used to create paintings with various textures and effects. They can be used for digital painting, from realistic oil paintings to more stylized illustrations.
Oil Paint Procreate Brushes (Free)
This set of five oil paint brushes have been created to look and function just like real oil paints. The collection includes True Oil, Small Liner, Bristle Brush, Super Wet, and Legacy Smudger.
Pro Painters Procreate Brushes
The Pro Painters brush set contains 31 brushes, all perfect for adding light paint or pencil textures to typography and illustrations.
Matt’s Painting Procreate Brush Set (Free)
Matt’s Painting Set is an all-purpose brush set for those using the gouache painting style. Add fine lines, texture, grit, or even airbrush effects with this free set.
Art Brushes for Procreate
This collection of art brushes includes 21 different brushes for imitating real painting techniques, and they naturally have both wet and dry looks.
Bookshelf Brushsets for Procreate (Free)
This free set of nine brushes will allow you to quickly paint a selection of books on a bookshelf. You can also use these brushes in Photoshop CC and Clip Studio Paint.
Tears Brushes for Procreate (Free)
This free brush set will let you quickly add various types of tears to your art. You can also use these brushes as small splashes or splatters.
Milk Brushes for Procreate (Free)
While milk may not be at the top of most people’s list of required brushes, this free collection will allow you to add various types of splatters, splashes, and drops to your artwork.
Jingsketch Basic Procreate Brushes (Free)
This collection of ten basic brushes is perfect if you’re starting out using Procreate. These versatile brushes can be used in a multitude of ways.
Procreate Swatches
This collection of swatches aren’t brushes per se, but they are still extremely useful for creating artwork in Procreate. With these, choosing colors should no longer be an issue.
Nature Effect Procreate Brushes
These brushes can be used to create a variety of natural effects, including leaves, grass, clouds, and water. They are handy for creating landscape designs, botanical illustrations, and other projects that require a nature-inspired touch.
Nature Stamp Brushes for Procreate (Free)
This free Procreate brush set will allow you to rapidly speed up the process of painting landscapes. You will get stamps for flowers, foliage, grass, leaves, rock, ivy, trees, and even glowworms.
Natural Brushes for Procreate
Here’s another set of brushes for Procreate that center around nature. This natural brush set includes 20 brushes and consists of pencils, chalks, and shaders.
Flora Vegetation Brushes for Procreate (Free)
The Flora Vegetation Brushes is a massive set with a whopping 91 brushes! All of these brushes are designed to mimic the textures, weights, and tone of things you’d find in nature—a must-have for creating nature scenes or even drawing backgrounds.
Rain Stamp Brushes for Procreate (Free)
This pack of free brushes will allow you to add various types of textured rain to your artwork to give them a moody, atmospheric look and feel. There are 25 free brushes in the set.
Floral Stamp Procreate Brushes (Free)
The Free Floral Stamp brushes consist of five different brushes that help you capture the look of petals, leaves, vines, and more.
Comic & Cartoon Effect Procreate Brushes
These brushes mimic the look and feel of traditional comic art styles. They can be used to create various effects, including ink lines, halftone dots, and speech bubbles, allowing you to create unique and engaging comic and cartoon artwork.
Comic Ink Brush Set for Procreate (Free)
The Comic Ink Brush Set for Procreate includes 16 inking and SFX brushes for creating comic books from scratch. From fine liners to gradients, you have everything you need here to get started.
Comics & Halftone Procreate Brushes
The Comics and Halftone Procreate Brushes offer up those brushstrokes that have become so synonymous with comic books. They can be used to add the look of real paper or brush strokes — like hash lines, for instance — to a drawing.
Anime Bokeh Procreate Brushes (Free)
Here’s a collection of 7 anime bokeh brushes that are certain to add flair to your next drawing. And they can be used in several ways to achieve different effects depending on the layer style you use.
Lettering Procreate Brushes
These brushes can be used to create a wide range of lettering effects, including calligraphy, graffiti, and retro styles. You can add a unique and personalized touch to your designs, creating custom lettering and typography for logos, titles, apparel, and other projects.
Banner Wave Calligraphy Procreate Brush (Free)
Banner Wave is a free Procreate brush set for creating textured and bold hand-drawn lettering and calligraphy.
Procreate Lettering Brushes for Procreate (Free)
Crafted for typography lovers, this free textured brush for Procreate transforms every stroke into calligraphy art. Elevate your digital lettering journey, blending tradition with modernity.
Graffiti Brush Pack (Free)
Unleash your inner street artist with the free Graffiti Brush Pack for Procreate! Dive into a world of urban expression, mastering street art’s essence with brushes that capture every drip, tag, and wall wonder.
Stripe Procreate Brush (Free)
Stripe is a single brush that’s well worth the download. It’s a smooth calligraphy or lettering brush, and it responds to pressure and layering—a fantastic choice for adding a script typography to your work.
Fire & Ice Brushes for Procreate (Free)
Created by Kelly Sikkema, this free Procreate brush is perfect for creating beautiful typography on a dark background.
Lettering Procreate Brush Set (Free)
This is a nice collection of lettering brushes that are a bit unusual and honestly appreciated. There’s a shrub brush, a wood grain brush, and even a worm brush!
Pencil & Pen Effect Procreate Brushes
Pencil, pen, and ink brushes simulate the look and feel of traditional inking tools, such as brush pens, dip pens, and technical pens. They can be used for line art, illustrations, and comics.
Pencil Brushes for Procreate (Free)
Another great free Procreate brush set are these grain pencil and Copic marker sets. They mimic the look and feel of real pencil strokes and real lines drawn with a Copic marker — the latter of which manages a level of buildable coverage that is stunning.
Procreate Pencil Brushes (Free)
A free set of pencil brushes that are perfect for both adding texture to an item and drawing. There are a total of 24 unique brushes in the set.
Ink Procreate Brushes & Textured Paper (Free)
Whether sketching, lettering, or embellishing intricate details, this ink brush expertly emulates the traits of authentic ink, accommodating diverse line widths, shading, and textures effortlessly. The download also includes textured paper.
Procreate Ballpoint Pen Brushes (Free)
The Ballpoint Pen brush mimics the look of a real ballpoint pen, offering fine strokes that you can layer to build shadows and contrast by applying greater pressure and through the use of hatching.
Marker Brushes for Procreate (Free)
Need marker brushes? This set offers two options: an opaque marker and a variable opacity marker. They offer irregular coverage that looks more natural.
Liner Procreate Brushes (Free)
Cheap Fine-Liner Brush for Procreate (Free)
The Cheap Fine-Liner Brush is a recreation of a 0.6 technical pen. It’s precise and allows you to create fine-line drawings or to fill in tiny details—a great addition to any brush collection.
Pencil, Inking & Painting Basic Brush Set for Procreate (Free)
The Pencil, Inking, Painting Basic Brush Set consists of 7 brushes for creating comic art from scratch. It’s got all you need to conceptualize a piece from the sketch phase through painting.
Pixel Art Procreate Brushes
These Procreate brushes allow you to create authentic pixel art with precision. You can craft detailed sprites, game graphics, and nostalgic artwork seamlessly. Unlock pixel-perfect creativity using these specialized brushes.
Pixel Art Procreate Brush Set (Free)
Create your own pixel art using this free Procreate brush set. This download package includes four unique brushes, three pre-configured canvases, and an informative user guide to swiftly launch you into the world of pixel art creation.
Constellation & Sky Procreate Brushes
These incredible brushes mimic elements of the night sky, including stars, planets, and other celestial bodies. These brushes can be used to create a variety of effects, including constellations, galaxies, and auroras.
Bright Sky Brushes for Procreate (Free)
While this premium set includes 49 constellation brushes, you can download the free trial of four brushes for personal use.
Constellation Brushes for Procreate (Free)
With this free Procreate constellation brush set, you can add depth and atmosphere to your art. The set also includes free zodiac signs.
How Do You Import or Install Brushes in Procreate?
Importing brushes into Procreate allows you to expand your creative toolkit with new textures and effects.
Remember that the process of importing brushes into Procreate might vary slightly depending on your device and the method you choose.
Here’s how to import brushes into Procreate:
Download Brushes: Find and download the Procreate brush files (usually in .brush or .brushset format) from the collection above.
Locate the Brush Files: Once downloaded, locate the brush files on your device. You might find them in your Downloads folder or wherever you saved them.
Transfer Files to Procreate: Upload the brush files to cloud storage services like iCloud, Dropbox, Google Drive, or others. Then, open the cloud storage app within Procreate and import the brushes. Or you can simply use AirDrop.
Import Brushes in Procreate: Open Procreate on your device. Tap the + button on the top right corner of the Brush Library to open the Add panel. Choose Import to access the import options.
Select Brush Files: Navigate to the location where you saved the brush files and select the brush files you want to import.
Confirm Import: Procreate will display a preview of the brushes you’re about to import. Review them and tap Import.
Organize Brushes (Optional): After importing, you can create custom brush sets and organize your imported brushes for easier access.
Start Using Brushes: The imported brushes will now be available in your Brush Library. Simply select a brush to start using it in your artwork.
Can You Use Photoshop Brushes in Procreate?
While using Photoshop brushes in Procreate is possible through conversion, it’s important to note that each program has its own brush engine and settings. This can lead to variations in how brushes behave and respond.
You could use a third-party tool or app to convert .abr files to .brush files, which Procreate can read. One such tool is abrMate for Windows
To fully leverage Procreates capabilities, though, consider exploring its native brushes and taking advantage of the brushes that have been optimized for the app.
Frequently Asked Questions (FAQ)
Why Use Brush Sets in Procreate?
Brushes can dramatically change the style and feel of your artwork. They allow for more creativity and help you achieve various effects, from realistic textures to quirky patterns.
Are These Brush Sets Really Free?
Yes, the ones we’re focusing on are totally free. Just be sure to check if there are any specific license guidelines for use.
Can Beginners Use These Brush Sets Easily?
These brush sets are great for beginners because they offer many effects and styles to experiment with, making the learning process more fun and diverse.
Do These Brushes Work on All Versions of Procreate?
Most brushes work with different versions of Procreate, but it’s a good idea to check their compatibility with your version, especially if it’s older.
Can I Use These Brushes for Commercial Projects?
Many free Procreate brushes are fine for both personal and commercial projects. However, it’s always wise to review the usage terms set by the brush creator, as some might have specific requirements or limitations.
Are These Brushes Customizable According to My Needs?
Procreate allows you to customize brushes. You can adjust settings like size, opacity, and flow to suit your specific requirements.
Do These Free Brushes Work for Different Art Styles?
Absolutely! There’s a wide variety of brushes available that cater to different art styles, from realistic painting to cartoon and manga.
How Can I Tell Which Brush Set is Right for My Project?
Consider the style and texture you want to achieve in your project. Experiment with different brushes to see how they complement your artwork.
What Makes Procreate Brushes Different from Other Digital Art Software Brushes?
Procreate brushes are specifically designed to take advantage of Procreate’s unique features, such as Apple Pencil pressure sensitivity and tilt functionality.
Conclusion
Now that you’ve had a chance to browse this collection of free brush sets for the Procreate app, hopefully, you’ll have either already downloaded a few or have put together a nice shortlist to revisit.
These free brushes make adding precision or texture to your work easy without creating designs from scratch. Plus, they add an extra dimension to your work needs without adding cost. All in all, this is a solid collection of Procreate brushes that can be used in various types of art.
It’s always a good idea to read any license agreements or terms and conditions before using these Procreate brushes in your commercial work, to ensure you’re following the rules and not infringing on any copyrights.
Pura Vida is the watchword of the people of Costa Rica. “Pure life.” It springs, I feel from the boundless beauty of the place, and sense of renewal the sun and the rain bring, the two gorgeous sweeps of coastline, east and west, framing one of the truly serene and magical places on earth–the Cloud Forest. Couple all this resplendent nature with the warm hearted people of Costa Rica, and it is a place that compels visitation, especially visitation with a camera.
What better place for a workshop, a new one for us, called: The Coast to the Clouds. A memorable adventure with friend and fellow Nikon Ambassador, Tamara Lackey. And we did go from the coast to the clouds! Thanks to Tamara, we also made it a must-see to find sloths in the wild – and we did with our expert guides at Jacamar. We started in San Jose at the Gran Hotel Costa Rica, which was a great jumping off point. Super nice folks, and within easy distance of the blue of the Pacific. A gorgeous opening dinner at Restaurante Grano de Oro was a perfect kickoff.
A note of thanks to our photographers. For Tamara, Annie and I, they were awesome! They took the sun, and the rain, in stride, always working hard and being open to new experiences, techniques, trying different gear, and hiking in the very humid rain forests. Looking for lizards, frogs (colorful, poisonous frogs!) and also helping one another often to make great pictures. Lucky to travel and explore with such a congenial group. They were fearless in terms of trying new things, showing the group their successes and mistakes, and supporting each other.
Rain is a fact of Costa Rican life. Bad weather makes for good pictures, someone once said, but then again, constant deluge dampens lenses and spirits. But photographer’s luck was with us. We dodged some serious predictions of nonstop rain in the month of October! We scouted last year in late September, and listened intently to our incredibly knowledgeable local guides and thought the pros of going last month outweighed the cons. Lush forests and greenery. Active animal life. More local life and fewer tourists. Annie was talking regularly to someone up in the clouds, as we had great weather.
We settled on the plan of “Coast to the Clouds” because there’s so much to see. How can you go there and not see the beaches? How can you go there and not visit the rain forests and the Cloud Forest? All are imperatives, especially photographically. We journeyed to Alma del Pacifico Beach Hotel & Spa located on the Pacific Ocean first. And, it’s really on the ocean. Beachfront, not beach view or near the beach, and we had it all to ourselves. No other guests. Spilled out of the room (or the bar) right onto the beach. Can’t say enough positive things about this place. The color is off-the-charts. And the staff at Alma were champs, knowing they had a hotel filled with photographers who were seeking the light. They made breakfasts early, and we got into the field with the sun.
Bonus of taking over the place is we set up an equipment depot in the lobby. Huge thanks to our friends at Profoto for the lighting kits! Our photographers were universally stunned at the simplicity and quality of the light we could bring to bear. Fantastic to be able to outfit groups to then charge onto the beach, set up at the pool or beach bar, and use any of the wild interiors as tropical backgrounds. And a thank you shout out to the intrepid Steve Lackey, who shot a lot of the BTS snaps you see here on the blog, and in general was super helpful to all, pulling and hauling gear!
Another big reason to set up camp at Alma was the close distance to the National Parks. We had a great morning on the Tarcoles River for a private wildlife/bird photo excursion worked out by Jacamar Tours and Nature Group Costa Rica, then hiked in Carara National Park.
Photo by Ashley Garrett
Thence to the mists and beauty of the Cloud Forest! El Silencio Lodge & Spa is one of the most beautiful, luxury properties I’ve ever visited. It isn’t just a place to stay. It connects to the soul of the traveler. It is serene. Quiet. You can hear the call of the birds as you walk from your room in the morning to literally one of the best breakfast menus ever. You eat with the soul-healing sound and a view of a rushing mountain stream. We had the place all to ourselves. No other guests. And the bar looks to be a place Hemingway might have penned a novel.
Our bird photographers were loving the Hummingbird Garden and got phenomenal pics. Staff again could not have been more helpful and friendly at El Silencio. Our model shoot day was a crazy, fun morning spread out all over the property (basically like a big playground) and they supported all of it!
Photo by Ashley Garrett
We liaised with Nature Group Costa Rica (operated by Randall Ortega Chaves) which has an excellent team of experienced guides who specifically customize tours for photography and not the basic side-of- the-road, here’s the pretty vista tourist outing. Huge difference. Randall is incredibly knowledgeable about the wildlife and the Tarcoles River, and is a passionate, wonderful photog in his own right. Great day on the River and Rain Forest with him and his team, and the terrific guides at Jacamar.
I mentioned above the wonderful people of Costa Rica and how welcoming the place is. Very true. We made lifelong friends there. Photographer and videographer Jairo Rojas joined us for a few days and was invaluable. What a hardworking, talented photog! He constantly circulated with our group, holding lights, explaining menus and just generally being part of the glue that kept us all shooting and laughing. Jairo was especially helpful on our lighting days. Which of course brings me to our models! At Alma on the Pacific, and at El Silencio in the clouds, our separate, unique crews of models ran, leaped, posed and partnered with us in magnificent fashion. A dozen models, hair and makeup, on different days of lighting instruction, again, in one of the most beautiful places on earth.
Speaking of gorgeous, the Jardín Else Kientzler is a lush botanical garden in Sarchi that hosted us and colorful dance troupes who performed dances and afterwards posed for natural light portraits. A perfect break on our travel day north – got to experience local culture and make pics.
And finally, a BIG shout out of thanks to Jacamar Naturalist Tours. We hit the jackpot with Jacamar. Top notch all the way from the vehicles, fearless drivers, expert guides, coordination – fantastic folks – and with us nearly the entire trip. Our lead nature guide – Ronald Caravaca – and MELANY OCÓN were not only endlessly knowledgeable (in addition to being photographers themselves) about wildlife , birds, culture, tradition, they were fun to hang out with. The incomparable Lory Chacon Campos at Jacamar made it all possible. Lory managed and coordinated all the details like a skilled puppeteer. She not only ensured that all things went smoothly, working with Annie for months ahead, but really put her heart and soul into everything for the experience. She and Annie have now bonded for life!
Photo by Ashley GarrettPhoto by Ashley Garrett
Our Costa Rican hosts and guides were as passionate to show us the best of their country, as all our photographers were to put their camera to their eye. It was a terrific marriage of access, education, natural beauty, talent, laughs, unbelievable food and ultimately, a huge array of excellent photos from our participants. A trip to be repeated. Another blog to come on the adventure with more photos and tech info. An experience rich and diverse, and the rewards were great, not only in pictures but in ongoing friendships. Kudos to all.
Looking ahead, spots are filling for the Ireland and Tuscany, Italy workshops in 2024 with Tamara Lackey and I teaching together again. European adventures await!
More tk….
The post An Amazing Costa Rica Photo Workshop! appeared first on Joe McNally Photography.
This year is quickly coming to a close and I wanted to leave a series of my favorite tips for Lightroom Classic and Lightroom to help you end on a good note or start next year off on the right foot. Heck, why not both! Please feel free to share any tips of your own in the comments.
Configure your default catalog
One of the most important ways of ensuring you’re opening the correct catalog each time you launch Lightroom Classic is to configure a specific catalog as the Default Catalog. Go to Lightroom Classic > Preferences > General (PC: Edit > Preferences > General) and click the Default Catalog drop-down menu to choose the catalog file that is currently open and set that as the default. From that point forward you can rest assured that each time you launch Lightroom Classic that catalog will open regardless of what catalog you previously had open.
Create an import preset
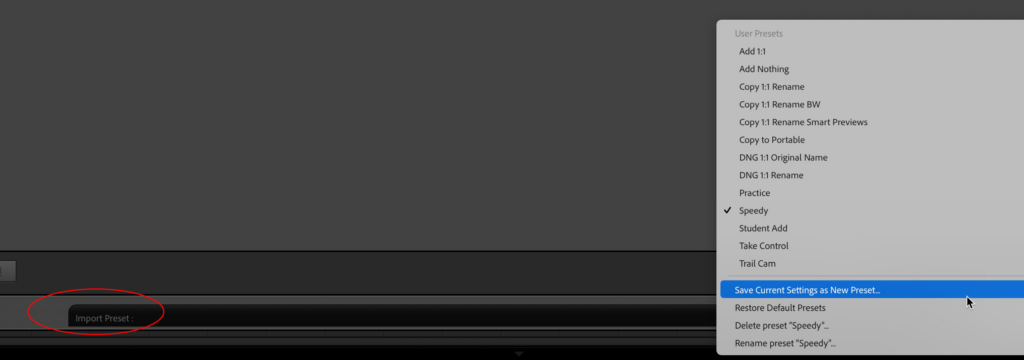
A huge time saver and important method for keeping your import process consistent and efficient is to save all the common settings of the Import dialog as a preset. On your next typical import, configure all general settings as desired (excluding any settings that are too specific, like keywords or collection membership), and then click the Import Preset drop-down menu and choose Save Current Settings as New Preset. Give the preset a meaningful name when prompted and click Create. The next time you import a new batch of photos just confirm your preset is selected (or select it yourself) and know all your core settings are ready to go.
Master zooming in Library and Develop
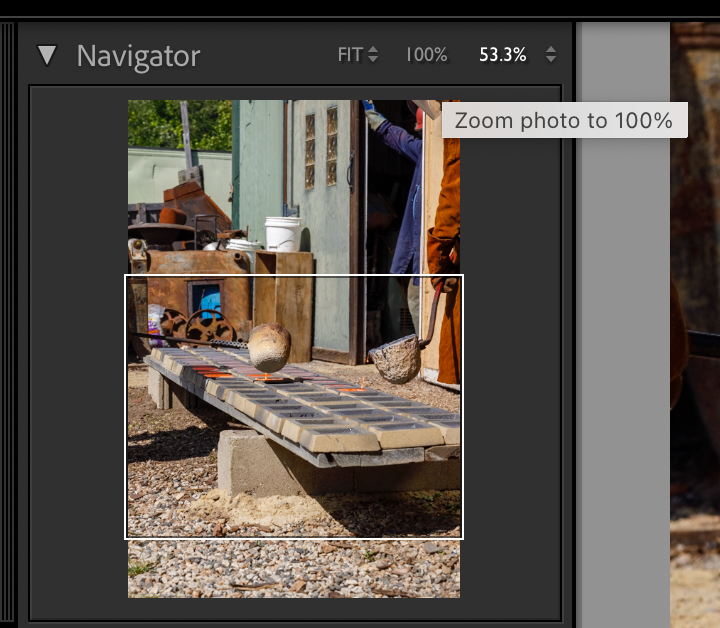
Some time ago Lightroom Classic got an update that changed some of the zoom functionality for the better. The first thing to note is that it replaced the old zoom ratios (1:1) with zoom percentages that I think are easier for people to understand. Additionally, it added a 100% button above the Navigator panel to make it easy to quickly jump to that zoom level as needed. You can still access a range of zoom levels, from 6% to 1600% from the drop-down menu at the top of the Navigator. We also gained two new ways to zoom; Box Zoom and Scrubby Zoom. Box Zoom works in both the Library (Loupe view) and Develop modules by holding the CMD key (PC: Ctrl) while dragging a rectangle (box) the size you want to zoom into. Scrubby Zoom only works in Develop (with GPU acceleration enabled), and involves holding the Shift key while dragging left to zoom out or right to zoom in. Give them a try!
Mark folders and collections as favorite sources
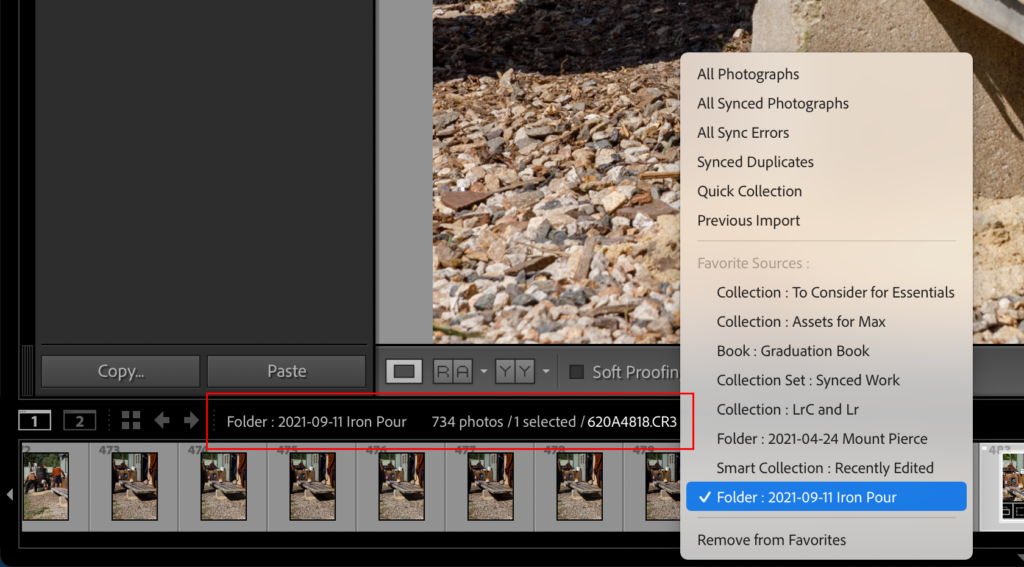
If you have folders that you want to access quickly from anywhere in Lightroom Classic, you can mark them as a favorite. Simply right click any folder in the Folders panel and choose Mark Favorite from the contextual menu that appears. This adds a star icon to that folder and adds the folder to the Favorite Sources list accessible from the Filmstrip panel in any module. You can add a collection or even collection set to the Favorite Sources list by first selecting it in the Collections panel, then click the breadcrumbs menu in the Filmstrip and choose Add to Favorites at the bottom of the list (you can remove sources from the list the same way).
Mark most used presets and profiles as favorites
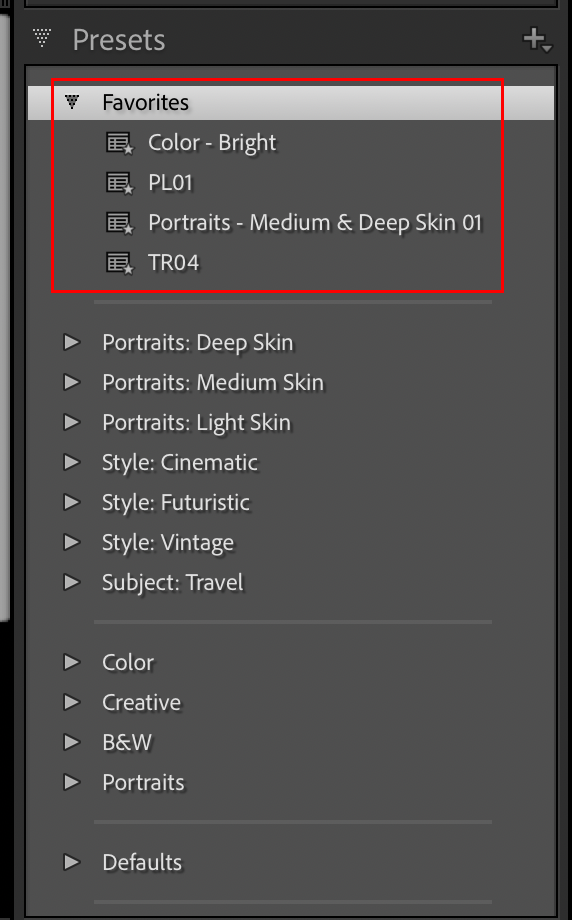
A quick way to gather your most used Develop presets into one group is to mark them as a favorite. Simply right click a preset and choose Add to Favorites from the contextual menu. That preset will be added to a special Favorites group at the top of the Preset panel.
Similarly, you can open the Profile Browser in the Basic panel, scroll through profile groups, and click the star icon that appears in the upper-right corner of each profile to mark it as a favorite. Favorite profiles will conveniently appear in the Profile drop-down menu in the Basic panel for easy access.
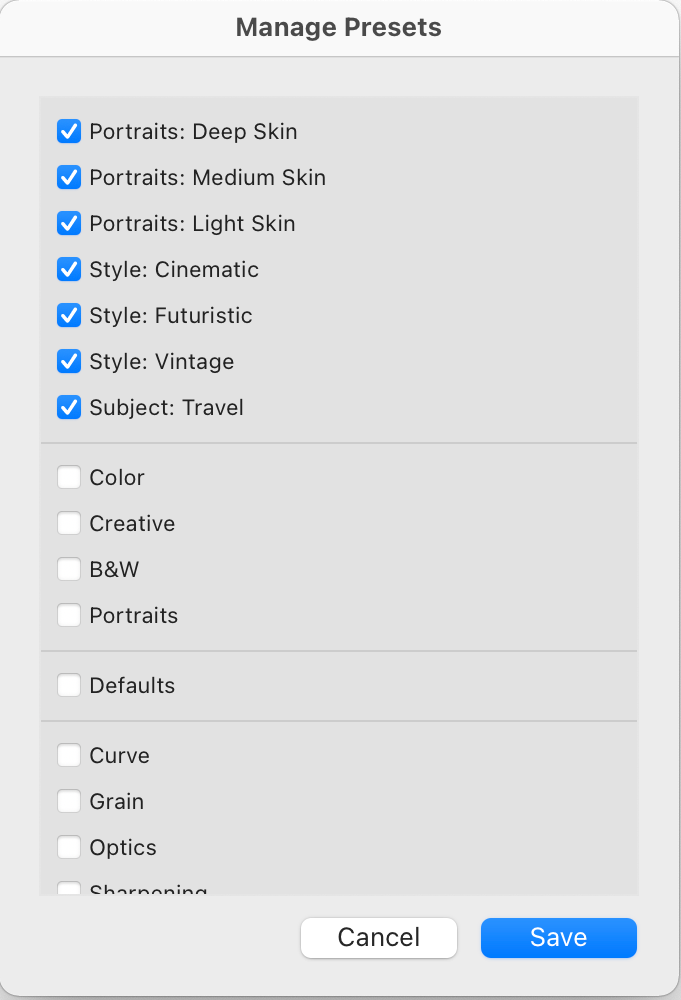
Manage the Presets panel
Lightroom Classic comes pre-installed with many Develop presets, in various groups, within the Preset panel. Some are good, some are not, but once you’ve explored them and possibly marked some as favorites (see previous tip) you can hide any preset groups in the panel you no longer need to see (presets marked as favorites will still be visible in the Favorites group even if you hide its parent preset group). Click the + sign at the top of the Presets panel and choose Manage Presets to open the Manage Presets dialog box. From there, simply uncheck any preset groups you no longer want to see in the Presets panel and click Save. You can always go back to this dialog box and restore any hidden groups.
Sync LrC catalog to Lr
To expand your Lightroom Classic catalog to your mobile devices it all starts with syncing your catalog. Click the cloud icon in the upper-right corner of the interface and click Start to begin the process. I’ve got an entire article if you want to learn more.
Explore Auto Adding photos in Lightroom for mobile
I like to use the Lightroom app on my iPhone to transfer photos taken on that device to my Lightroom Classic library. I have the Photography plan with 1TB of storage, so I don’t worry about filling up the cloud storage, and I like that this can be automated. If you only have the 20GB storage plan, use this tip with caution (or not at all). To set up Auto Add, tap the 3-dot menu next to the album you want to add the photos to automatically and toggle the Auto add from device photos to the on position. From that point on any newly add photos to your device’s camera roll will automatically import into Lr. You can disable by toggling that same switch to the off position. This will not automatically add photos previously sitting on your camera roll.
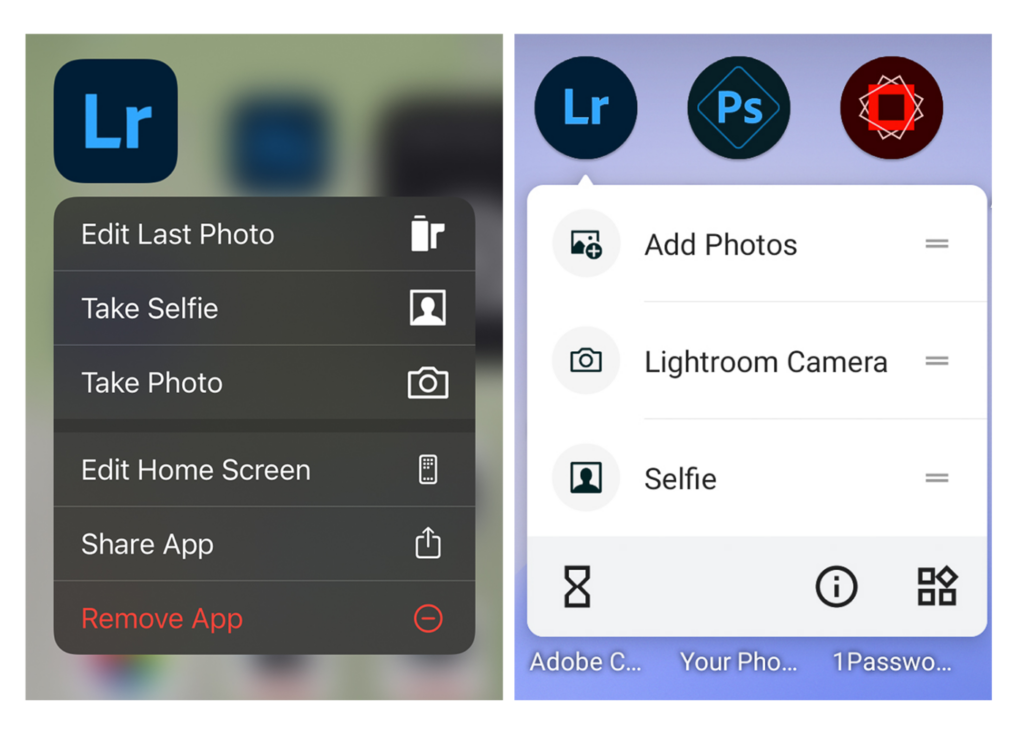
Access the Lightroom camera faster
I love the camera module within the Lr app on my phone and shoot with it a lot. On iOS (version 9 or later) you can jump right to the camera by doing a long press on the Lr icon to access a contextual menu containing an option for Take Photo or Take Selfie to choose the back or front facing camera respectively. On Android (version 7.1.1 or later) the process is similar. Locate the Lr icon on your home screen and give it a long press to access the Lightroom Camera app shortcut.
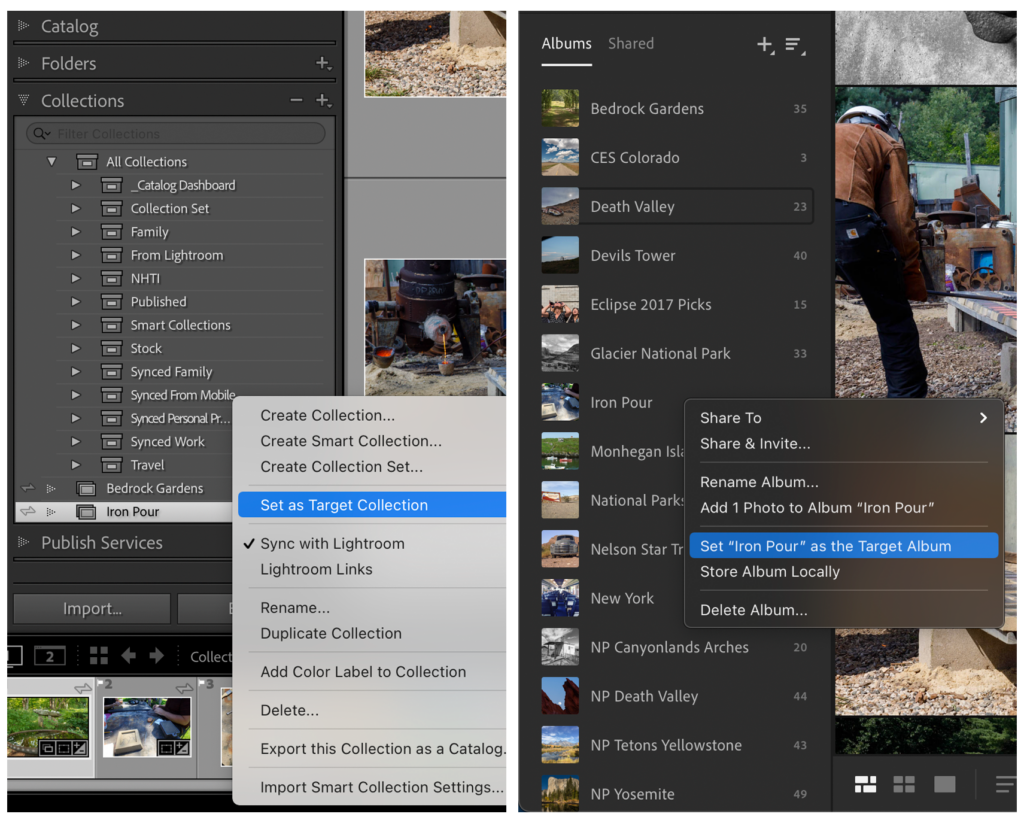
Set a Target Collection or Album
A fast way to add photos to a collection in Lightroom Classic or album in Lightroom is to designate a collection or album as the Target. In Lightroom Classic, right-click any regular collection and choose Set as Target Collection from the contextual menu. From that point on, you can select any photo (or group of photos in Grid view) and press the B key to add the selection to the Target Collection. In the Lightroom for desktop app, right-click the desired album and choose Set “[album name]” as the Target Album from the contextual menu. In this app, the T key is the shortcut to add selected photos to that album.
I put together a lovely distressed French-inspired Rose paper set to share with you today. These are all high-resolution papers that can be used alone or in any of your designs, printed or on the web. I used some of the Graphics Fairy premium site designs on these. Check out their website, I am a part-time instructor over there and they have so many gorgeous vintage designs you can use in your own projects!
Download the CoffeeShop “French Rose” Digital Paper Set!
Do you want to download thousands of professional CoffeeShop PSE/Photoshop actions (including exclusive ones not found anywhere for free), textures/overlays, scrapbooking papers, clip art/design elements, photo storyboards and frames, and Lightroom presets from this site in one convenient zipped file AND help support this one-woman blog?
Just click here for my CoffeeShop Mega Download Pack!
In this episode, we dig into the importance of taking creative risks. We all know that some risk is necessary. Simply said, you cannot stand out and fit in at the same time. If you’re not sharing your work, you’re hiding, and this tends to compound on itself. Once you start hiding, you stop growing.
Creativity requires taking risks and embracing failure. Failure is the forward propulsion toward success and the sooner we can change our perspective around it, we easier it is to muster the courage to face the fears that are holding us back.
Some topics we get into:
The danger of hiding and not sharing your creative work
The importance of taking risks to grow as an artist
The role of mistakes in the creative process
The value of having fun and making an array of bets to play longer
The importance of assessing risks and anticipating problems
The Grid Blind Photo Critiques: Perfecting Your Aviation Shots
Join Scott Kelby and Erik Kuna in this critique session as we dive deep into the world of aviation photography. From the allure of dusk shots to the pitfalls of over-lighting, we explore how to truly capture the essence of aircraft. Discover the importance of sculpting light, the challenges of nighttime static shots, and the nuances of post-processing. Whether you’re an aviation enthusiast or a budding photographer, this session offers invaluable insights to elevate your shots. Don’t miss our highlight critique of a standout image that truly soars above the rest!
New KelbyOne Course: Making Your Skies Look Fantastic in Photoshop with Scott Kelby
Have you ever taken a photograph only to find that the sky has problems? Or, have you taken an outdoor portrait but the sky doesn’t look all that interesting? In this class with Scott Kelby you’ll learn how to make the sky look amazing in all kinds of situations. From taking the sky you have and enhancing it to repairing it to completely replacing it from scratch. By the end of the class you’ll have a complete toolkit of techniques for making your skies look their best in all your photos.
var tve_frontend_options = {“is_editor_page”:””,”page_events”:[],”is_single”:”1″,”ajaxurl”:”https://www.lightstalking.com/wp-admin/admin-ajax.php”,”social_fb_app_id”:”234010690138279″,”dash_url”:”https://www.lightstalking.com/wp-content/plugins/thrive-visual-editor/thrive-dashboard”,”translations”:{“Copy”:”Copy”},”post_id”:”511492″,”user_profile_nonce”:”6942ac5bf5″,”ip”:”121.29.46.186″,”current_user”:[],”post_title”:”Major Camera Company Urges Photographers to u201cEmbraceu201d AI”,”post_type”:”post”,”post_url”:”https://www.lightstalking.com/major-camera-company-urges-photographers-to-embrace-ai/”,”is_lp”:””,”post_request_data”:[],”conditional_display”:{“is_tooltip_dismissed”:false}};
var advanced_ads_pro_visitor_conditions = {“referrer_cookie_name”:”advanced_ads_pro_visitor_referrer”,”referrer_exdays”:”365″,”page_impr_cookie_name”:”advanced_ads_page_impressions”,”page_impr_exdays”:”3650″};
var essb_settings = {“ajax_url”:”https://www.lightstalking.com/wp-admin/admin-ajax.php”,”essb3_nonce”:”e46915f21c”,”essb3_plugin_url”:”https://www.lightstalking.com/wp-content/plugins/easy-social-share-buttons3″,”essb3_stats”:true,”essb3_ga”:false,”essb3_ga_ntg”:false,”blog_url”:”https://www.lightstalking.com/”,”post_id”:”511492″};
There’s a lot of debate surrounding AI – and for good reason.
A MacBook with lines of code on its screen on a busy desk. Photo by Christopher Gower
Some people worry it is going to take away jobs and displace photographers, others question whether or not AI can even make photography or art in the first place and question how artificial intelligence got those skills to start.
All of this is well and valid, but, while we debate, the AI revolution steams ahead and it looks like one major camera company is all aboard as far as the artificial intelligence bandwagon goes.
Yahoo reports that Canon is urging photographers to “embrace” AI, citing the many productivity and time-saving hacks that it will bring to the market.
“We’ve all been there – experiencing an amazing sunset or a bright, perfectly rounded full moon – and the photo we snap doesn’t do any justice… Whatever your level, the AI incorporated into many modern cameras has been a game-changer,” says Amine Djouahra of Canon Central and North Africa.
Yet, even with the advantages of AI, Djouahra emphasizes that it is one of the many tools available to a photographer and cannot replicate the art that a person creates, citing the unique perspective and training that a human brings to the table.
Of course, no one is really denying that all of this will save people a bunch of time in post-production, but it does hearken back to the central questions surrounding all of this and that it is to what extent AI assistance dilutes an artist’s vision and, again, how is AI able to do this stuff (like generative fill or generated images) so well?
One of our biggest trends of 2023, AI is showing no signs of slowing down, particularly in our space, and it is both exciting and nerve-wracking at the same time to watch as new developments (and technologies) unfold.
Any thoughts on artificial intelligence are welcome in the comments.
We have some other headlines for you to read at this link.
Kehl is our staff photography news writer since 2017 and has over a decade of experience in online media and publishing and you can get to know him better here and follow him on Insta.
var advanced_ads_cookies = {“cookie_path”:”/”,”cookie_domain”:””};
var advadsCfpInfo = {“cfpExpHours”:”3″,”cfpClickLimit”:”3″,”cfpBan”:”7″,”cfpPath”:””,”cfpDomain”:”www.lightstalking.com”};
var beloadmore = {“url”:”https://www.lightstalking.com/wp-admin/admin-ajax.php”,”query”:{“post__not_in”:[511492],”category_name”:”news”,”posts_per_page”:3}};
var tve_dash_front = {“ajaxurl”:”https://www.lightstalking.com/wp-admin/admin-ajax.php”,”force_ajax_send”:”1″,”is_crawler”:””,”recaptcha”:[],”post_id”:”511492″};
var TVE_Ult_Data = {“ajaxurl”:”https://www.lightstalking.com/wp-admin/admin-ajax.php”,”ajax_load_action”:”tve_ult_ajax_load”,”conversion_events_action”:”tve_ult_conversion_event”,”shortcode_campaign_ids”:[],”matched_display_settings”:[],”campaign_ids”:[],”post_id”:511492,”is_singular”:true,”tu_em”:””,”evergreen_redirects”:[]};
(function() { var po = document.createElement(‘script’); po.type = ‘text/javascript’; po.async=true;; po.src = ‘https://www.lightstalking.com/wp-content/plugins/easy-social-share-buttons3/lib/modules/conversions-pro/assets/share-conversions-tracker.js’; var s = document.getElementsByTagName(‘script’)[0]; s.parentNode.insertBefore(po, s); })();(function() { var po = document.createElement(‘script’); po.type = ‘text/javascript’; po.async=true;; po.src = ‘https://www.lightstalking.com/wp-content/plugins/easy-social-share-buttons3/assets/modules/pinterest-pro.min.js’; var s = document.getElementsByTagName(‘script’)[0]; s.parentNode.insertBefore(po, s); })();(function() { var po = document.createElement(‘script’); po.type = ‘text/javascript’; po.async=true;; po.src = ‘https://www.lightstalking.com/wp-content/plugins/easy-social-share-buttons3/assets/modules/subscribe-forms.min.js’; var s = document.getElementsByTagName(‘script’)[0]; s.parentNode.insertBefore(po, s); })();(function() { var po = document.createElement(‘script’); po.type = ‘text/javascript’; po.async=true;; po.src = ‘https://www.lightstalking.com/wp-content/plugins/easy-social-share-buttons3/assets/js/essb-core.min.js’; var s = document.getElementsByTagName(‘script’)[0]; s.parentNode.insertBefore(po, s); })();
var essb_handle_stats = function(oService, oPostID, oInstance) { var element = jQuery(‘.essb_’+oInstance); var instance_postion = jQuery(element).attr(“data-essb-position”) || “”; var instance_template = jQuery(element).attr(“data-essb-template”) || “”; var instance_button = jQuery(element).attr(“data-essb-button-style”) || “”; var instance_counters = jQuery(element).hasClass(“essb_counters”) ? true : false; var instance_nostats = jQuery(element).hasClass(“essb_nostats”) ? true : false; if (instance_nostats) { return; } var instance_mobile = false; if( (/Android|webOS|iPhone|iPad|iPod|BlackBerry|IEMobile|Opera Mini/i).test(navigator.userAgent) ) { instance_mobile = true; } if (typeof(essb_settings) != “undefined”) { jQuery.post(essb_settings.ajax_url, { ‘action’: ‘essb_stat_log’, ‘post_id’: oPostID, ‘service’: oService, ‘template’: instance_template, ‘mobile’: instance_mobile, ‘position’: instance_postion, ‘button’: instance_button, ‘counter’: instance_counters, ‘nonce’: essb_settings.essb3_nonce }, function (data) { if (data) { }},’json’); } }; var essb_log_stats_only = function(service, postId, position) { var instance_mobile = false; if( (/Android|webOS|iPhone|iPad|iPod|BlackBerry|IEMobile|Opera Mini/i).test(navigator.userAgent) ) { instance_mobile = true; } if (typeof(essb_settings) != “undefined”) { jQuery.post(essb_settings.ajax_url, { ‘action’: ‘essb_stat_log’, ‘post_id’: postId, ‘service’: service, ‘template’: position, ‘mobile’: instance_mobile, ‘position’: position, ‘button’: position, ‘counter’: false, ‘nonce’: essb_settings.essb3_nonce }, function (data) { if (data) { }},’json’); } };
let ccwpDOMLoaded=!1;
let ccwp_loaded = false;
let resources_length=0;
let resources =undefined;
let is_last_resource = 0;
ccwpUserInteractions=[“keydown”,”mousemove”,”wheel”,”touchmove”,”touchstart”,”touchend”,”touchcancel”,”touchforcechange”];
ccwpUserInteractions.forEach(function(e){
window.addEventListener(e,calculate_load_times);
});
function calculate_load_times() {
// Check performance support
if (performance === undefined) {
console.log(“Performance NOT supported”);
return;
}
// Get a list of “resource” performance entries
resources = performance.getEntriesByType(“resource”);
if (resources === undefined || resources.length <= 0) {
console.log(“NO Resource performance records”);
}
if(resources.length){
resources_length=resources.length;
}
for(let i=0; i < resources.length; i++) {
if(resources[i].responseEnd>0){
is_last_resource = is_last_resource + 1;
}
}
let uag = navigator.userAgent;
let gpat = /Google Page Speed Insights/gm;
let gres = uag.match(gpat);
let cpat = /Chrome-Lighthouse/gm;
let cres = uag.match(cpat);
let wait_till=300;
let new_ua = “Mozilla/5.0 (Linux; Android 11; moto g power (2022)) AppleWebKit/537.36 (KHTML, like Gecko) Chrome/109.0.0.0 Mobile Safari/537.36”;
let new_ua2 = “Mozilla/5.0 (Macintosh; Intel Mac OS X 10_15_7) AppleWebKit/537.36 (KHTML, like Gecko) Chrome/109.0.0.0 Safari/537.36”;
if(gres || cres || uag==new_ua || uag==new_ua2){
wait_till = 3000;
}
if(is_last_resource==resources.length){
setTimeout(function(){
console.log(“ccwpTriggerDelayedScripts timeout : “+wait_till);
ccwpTriggerDelayedScripts();
},wait_till);
}
}
window.addEventListener(“load”, function(e) {
console.log(“load complete”);
setTimeout(function(){
calculate_load_times();
},100);
});async function ccwpTriggerDelayedScripts() {
if(ccwp_loaded){ return ;}
ccwpPreloadStyles();
ccwpPreloadDelayedScripts();
ccwpLoadCss();
ccwpScriptLoading();
ccwp_loaded=true;
}
function ccwpPreloadStyles() {
let e = document.createDocumentFragment();
var cssEle = document.querySelectorAll(“link[rel=ccwpdelayedstyle]”);
for(let i=0; i <= cssEle.length;i++){
if(cssEle[i]){
cssEle[i].href = removeVersionFromLink(cssEle[i].href);
let r = document.createElement(“link”);
r.href = cssEle[i].href;
r.rel = “preload”;
r.as = “style”;
e.appendChild(r);
}
}
document.head.appendChild(e);
}
function ccwpPreloadDelayedScripts() {
var e = document.createDocumentFragment();
document.querySelectorAll(“script[type=ccwpdelayedscript]”).forEach(function(t) {
var n = removeVersionFromLink(t.getAttribute(“src”));
if (n) {
t.setAttribute(“src”, n);
var r = document.createElement(“link”);
r.href = n, r.rel = “preload”, r.as = “script”, e.appendChild(r)
}
}), document.head.appendChild(e)
}
function ccwpScriptLoading(){
var jsEle = document.querySelectorAll(“script[type=ccwpdelayedscript]”);
jsEle.forEach(function(t) {
t.type = “text/javascript”;
if(t.src)
{
t.src = removeVersionFromLink(t.src);
}
});
}function ccwpLoadCss(){
var cssEle = document.querySelectorAll(“link[rel=ccwpdelayedstyle]”);
for(let i=0; i <= cssEle.length;i++){
if(cssEle[i]){
cssEle[i].href = removeVersionFromLink(cssEle[i].href);
cssEle[i].rel = “stylesheet”;
cssEle[i].type = “text/css”;
}
}var cssEle = document.querySelectorAll(“style[type=ccwpdelayedstyle]”);
for(let i=0; i <= cssEle.length;i++){
if(cssEle[i]){
cssEle[i].type = “text/css”;
}
}
}
function removeVersionFromLink(link)
{
if(ccwpIsValidUrl(link))
{
const url = new URL(ccwpFormatLink(link));
url.searchParams.delete(“ver”);
url.searchParams.delete(“time”);
return url.href;
}
else{
return link;
}
}
function ccwpIsValidUrl(urlString)
{
if(urlString){
var expression =/[-a-zA-Z0-9@:%_+.~#?&//=]{2,256}.[a-z]{2,4}b(/[-a-zA-Z0-9@:%_+.~#?&//=]*)?/gi;
var regex = new RegExp(expression);
return urlString.match(regex);
}
return false;
}
function ccwpFormatLink(link)
{
let http_check=link.match(“http:”);
let https_check=link.match(“https:”);
if(!http_check && !https_check)
{
return location.protocol+link;
}
return link;
}
For those of you who prefer written instructions rather than watching a video, here’s an article from a few years ago explaining how to create and apply a copyright metadata preset.
Exporting Copyright and Contact Information: If you want your copyright and contact information to tag along with your photos when you export copies, then in the Metadata section of the Export dialog towards the bottom be sure to choose Copyright and Contact Info (or All Metadata). This information will then tag along with your photos in the file properties data — it will not be written across your photos. To write information onto your photos themselves, use the Watermarking functionality in the Export dialog.
Viewing the Information: In the video above I show you how to view the information you have added using the Metadata panel in Lightroom Classic. People can also view this information using Adobe Bridge. On Mac, it can also be viewed in Preview: Open the photo in Preview, go to Tools>Show Inspector, click on the information tab (i), and then the IPTC tab. In Windows Explorer, right-click on your file, choose Properties and go to the Details tab – this will show the copyright, but not the contact information.
Happy New Year, everyone – I hope you have a happy, healthy and photographically-inspired 2021!