[ad_1]
Need to brush up on your Lightroom or Photoshop? Having Catalog or Missing File or Folder issues and need help? Using a variety of services, I can help you online with either.
[ad_2]
Source link

Mar 28
[ad_1]
Need to brush up on your Lightroom or Photoshop? Having Catalog or Missing File or Folder issues and need help? Using a variety of services, I can help you online with either.
[ad_2]
Source link
Mar 24
[ad_1]
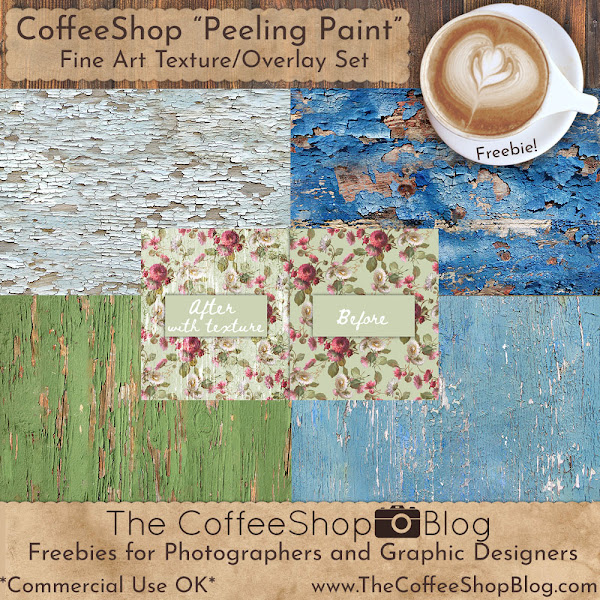
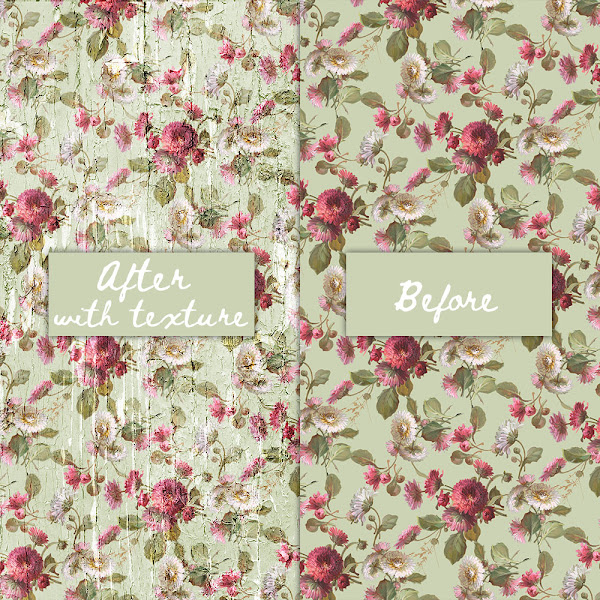
I have a backload of freebies I need to post on my site, so today I start with a really nice set of peeling paint textures. These are high resolution and can be used alone as papers or layered over images/designs.
Below is an example where I used one of the textures to age a pretty paper. I added it twice, once in Overlay blending mode and once in Soft Light. Then I adjusted the contrast a bit.
It is so satisfying antiquing papers like this! These textures come with free commercial TOU, so use them anyway you wish, just don’t resell them “as is”. Note: You can grab the original 19th century flower paper below here.
Download the CoffeeShop “Peeling Paint” Fine Art Texture Set.
Do you want to download thousands of professional CoffeeShop PSE/Photoshop actions (including exclusive ones not found anywhere for free), textures/overlays, scrapbooking papers, clip art/design elements, photo storyboards and frames, and Lightroom presets from this site in one convenient zipped file AND help support this one-woman blog?
Just click here for my CoffeeShop Mega Download Pack!
[ad_2]
Source link
Mar 23
[ad_1]
This article was updated in March 2024 with contributions from Megan Kennedy and Jaymes Dempsey.
Vignettes are a great way to add a bit of extra oomph to your images. They help keep the viewer focused on the main subject – while de-emphasizing the edges of the frame.
Many photographers, myself included, regularly apply vignettes to their images. But while many programs (such as Lightroom) include a straightforward vignetting tool, creating a vignette in Photoshop is a bit more complicated.
Fortunately, Photoshop is a very sophisticated program, and there is not just one, but a handful of methods for adding vignettes to your files.
In this article, I’ll share three of my favorite ways to apply the effect. By the time you’re finished reading, you’ll be able to apply a vignette to any digital photograph quickly and easily, and you’ll even be able to customize the shape and intensity as needed.
Let’s get started!
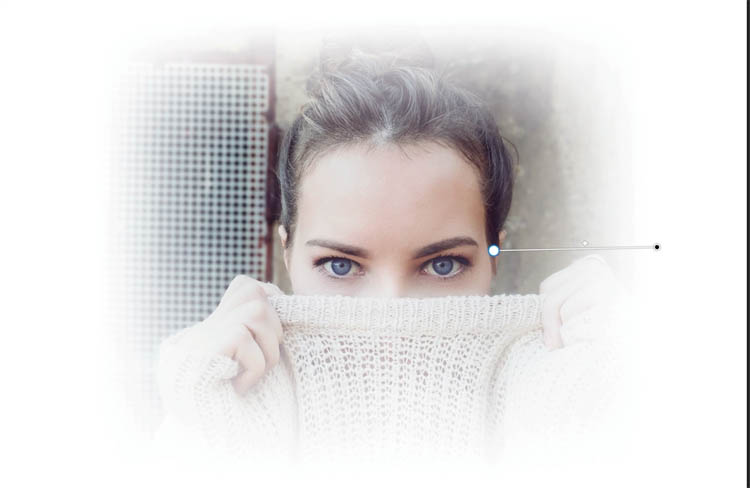
In photography, a vignette is any shadowy darkness that appears around the periphery of an image. Here’s a very extreme example:
Here’s a much more subtle, realistic example:
Now, vignetting can occur for several reasons.
For instance, optical vignetting is caused by the physics of wide-aperture lenses. Less light reaches the edges of the camera sensor, and as a result, you get a darkening effect at the edge of the frame. Many post-processing programs offer optical modules designed to counteract specific vignetting effects created by specific lenses – but that’s a topic for another article!
The type of vignetting we’re interested in is artificial vignetting – where you create vignetting yourself using a program such as Photoshop.
As I mentioned above, Photoshop isn’t the only program you can use to create a vignette. In fact, Photoshop is unusual in that it doesn’t include an obvious, easy-to-access vignetting tool. But adding a vignette is still pretty simple, as I’ll explain below.
Vignetting can be a contentious topic in photographic circles. Some photographers love vignettes, while others loathe them.
But as photography has evolved, applying artificial vignettes in Photoshop has become a useful compositional device. Vignettes are an enduring photographic technique that can add to the gravitas of an image by creating a sense of atmosphere, age, or depth.
Personally, I think a restrained vignette can add to an image, especially if the composition includes a main subject toward the center of the shot. If the vignette is present but not immediately obvious to the viewer, it can subtly yet effectively emphasize specific parts of your photo.
The key word, however, is “subtle.” As soon as the vignette becomes perceptible to the viewer, it detracts from the image. So have fun creating your vignette – but don’t go overboard!
There are quite a few ways to create a vignette in Photoshop, each offering various levels of customizability. Today, I’m going to cover the three that I recommend the most.
These methods are simple, easy to apply, and will do a great job of creating a customizable vignette effect.
If you’re looking for a quick way to create a vignette, then this method is a perfect choice.
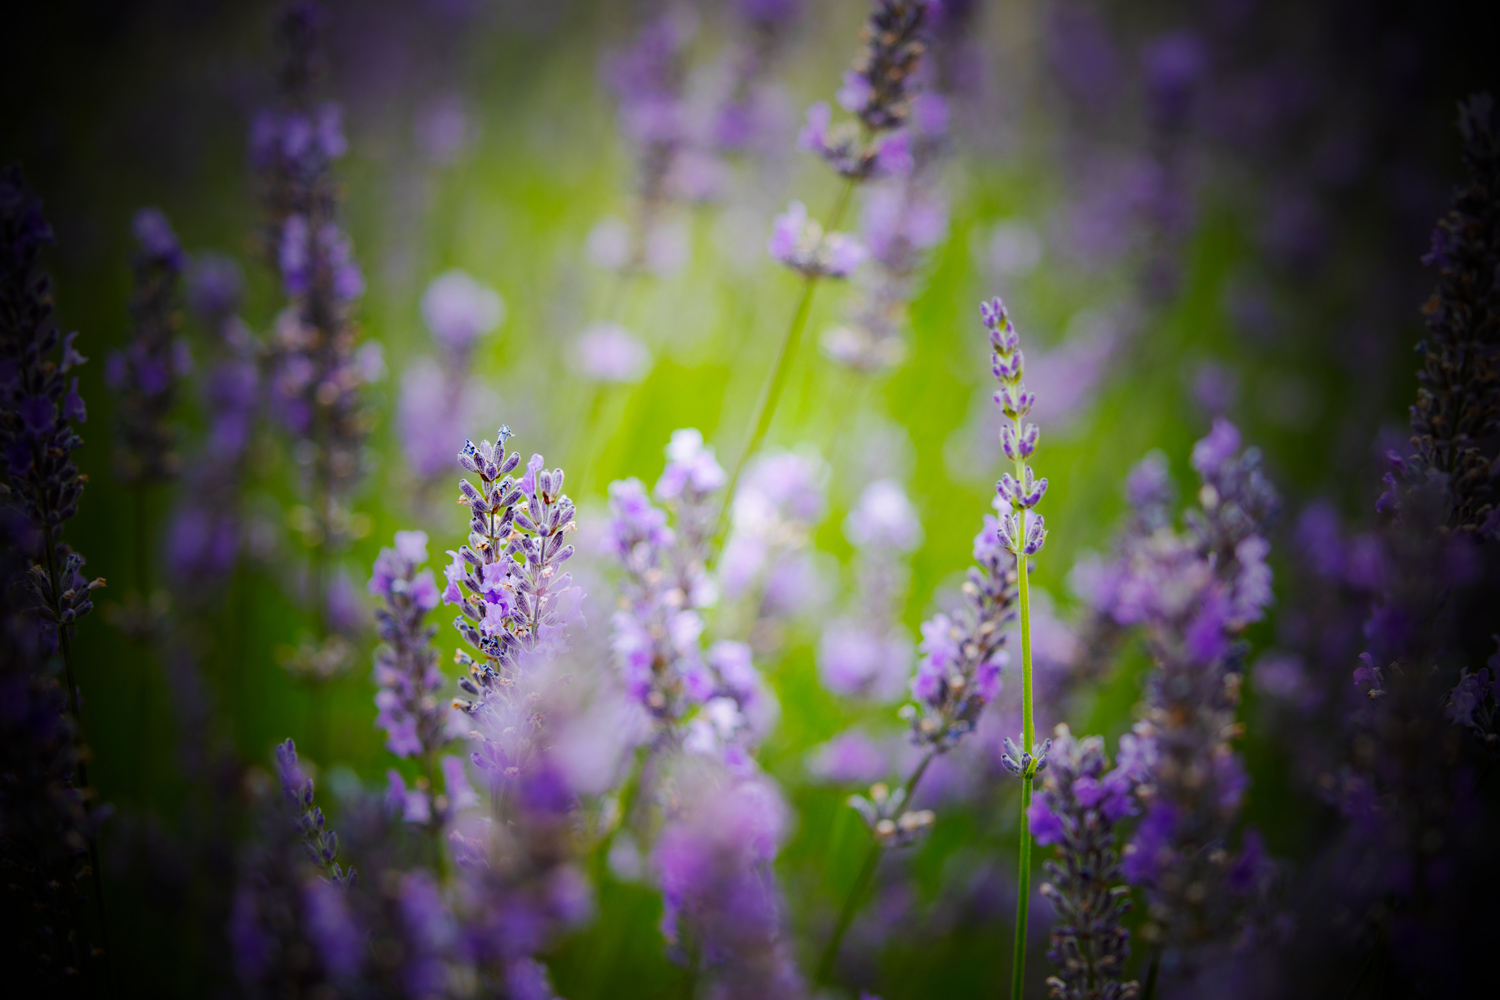
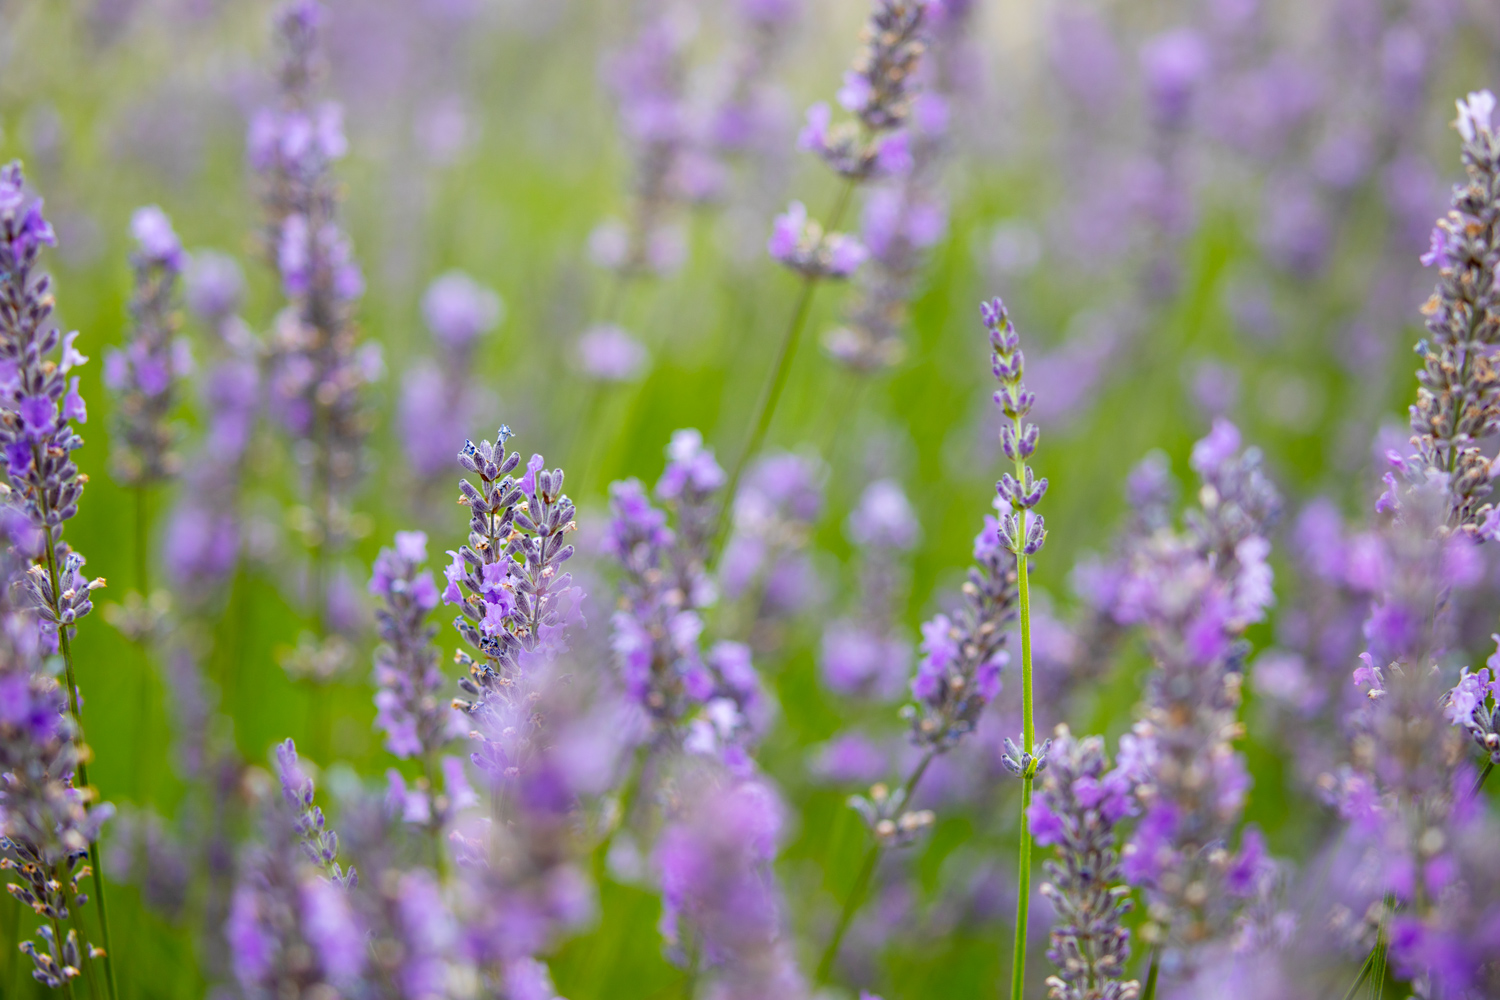
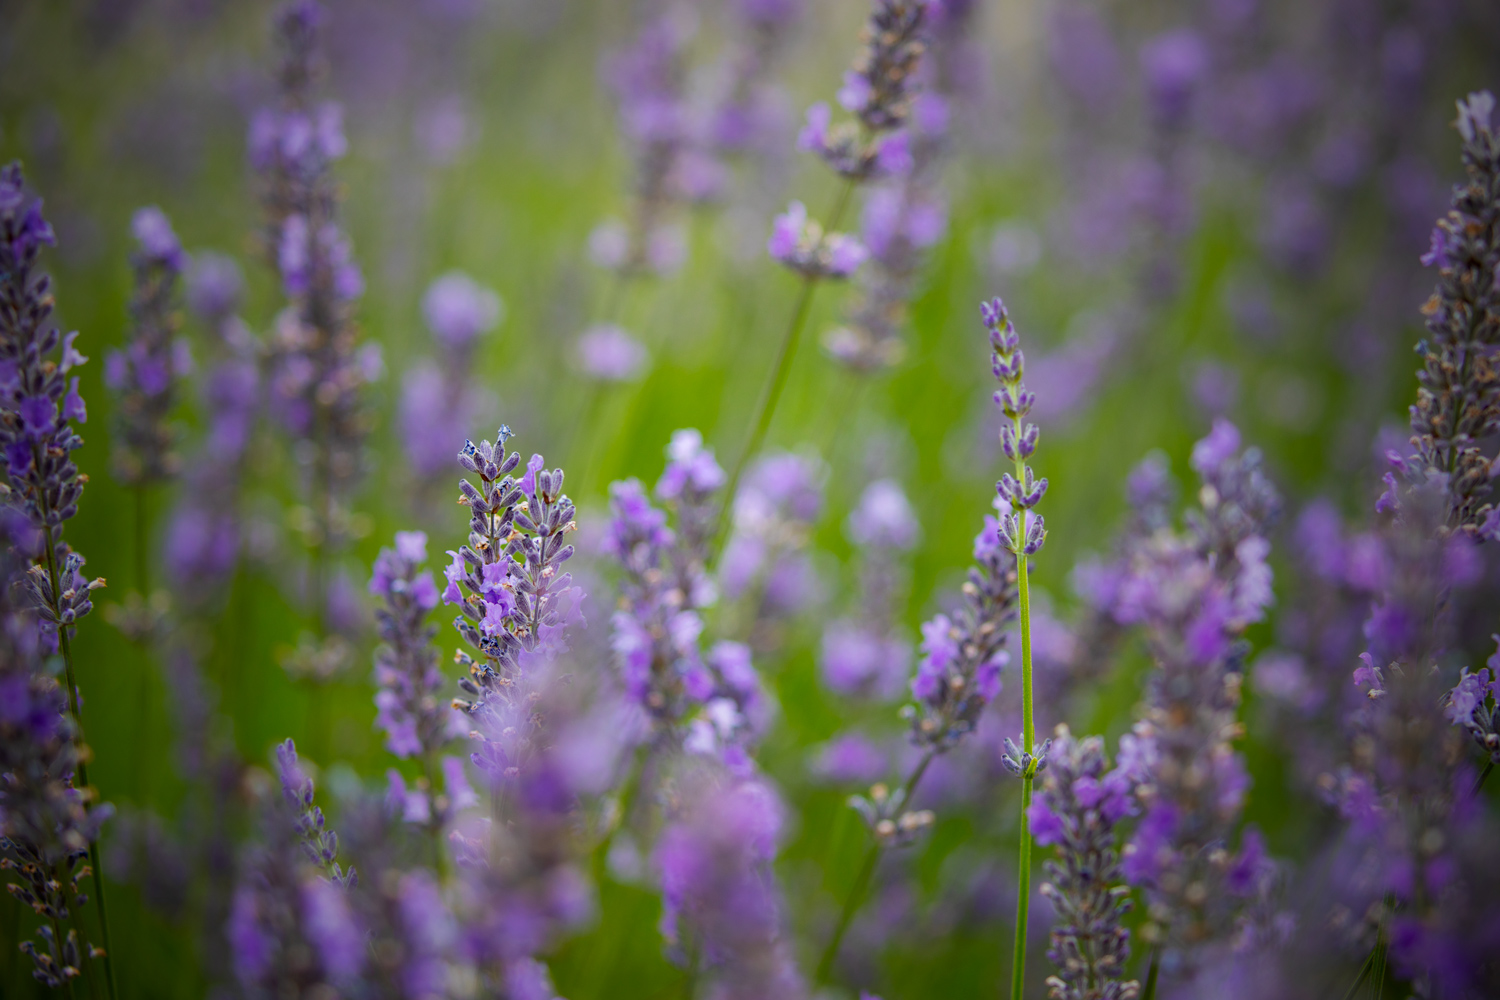
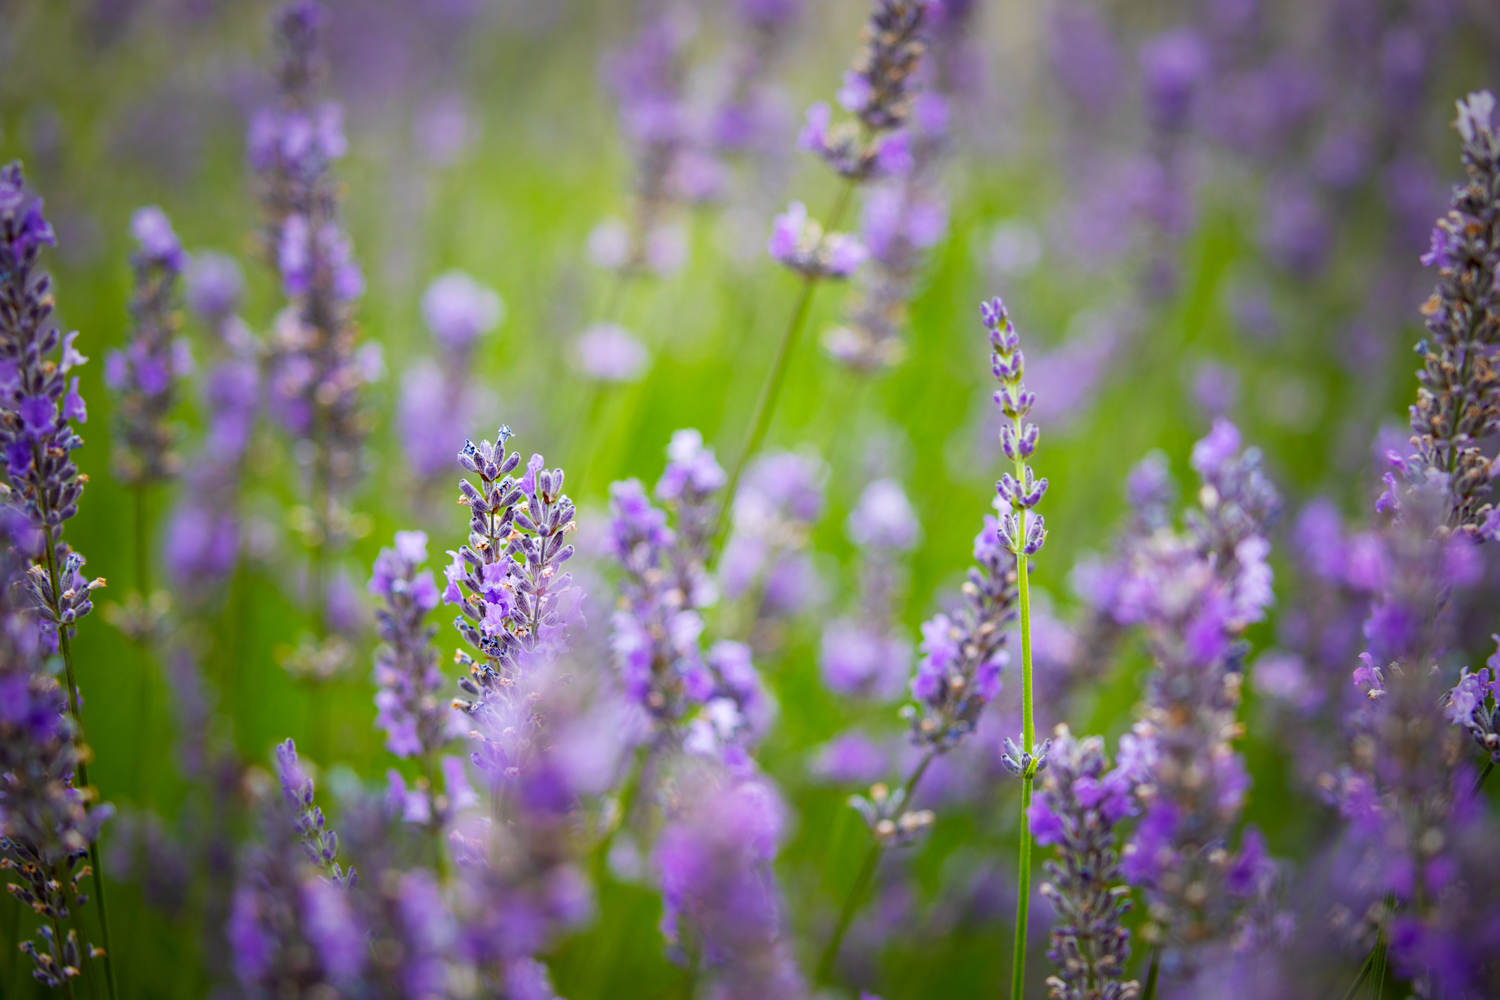
To start off, open your image in Photoshop. I’m going to use this lavender photo, which has already been processed but doesn’t yet feature a vignette:
In Photoshop, it’s best to edit your files non-destructively; that way, you can go back and adjust your original file if required.
Standard Photoshop adjustments are destructive by default – but you can avoid editing the original file thanks to the power of layers.
So right-click on the Background layer in the Layers panel, then select Duplicate Layer.
In the pop-up window, rename the layer “Vignette.”
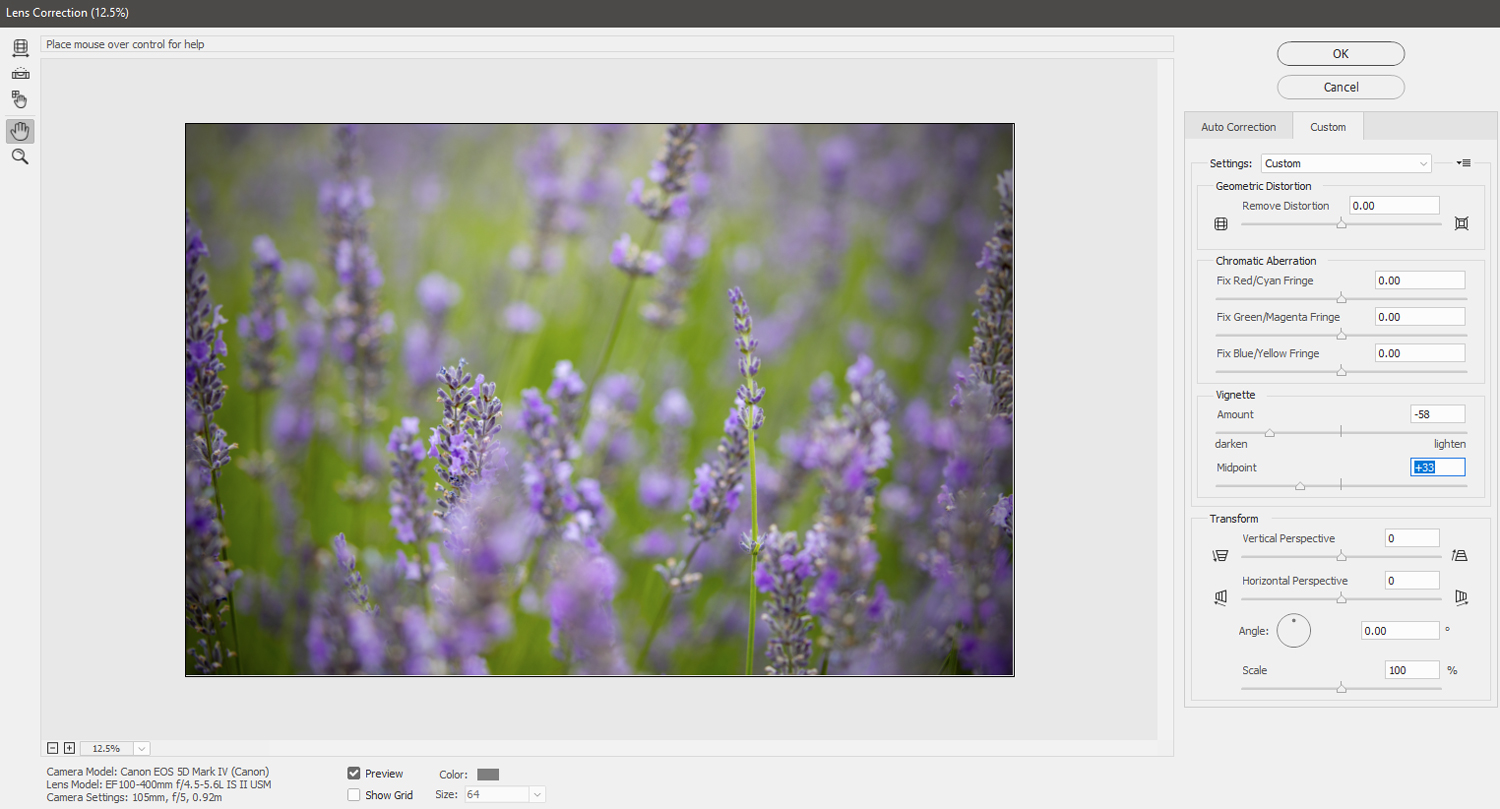
With the Vignette layer still selected, click Filter in the Photoshop menu. Then select Lens Correction.
A new Lens Correction window will open. Click the Custom tab on the right-hand panel. Under the Vignette heading, adjust the Amount and Midpoint sliders until you’re happy with the vignette effect.
Then click OK.
If the image looks a little dull after applying the vignette, you can give it a contrast boost with a Curves adjustment layer. You can also adjust the intensity of the colors with a Vibrance adjustment layer. Make edits until you’re satisfied, then call it a day!
This second method is a little more complex than the Lens Correction method; however, it’s also more flexible. I like to use it when I want to create more sophisticated vignetting effects.
Here’s how it works:
With your file open in Photoshop, the first thing to check is that the foreground color swatch is set to black.
To revert to the Photoshop default of a black foreground and a white background, press the D key.
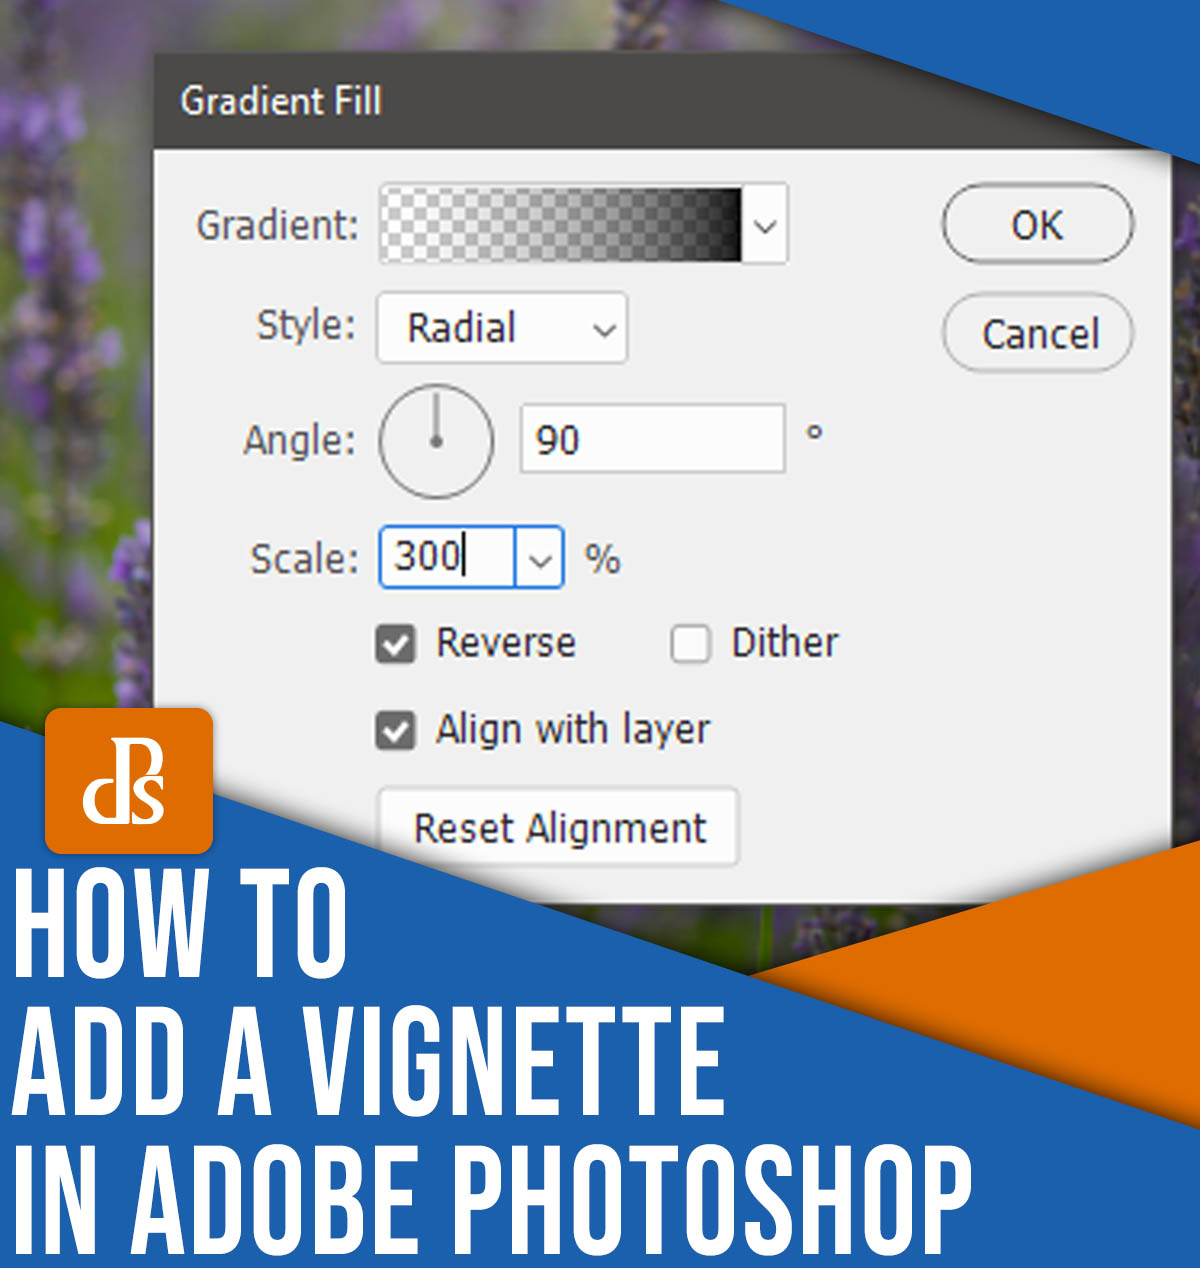
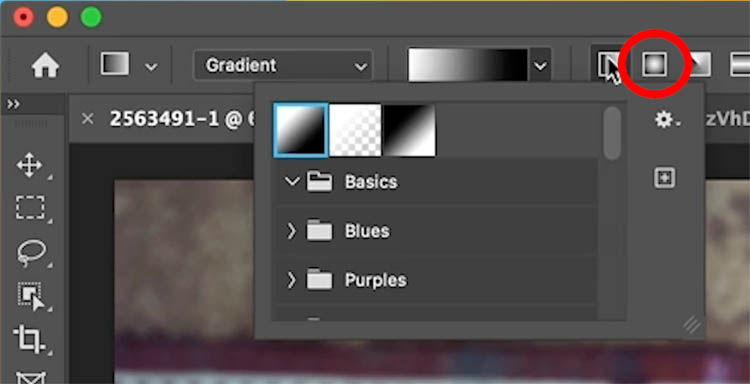
Next, choose Layer in the main menu, then select New Fill Layer>Gradient. Click OK on the first pop-up window that appears.
A second pop-up will appear: the Gradient Fill settings window. Make sure to tick the Reverse box (otherwise, your vignette will be inside-out, with the center of the image dark, and the edges of the image untouched by the effect).
By default, the Gradient Fill Style will be set to Linear. Change this to Radial – that way, Photoshop knows to create the gradient in a circle, rather than a line.
At this point, you should see a vignette applied to your image, but it’ll be extremely intense. You can boost the Scale percentage to alter the strength of the vignette (smaller numbers correspond to a more intense gradient). I usually enter a value around 300% to 350%.
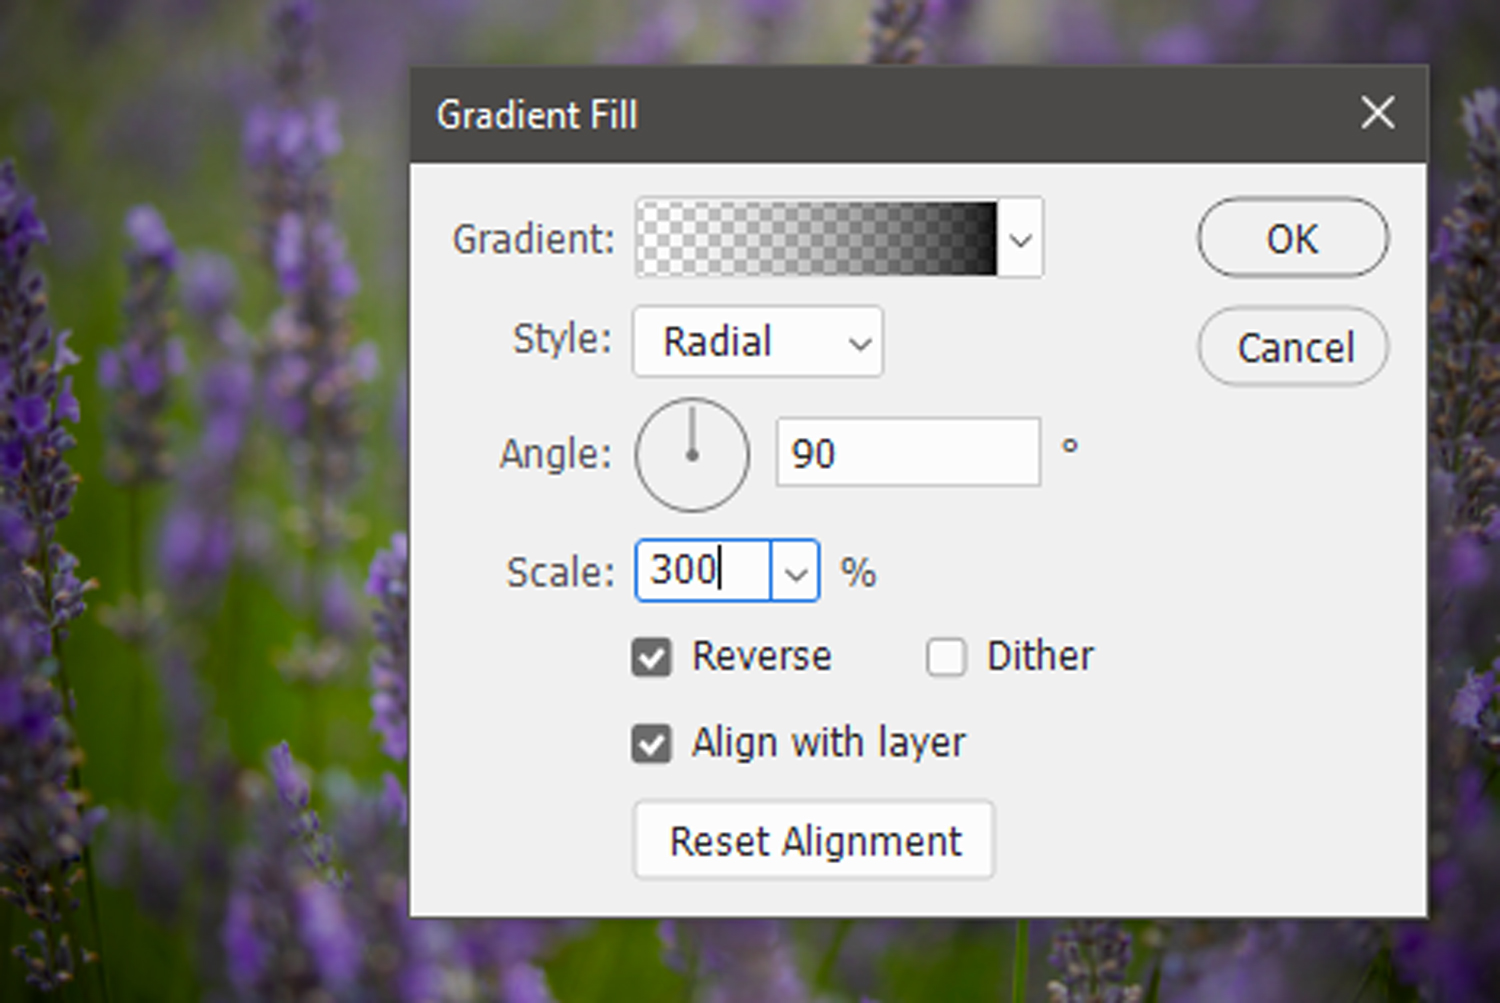
Click OK.
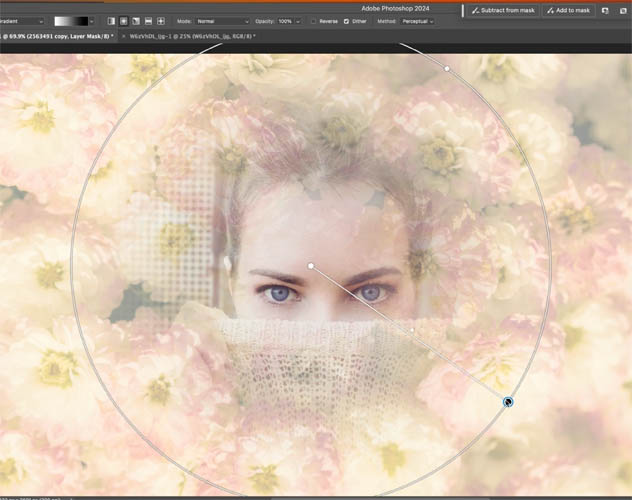
Once you’ve applied the Gradient fill layer, your image may look a little dark and flat. To blend the gradient effect more carefully, make sure the Gradient fill layer is selected, then reduce the opacity of the layer via the Opacity slider.
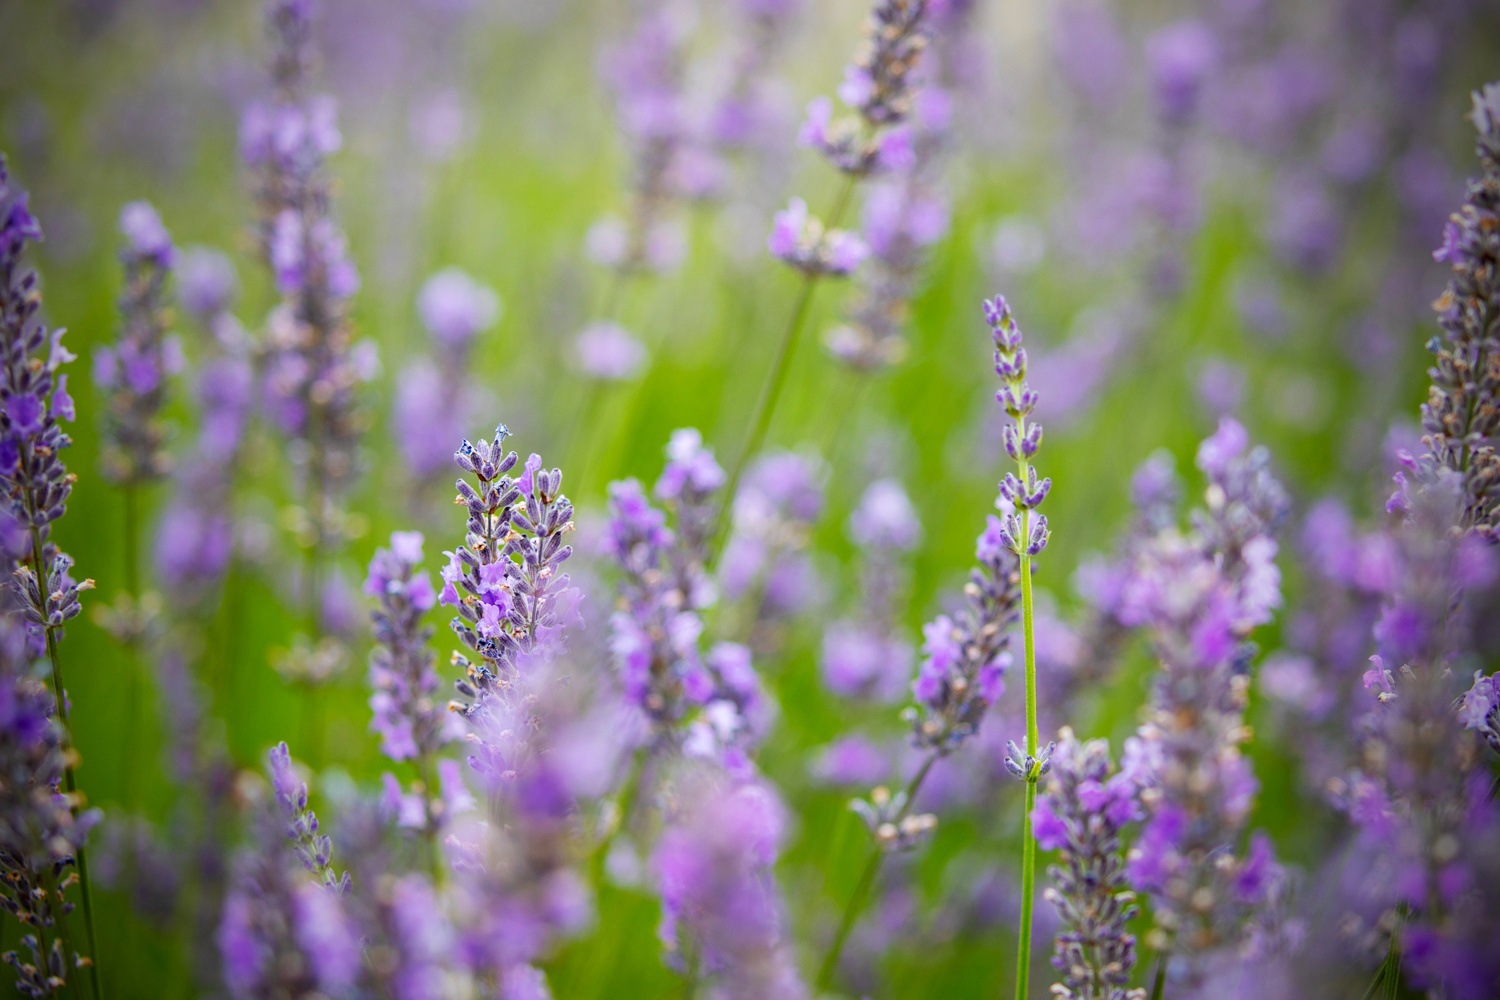
Each image will be different, but I usually reduce the opacity of the Gradient Fill layer to around the 50% mark. Here’s my example image with reduced opacity:
To further blend the Gradient fill layer with the underlying image, you can also work with Photoshop blending modes. Just click on the blend mode dropdown menu and see what works best for your image.
Finally, if your image is still feeling a little flat, make some adjustments with a Curves adjustment layer to boost the contrast.
Photoshop’s Shape tool has endless uses – including adding a vignette to a photograph.
Specifically, by working with an ellipse shape, you can easily create a versatile vignette. Here’s how:
First, make sure your foreground color is set to black.
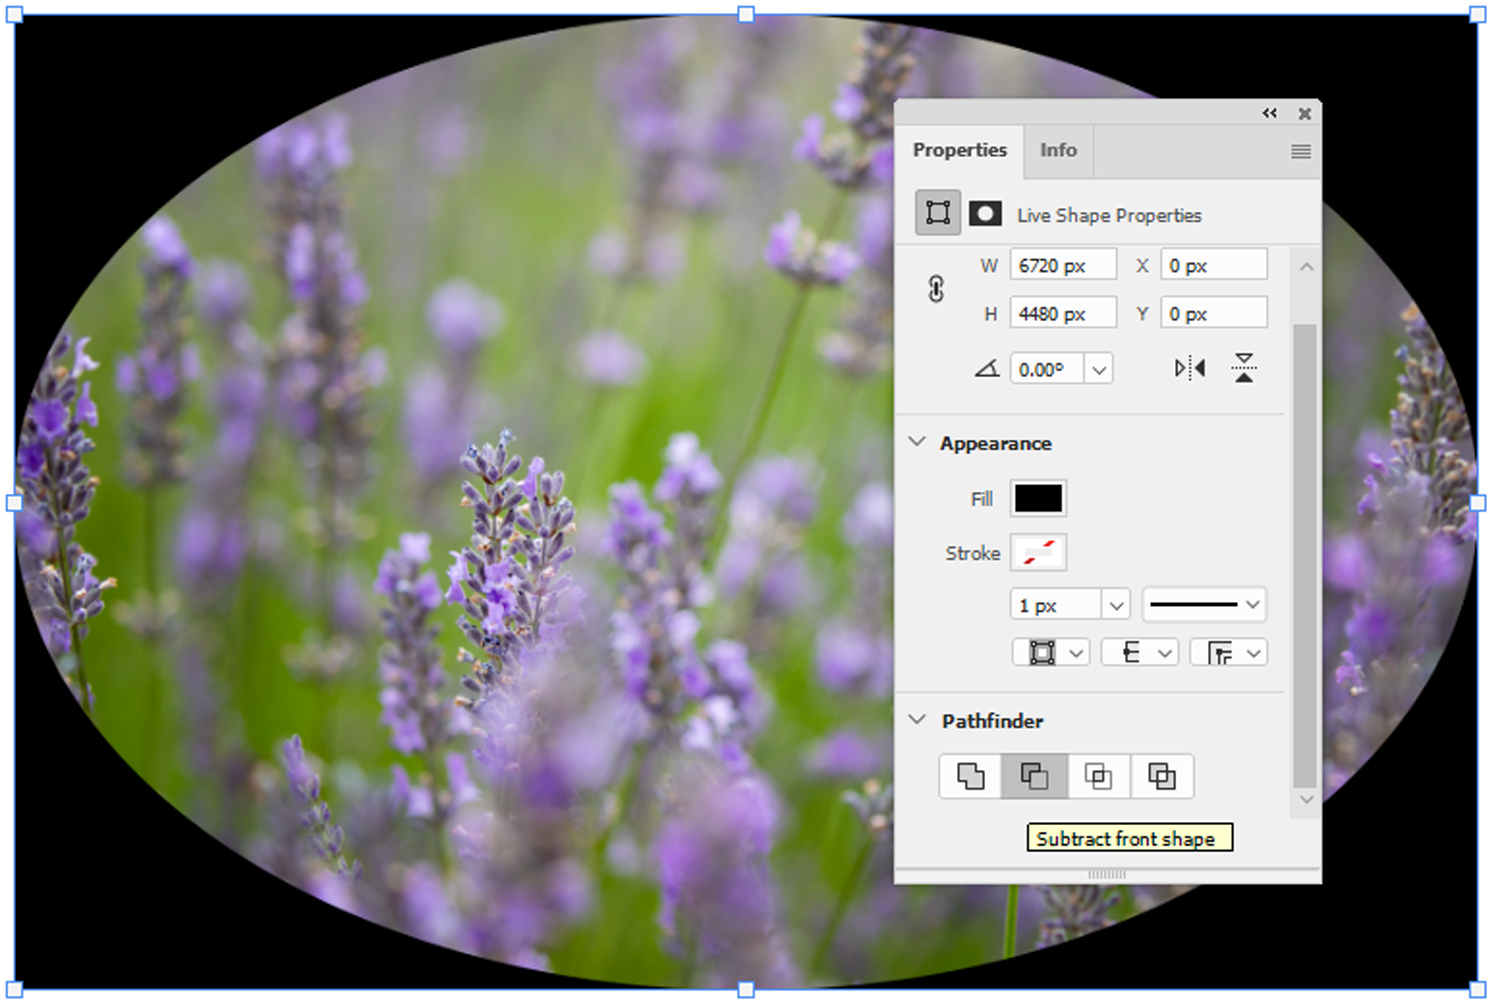
Then, with your image open in Photoshop, select an ellipse from the Shape Tool menu on the far left Photoshop toolbar. Check to make sure that the Fill swatch located toward the top of the screen in the Shape menu is set to solid black (if it’s not, then double-click and adjust the Fill color).
Once the color is set, drag the ellipse outline over your image to form an oval shape. When you release the mouse button, the shape will automatically fill with black.
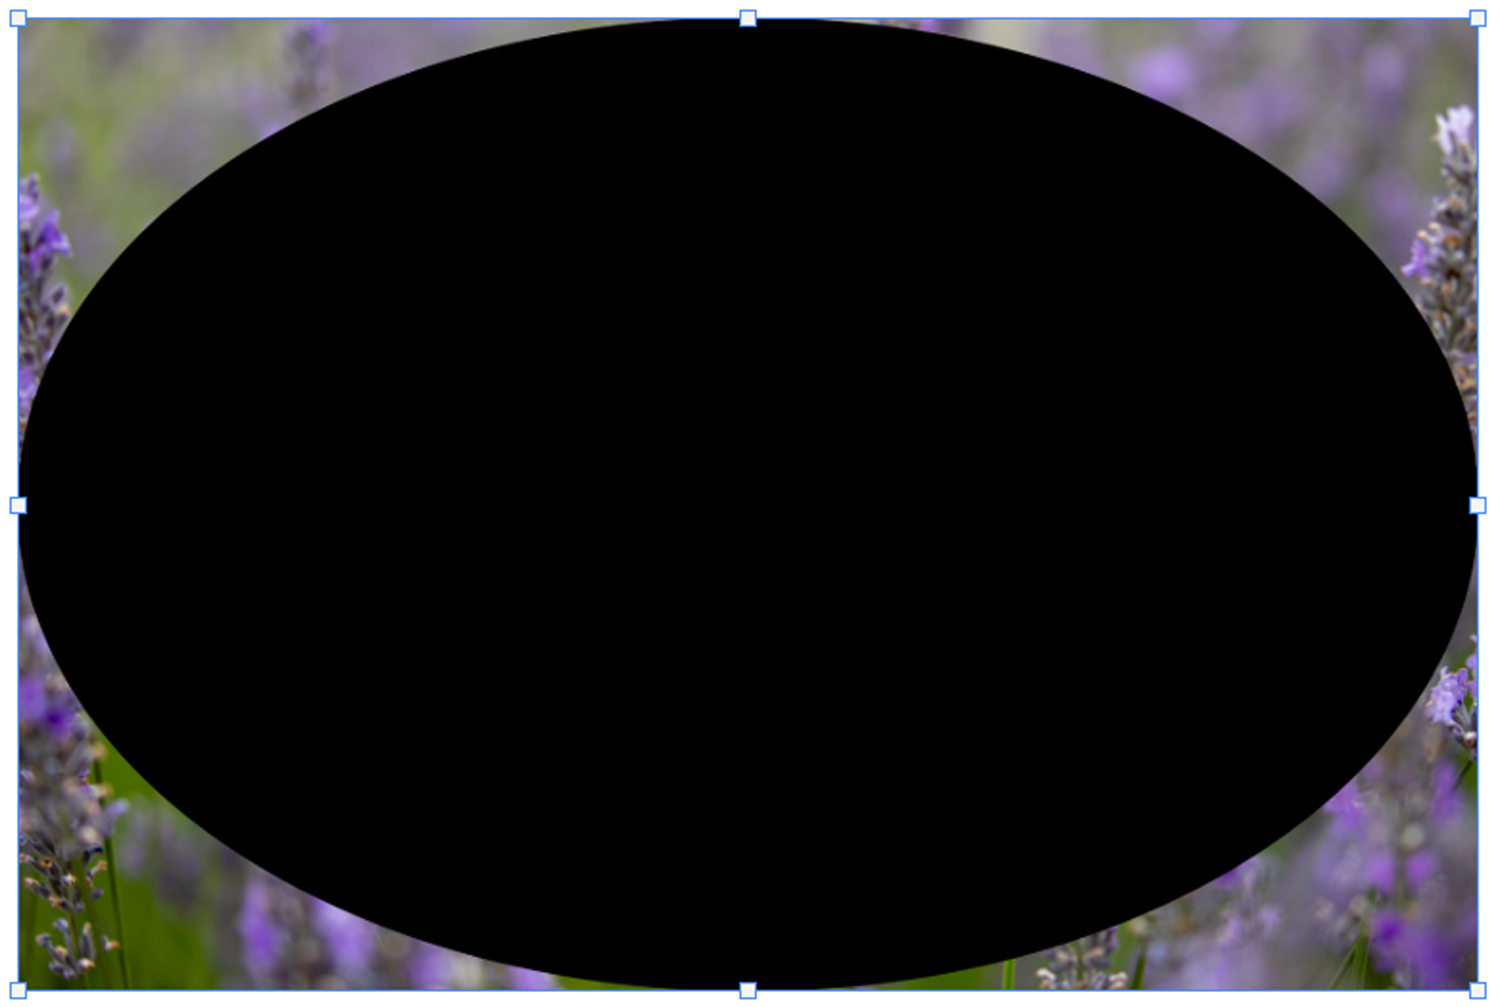
With your Ellipse layer selected, click on the Properties window and select the Subtract front shape icon located under the Pathfinder heading (see below). The shape will reverse, creating a black border around a now-transparent ellipse.
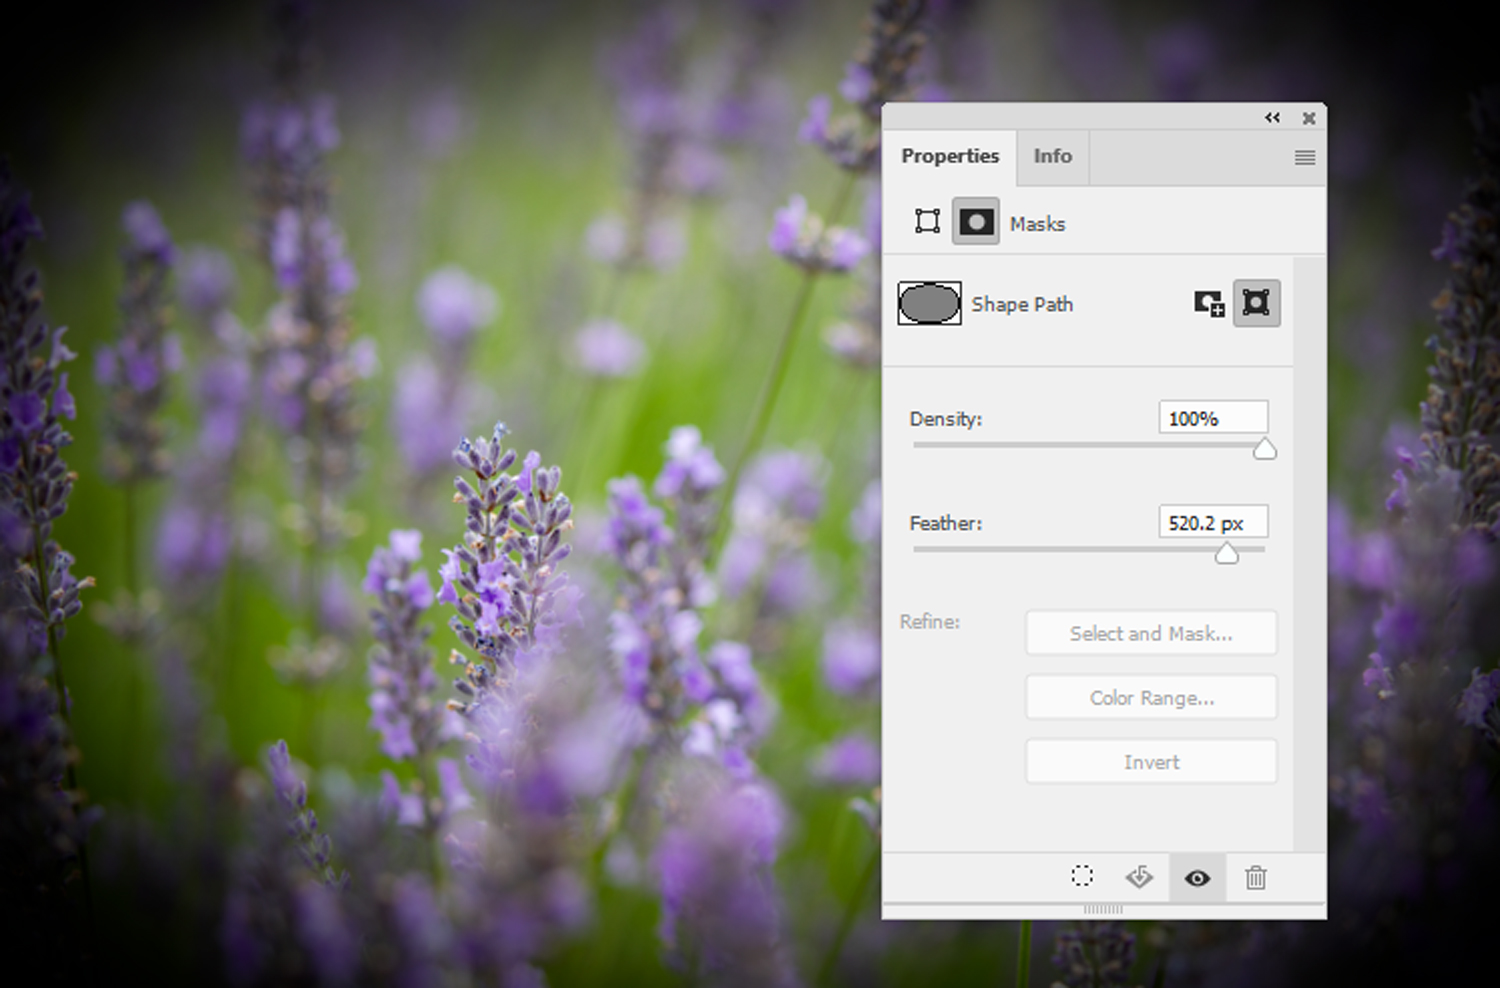
Make sure the Ellipse layer is selected, then refer back to the Properties menu.
This time, click the Masks icon; it looks like a gray circle on a dark background (see below). The Masks menu allows you to adjust the Density and Feather of the Ellipse layer. I usually leave the Density at 100%, but I push the Feather adjustment to its upper limits (which softens the vignette effect).
To increase the subtlety of the vignette, you can adjust the opacity of the Ellipse layer. Experimenting with different blending modes is another effective way to adjust the impact of the artificial vignette.
And feel free to alter the dimensions of the vignette with the Transform options or tweak the contrast and saturation with adjustment layers.
Once you’re done, you should have a vignette like this:
As you can see, applying vignettes to your photos in Photoshop doesn’t have to be hard. In fact, it’s really very simple! And it’s fairly customizable, too – which means you can spend plenty of time playing around with the strength, feathering, and position of your vignette effect.
So open some of your favorite images in Photoshop. See how they look with vignettes.
As long as you keep it subtle, I’m guessing you’ll get a great result!
A vignette is a darkening around the periphery of a photograph. It occurs for various reasons in many photographic circumstances.
There are several ways to create a vignette in Photoshop. The methods listed in this article are simple and effective ways to apply a vignette aesthetic.
Unfortunately, Photoshop doesn’t offer a vignette tool. However, you can easily create a vignette with the Shape tool, a Gradient fill layer, or a Lens Corrections filter.
The easiest way to remove vignetting in post-production is to open the image in Photoshop and – with the image layer selected – click Filter>Lens Correction. The Lens Correction window will present various options for reducing unwanted vignetting.

[ad_2]
Source link
Mar 18
[ad_1]
This is one of those fundamental skills in Photoshop. I’m making this tutorial because some things have changed in photoshop and I want to show the newest and best way to achieve the blending or fading effect. I’m also offering a way to have more flexibility and some different options to blend all the edges, not just one edge.
Here I our Photo on a layer, with a pattern in the background that we will fade into. (How to combine images here If you don’t know how to get to this point.)
Add a layer mask on the top layer
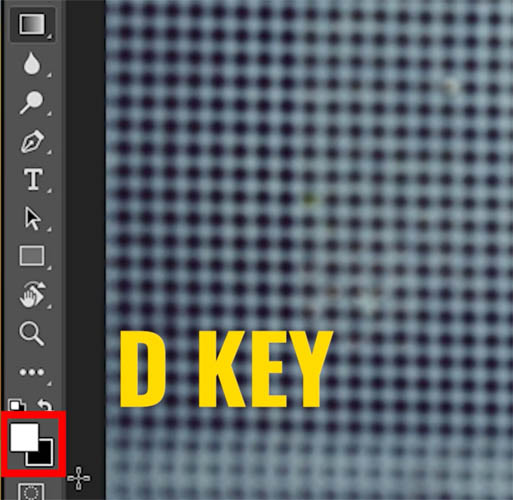
Press the D key to reset colors
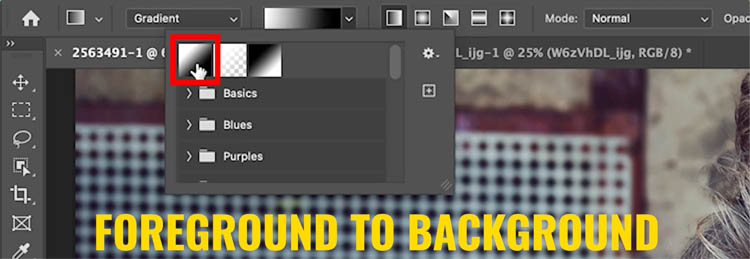
Choose the Gradient tool or hit the G key
Choose foreground to background and linear for the options as shown. Mode normal, opacity 100%
Drag on the image to apply the gradient.
Black hides the layer and white shows. Because it’s a gradient, you get a smooth blend.
The new gradients allow you to drag the points to change them.

On white so you can see better. (I created a white layer)
What if you want to fade the top too?
In the past, I would have said grab a black to transparent gradient. This still works, but the following gives more options for you
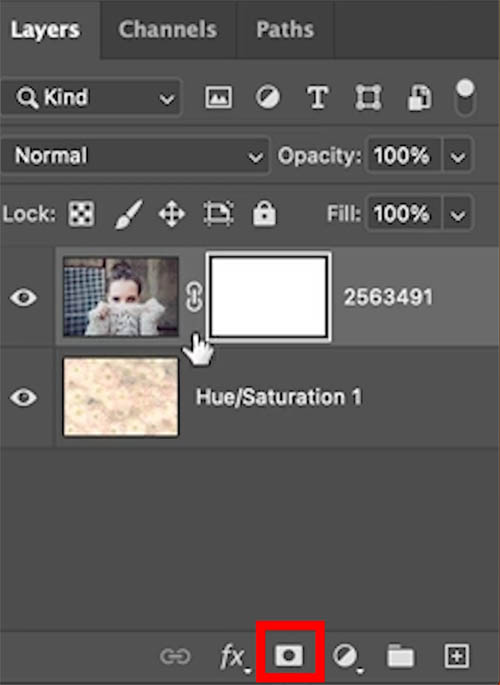
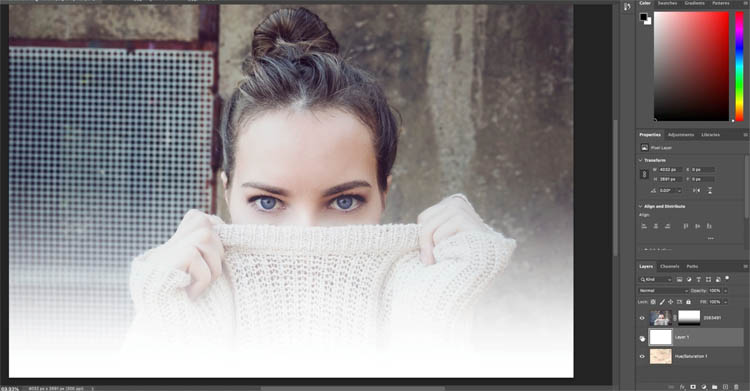
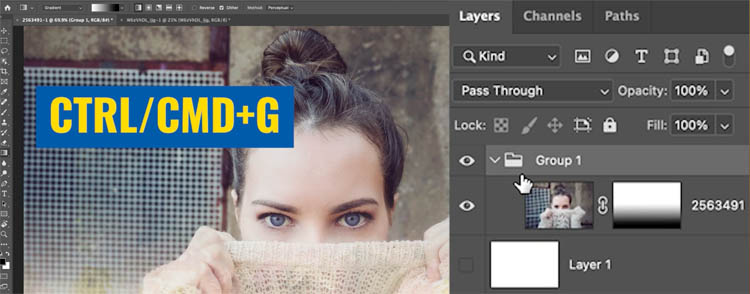
With your Layer selected, Press Ctrl/Cmd+G
This puts your layer in a group
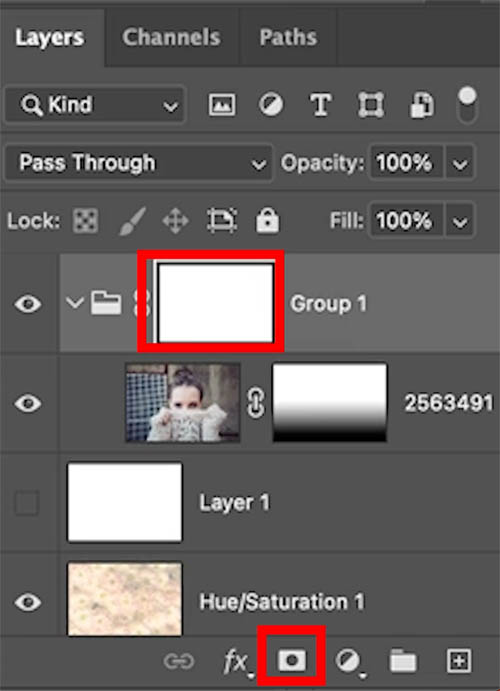
You can add Masks to groups
Add a layer mask
Apply the gradient at the top.
Notice it doesn’t affect the gradient at the bottom

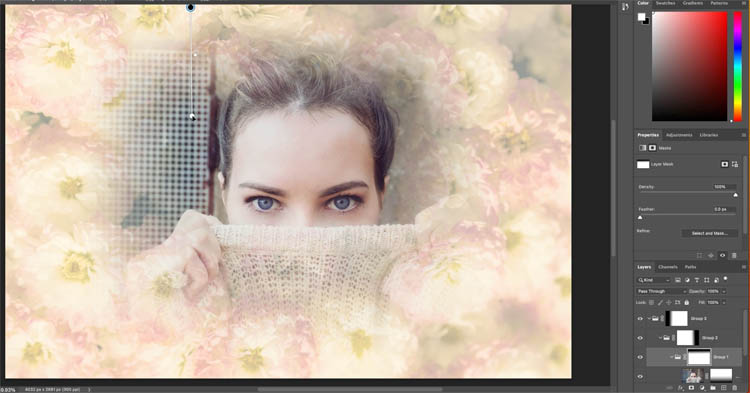
If you want more, select the top group (Its already selected unless you clicked somewhere else)
Press Ctrl/Cmd+G to put the group inside another group.
Add a mask, apply a gradient on the left.
Repeat for the right side. As you can see, you can keep nesting Layer groups and adding masks to each one. This is handy to know.
Another option is to choose. a radial Gradient instead.
Now you can do everything in one gradient. Here is a tutorial on using the radial gradient for blending layers, it shows the basics and goes into more depth
I hope you found this tutorial useful!
Thanks
Colin
[ad_2]
Source link
Mar 18
[ad_1]
Letter and line spacing are fundamental tools for anyone working with text in a design. In this overview, you’ll learn about the key spacing processes of kerning, leading, and tracking. These elements work in tandem to provide visually appealing lines of type.
Read on to learn about each process and how you can use them to manipulate text in Adobe Creative Cloud or our in-house editing tool, Shutterstock Create. You’ll be surprised how easy it is to adjust the spacing between letters and lines and have your designs feeling extra polished in no time!
Kerning refers to the space between two letters or characters.
There are extremes to kerning—letters can be too far apart or too close together. Both extremes will effect the legibility and readability of type. Therefore, the space between letters is an extremely important design principle to understand and master.
In this image below, the letters are disproportionately spaced out. The goal is to have a proportional amount of space between letters and/or characters.
Pay special attention to serifs, flourishes, and angular letters like A, W, or V to achieve a consistent appearance. Note that angular letters might need even more attention than straight letters.
It is worth noting that some fonts may have specific kerning adjustments for certain pairs of letters (kerning pairs), such as capital letters with lowercase letters or specific combinations of capital letters, to ensure optimal spacing and visual harmony.
Overall, kerning rules apply universally to all characters in a font, regardless of their case.
Kerning is usually reserved for medium to larger text and headlines, as those letters are more noticeable when the spacing or kerning pairs are out of balance.
Kerning rules refer to the guidelines and principles that govern the spacing between individual characters in a typeface. These rules help ensure optimal legibility, readability, and aesthetic appeal. Be sure to pay extra attention when you are manually kerning your letters and characters.
Kerning guidelines suggest adjusting the spacing, so it’s important to consider factors such as ascenders (letters that extend above the x-height of your text, such as d, h, or l), descenders (letters that dip below the baseline, such as g, y, or j), and the overall letterforms.
Additionally, it is important to examine the intended medium and size of the text, as kerning may need to be adjusted for readability and legibility.
Each typeface has its own inherent kerning values, but designers often have to manually adjust the spacing between certain letter combinations to improve the overall quality of the typography.
Good kerning is essential in typography and can greatly enhance the overall visual impact and professionalism of a design.
This video will help you understand the best practices for space between individual letters and characters from a seasoned graphic designer.
Adobe Creative Cloud programs such as Illustrator, Photoshop, and InDesign all have a central place to adjust kerning. You can find this in the Character palette, located in the Window drop-down menu.
In InDesign and Illustrator only, you can quickly bring the Character palette into view by hitting Cmd+T or by accessing the Window drop-down and hovering over Type to enable the palette.
To change the spacing between individual characters, activate the Type Tool (T) and move your cursor between your chosen letters. Hold down Option and use the right or left arrow keys to move the letters closer or farther apart.
If you want to use the Character palette, navigate to the kerning drop-down (pictured below in Illustrator), and select from the menu or use the up and down arrows to start manual kerning.
Negative values will bring the two letters closer together, while positive values will increase distance between the letters.
Play around with different values to find spacing that satisfies your design.
Leading consists of the vertical spacing between lines of contiguous text.
This term came from the days of typesetting when individual pieces of lead were inserted between text blocks to increase the vertical distance between lines.
Like kerning, leading can impact the readability and legibility of type. Big gaps between lines of text can make reading more difficult and disrupt the reader’s flow, so don’t go too crazy with leading.
Again, ascenders are letters that extend above the x-height of your text, such as d, h, or l. And descenders refer to the letters that dip below the baseline, such as g, y, or j.
In the example below, most of the letters meet at the x-height, or the mean line at which lowercase letters meet. These words sit on a baseline, which is where leading comes into play.
Leading refers to the spacing between baselines, which often needs to be changed so ascenders and descenders don’t overlap.
Like kerning, leading is found in the Character palette in Illustrator, InDesign, and Photoshop.
When typing multiple lines of text with the Type Tool (T) in, say, 12 point font, Adobe will revert to an estimate leading value that is enclosed in parentheses (pictured below). Think of this number as the minimum value for leading, as going smaller might affect readability.
Highlight the text you want to alter or select the whole text box with the Selection Tool and change the leading in the Character palette.
Negative values decrease the spacing between lines of text, while positive values increase it.
A few lines of text will call for different leading measures compared to a blog post or a magazine article. Increase the leading when designing type for a long article to ensure your audience can follow along with ease.
Tracking, like kerning, adjusts the distance between letters. The only difference between these two is that tracking focuses on the space between all letters in a word instead of two letters.
Use this tool with great caution, as too much tracking can make reading a lot more difficult.
The tracking adjustment can be found in the Character palette right under the Leading tool. Adobe programs normally default to 0 when you type out strings of text.
Use the drop-down menu or up and down arrows to increase and decrease the tracking. Don’t increase tracking too much, except for emphasis on headlines or display fonts.
Don’t have Adobe Creative Cloud? You can easily manipulate letter and line spacing of text using our very own design tool, Shutterstock Create.
Type out some words with the Text tool and utilize the Line Height and Letter Spacing button (the “T” next to the arrow) within the top toolbar.
Line Height will adjust the leading of multiple lines of text, and Letter Spacing will adjust the tracking of words.
Easy, right? Now it’s your turn! Good luck!
License this cover image via Roman Samborskyi.
${excerpt}
[ad_2]
Source link
Mar 18
[ad_1]

Have you ever wrapped up a photoshoot, confident that your images were perfectly sharp as you reviewed them on your camera’s LCD screen, only to be disappointed when you later viewed them on your computer monitor and realized they weren’t quite as sharp as you initially thought?
This scenario is a common frustration for photographers, but don’t worry! We’re here to share some invaluable tips to ensure your photos are consistently sharp and clear:

Conventional advice often encourages photographers to fully open their camera lenses to their widest aperture setting, typically because it allows for the maximum amount of light into the camera, producing a beautiful blurred background. However, following this rule isn’t always the best option, and there are situations where refraining from fully opening your lens may be a better choice.
For example, rather than keeping your lens wide open at, say, f/1.4, consider stopping down to f/2.8. This choice aims to achieve a more BALANCED FOCUS across your subject.
When your lens is fully open, you risk having only a portion of your subject in sharp focus, such as their eyes being tack-sharp, while the rest of their face remains slightly blurry. Another instance can occur when photographing multiple subjects – the camera may focus solely on one person, leaving others or the rest of the group in a state of soft focus.
By adjusting the aperture just a couple of stops from its widest setting, you will still let enough light into your camera to achieve that beautiful background blur while ensuring more of your subject remains in sharp focus, resulting in more visually striking images that capture your subjects with greater clarity and detail.

The tiniest camera movement during a shot can introduce unwanted blur to your subject, commonly known as camera blur or camera shake. Even if you’re shooting without a tripod, you can still take measures to get sharper images – starting with PRESSING THE SHUTTER RELEASE GENTLY.
Even if you have steady hands, if you press the shutter too forcefully, you can create a slight camera shake, resulting in blurriness that is not visible until the images are viewed later or printed. If you have unsteady hands like I do, you may want to try using a tripod. If I’m excited, happy, or nervous, my hands ALWAYS shake, no matter what! So, I use a tripod as much as I possibly can.
While using a tripod might initially seem cumbersome or impractical, it rapidly becomes second nature with practice. Personally, I’ve found that taking this extra step consistently yields crisper, blur-free images, ensuring that my subjects are always captured in sharp detail.

Tailoring your shutter speed to suit your subject is critical in achieving sharper photos. The ideal shutter speed varies based on the characteristics of your subject.
Shutter speed is closely linked to the focal length of your lens, and there’s a handy (albeit rough) rule of thumb that helps you determine the minimum shutter speed needed to prevent camera shake – this rule suggests that your minimum shutter speed should be the reciprocal of your focal length in millimeters. In simpler terms, the equation is Minimum Shutter Speed = 1/Focal Length (in millimeters).
For example, if you’re using an 80mm lens, your minimum shutter speed would ideally be set to 1/80th of a second. Similarly, with a 50mm lens, the recommended minimum shutter speed would be 1/50th of a second. Keep in mind that this is just a general guideline, and the actual minimum shutter speed you can successfully achieve also depends significantly on the steadiness of your hand.
As mentioned earlier, some of us tend to have unsteady hands, particularly when the excitement of shooting takes over (which is quite common!). In such cases, a good approach is to multiply your focal length by a factor that suits your stability.
For instance, if you’re using a 50mm lens and want to account for your unsteady hands, you might opt for a minimum shutter speed of 1/200th of a second (50mm x 4 = 200). By doing so, you will minimize the risk of camera shake and ensure your photos come out crisp and clear, even when you are excited and your hands aren’t as steady as they should be.

When shooting in RAW, it’s essential to recognize that the images may initially appear less sharp on your computer screen than they did on your camera’s LCD. To bring out the desired level of sharpness and detail, you can leverage post-processing tools in Lightroom or Adobe Camera Raw.
In Lightroom, for example, you will want to fine-tune settings like Sharpness and Clarity during the post-processing phase. However, it’s crucial to exercise restraint and avoid excessive adjustments.
While a subtle touch of sharpening can make a significant difference in image quality, overdoing it can lead to unnatural and unappealing results. So proceed with a measured hand when enhancing the sharpness of your RAW images in post-processing.

Achieving sharper photographs is an art that combines technical knowledge with practical skill. We’ve explored essential tips like selecting the correct aperture and shutter speed, preventing camera movement, and sharpening RAW images in post-processing. When applied thoughtfully, these techniques can make a world of difference in the quality and impact of your photos.
As you continue your photographic journey, remember that mastering sharpness is a CONTINUOUS LEARNING PROCESS. Each click of the shutter offers an opportunity to refine your skills and capture images that resonate with clarity and precision.
So, keep experimenting, keep practicing, and let your passion for photography drive you towards consistently sharper and more stunning results!
Do you have any questions or comments about How to Get Sharper Photos? Leave us a comment below – we would love to hear from you! And PLEASE SHARE our tutorial using the social sharing buttons (we really appreciate it)!

[ad_2]
Source link
Mar 13
[ad_1]
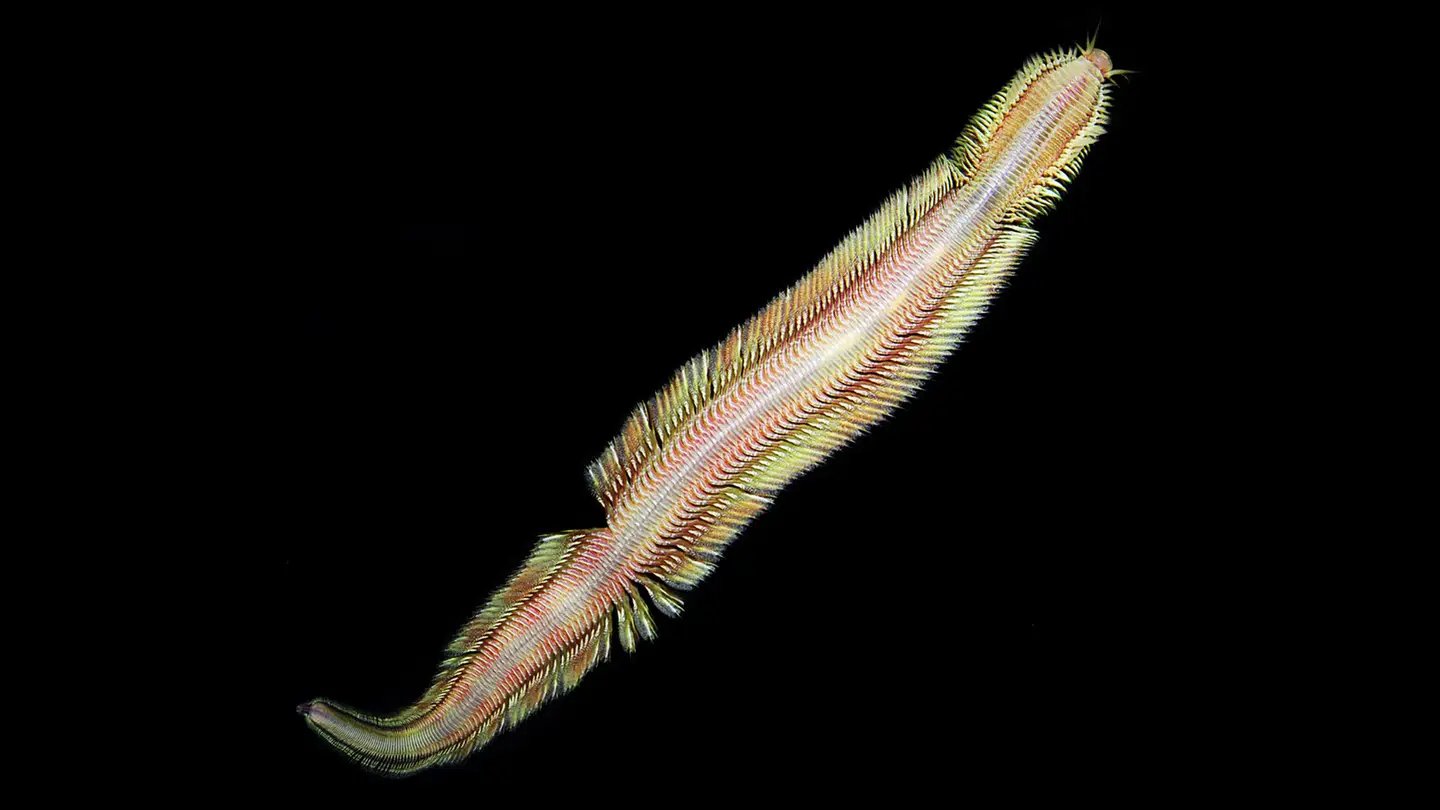
Scientists have photographed a never-before-seen deep-sea worm species that moves just like a “living magic carpet.”
Scientists discovered the new species of the deep-sea worm living near an underwater methane seep some 30 miles (50km) off the Pacific coast of Costa Rica.
Methane seeps are parts of the seafloor where the powerful greenhouse gas methane escapes from rocks or sediment on the seafloor in the form of bubbles.
In a study published last week in scientific journal PLOS ONE, the researchers reveal how the deep-sea worm species, which has now been formally named “Pectinereis strickrotti,” was first spotted during a dive at a depth of 3,280 feet (1,000 meters) in the HOV Alvin submersible back in 2009.
“When we first saw it, we immediately starting asking what it was. A vertebrate? Some strange fish? We had this blurry image and that was it, but we were very intrigued,” Alvin’s lead pilot Bruce Strickrott tells PopSci.
“That’s how it is down there. You see things for one minute, they’re gone, and then you talk about it.”
However, the team saw the species again when they returned to the Costa Rican methane seeps in 2018.
On their second encounter, Strickrott described how the deep-sea worms had a sinuous swimming technique that reminded them of a fantastical magic carpet.
“They swim slowly, but when he really wanted to move, he started to undulate almost like a living magic carpet,” Strickrott explains.
Using a five-chambered vacuum canister device that Alvin’s lead pilot Bruce Strickrott called the “slurp gun,” the team carefully collected several specimens and enough photos and video to formally describe the new species.
According to PopSci, the team has discovered that Pectinereis strickrotti is about four inches long. Its elongated body is flanked by a row of feathery, gill-tipped appendages called parapodia — which help it swim in a wavy pattern reminiscent of a magic carpet.
The worms are blind, owing to the total darkness that they experience 3,280 feet under the ocean. The team believes that Pectinereis strickrotti likely has a keen sense of smell and touch to navigate the inky black ocean.
Pectinereis strickrotti also boasts impressively large jaws. However, it still remains a mystery what these deep-sea worms exactly eat.
Image credits: All photos by Ekin Tilic.
[ad_2]
Source link
Mar 12
[ad_1]
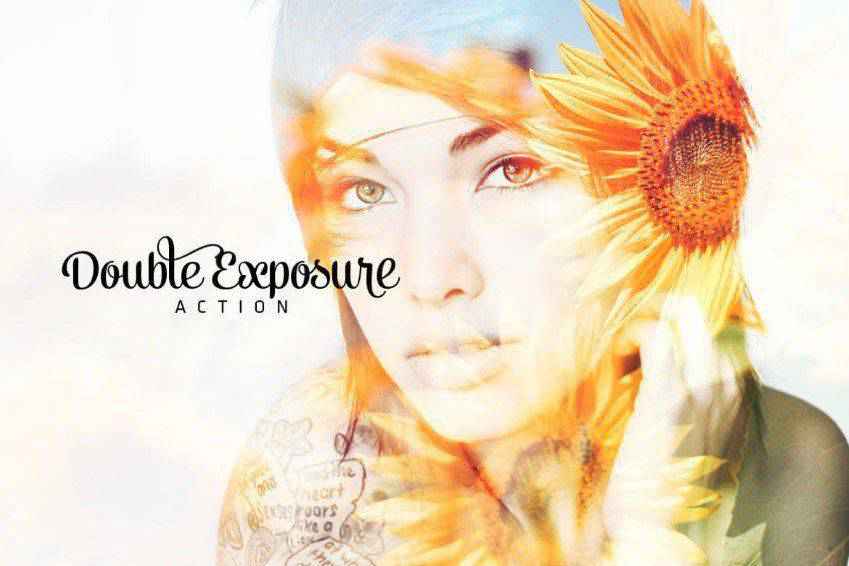
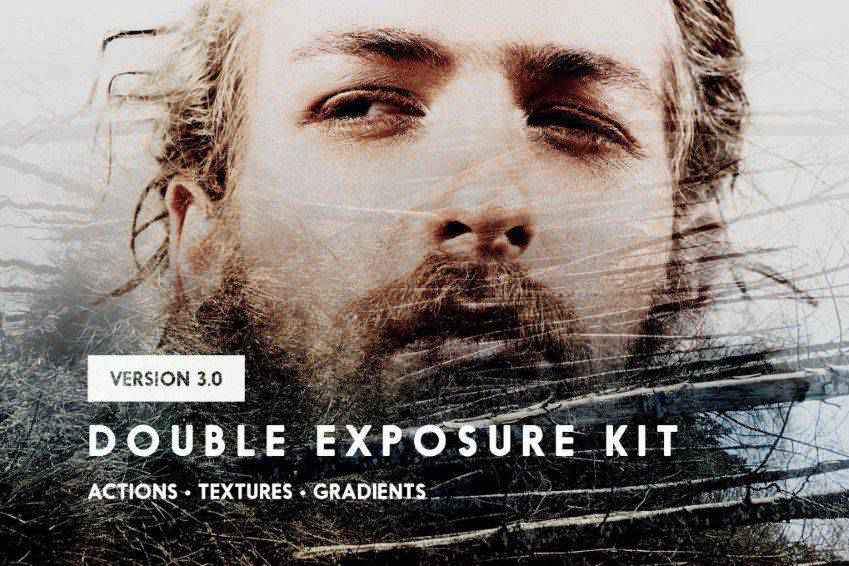
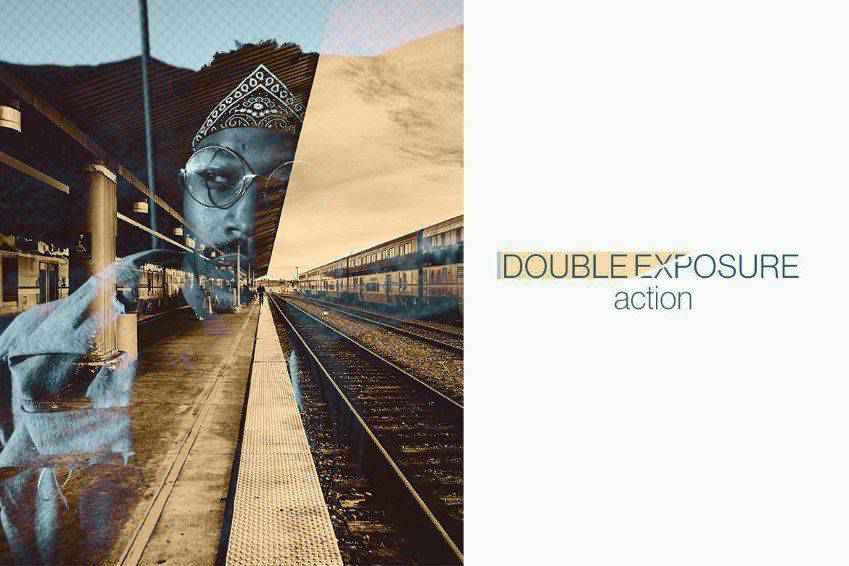
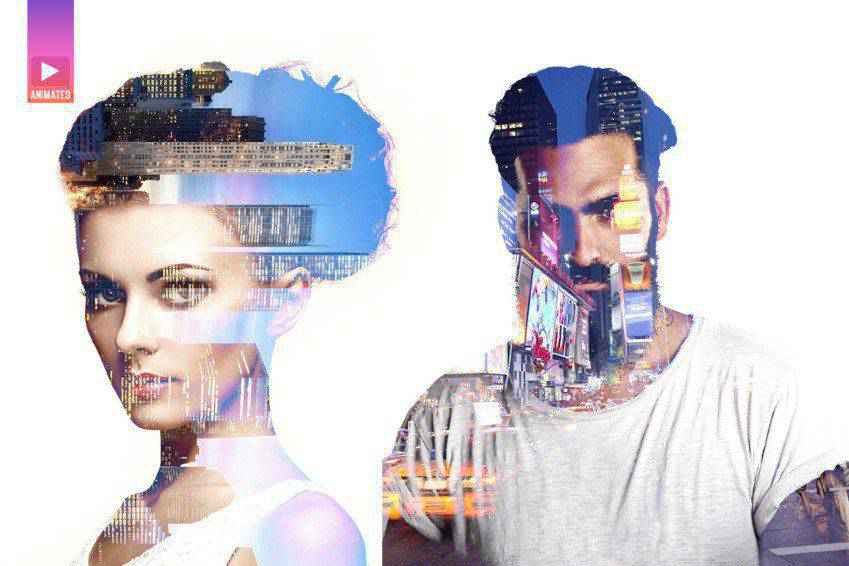
The double exposure effect, or duotone effect, is a photographic technique where two separate images are overlaid to create a single composite image. This technique has been used in traditional film photography for decades, but with the advent of digital cameras and photo editing software, it has become even more accessible.
If you’re looking to create a double exposure effect without having to manually adjust camera settings, Photoshop action sets are a great solution. They’re designed to streamline your workflow and save you precious time.
To help you get started, we’ve compiled a collection of the best double exposure and duotone effect Photoshop action sets. They will all enhance your photos and add a touch of creativity. With these tools at your fingertips, you can achieve new aesthetics in minutes and take your photography to the next level.
Double exposure or duotone effects are creative techniques that can transform your photos into visually captivating and artistically expressive works.
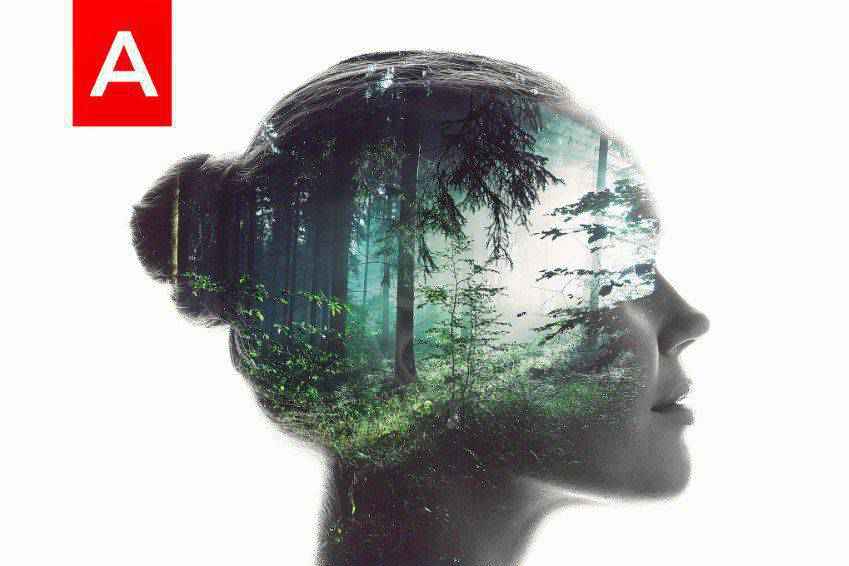
Double exposure involves blending two images into one, creating a surreal and dreamlike composition. It’s often used to merge portraits with landscapes, nature, or other subjects, resulting in a striking and visually intriguing image.
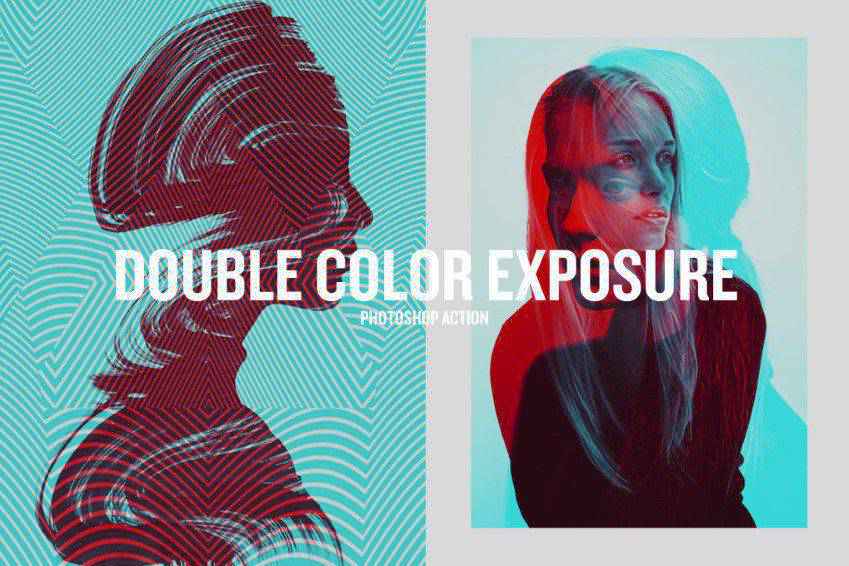
Duotone effects, on the other hand, involve converting an image into two dominant colors, usually contrasting shades. This technique adds a bold and dramatic look to your photos, emphasizing certain elements and creating a strong visual impact.
To achieve these effects, photographers often turn to Photoshop actions. They provide the tools to control the blending of images for double exposure and customize the color tones for duotone effects.
Whether you want to create a mesmerizing double exposure or give your images a duotone makeover, these actions can help you achieve your desired artistic effects. Transform your photos into visually engaging and memorable compositions that tell unique visual stories.
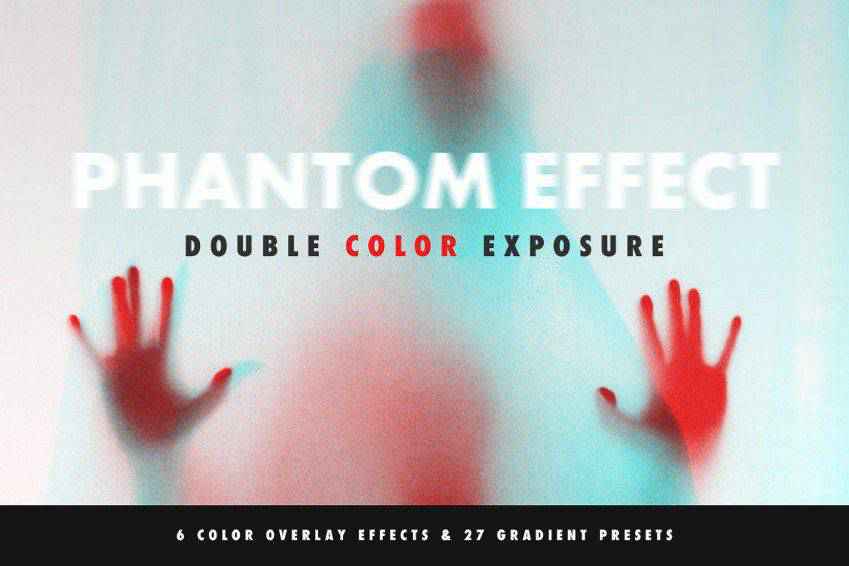
First in our collection is the Double Color Exposure Effect Photoshop Action. This action is powerful yet easy to use. It comes with six overlay effects and 27 gradient presets. You can apply the effects with just a couple of clicks, and it comes with a help file to help you troubleshoot should anything go awry along the way.
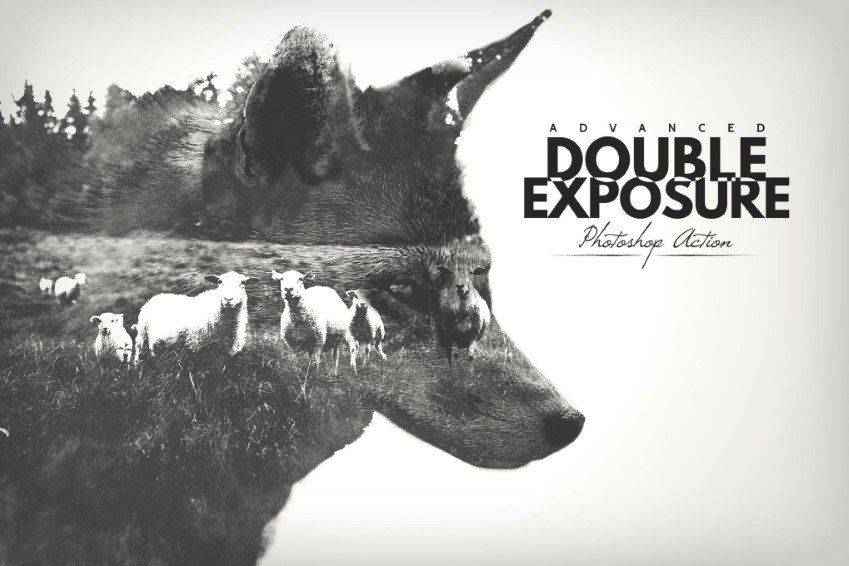
The Advanced Double Exposure Photoshop Action is easy to use and established in well-organized layers so you can undo your work should you need to. This set comes with 18 mixable color presets and provides a text guide.
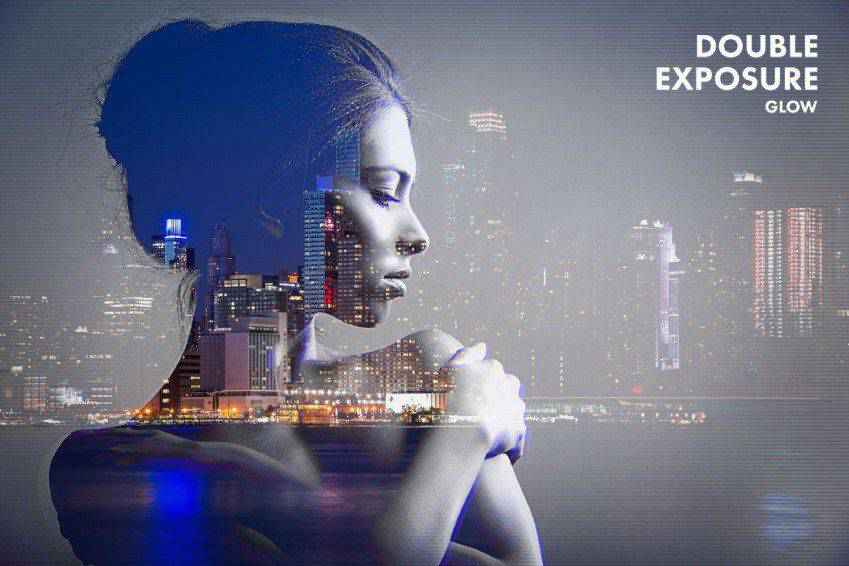
Another option is the Double Exposure Glow Photoshop Action. This action makes it easy for anyone to add a glowing double exposure effect to your photos with a few clicks. The action has organized layers and comes with complete documentation.

This double exposure Photoshop action seamlessly combines two photos to create a beautiful finished product. It’s customizable and includes a vintage effect, light leaks, and color grading options.
Another Photoshop action you might want to consider is this, which includes four variations. It ideally works in medium to high-exposure photographs, comes with a help file, and is generally designed to be used quickly and efficiently.
This Double Exposure Photoshop Action is a fantastic effect for your photos. After making that one click, you can add color tones, gradients, and more. It’s easy to use and can make a lasting impression by means of the end result.

The Double Exposure Photoshop Action Kit allows you to create double exposure effects in many ways. With just one click, you can adjust the brightness, opacity, dodge, masks, gradients, and more. Plus, it comes with 30 textures and double exposure gradients, to boot.
The Double Exposure Photoshop Action makes it super easy to create a double exposure effect on a whim. It only takes a few seconds to implement, and the end result is stunning. This action comes with 25 color scripts and custom colors. Plus, it’s fully layered, customizable, and comes with documentation. What more could you ask for?
This trendy action set is super easy to use and yields results you will be proud of. It has organized layers for easy use and comes with an illustrated guide and video tutorial.

Another great option is The Double Color Exposure Photoshop Action set. This one makes it possible to add colorful double exposure effects to photos, text, graphics, and more. With one click, you can transform an image using seven different color styles.
This set of double exposure Photoshop actions includes a video tutorial and documentation that make getting started easy. It comes with several actions for blending two photos, and for adding effects to a single photo, adding depth of field, and adding chromatic distortion. It also comes with light effects, textures, and more.

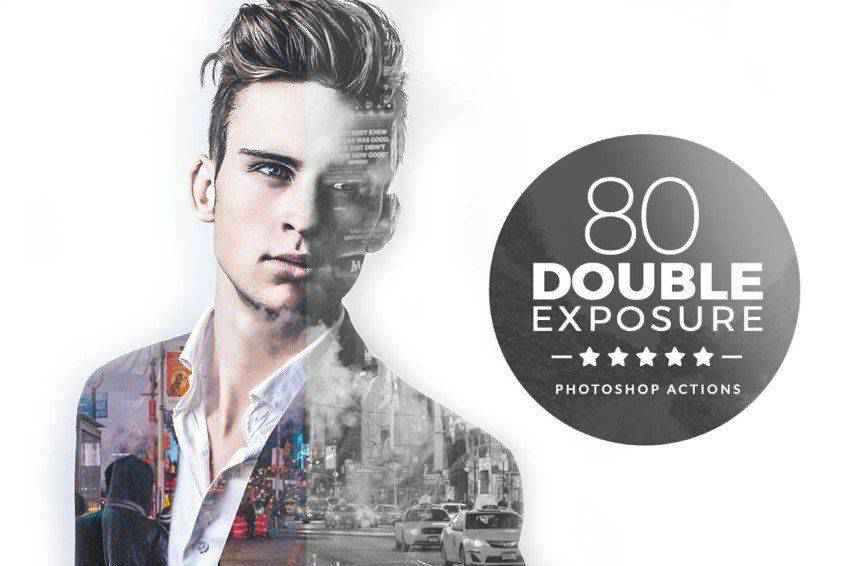
Another choice to consider is this set of 80 double exposure Photoshop actions. They all work with a single click, and the set comes with instructions for their specific use.
The Color Double Exposure Photoshop Action delivers professional results in a matter of minutes. It’s easy to use, fully editable, and grouped so that it can be used fast. It comes with 50 color presets, and you have control over each layer, so you can pick and choose which elements of the effect you want to use. Finally, this action is non-destructive, so your original images remain intact.

The Double Exposure Glow Photoshop Actions is just as solid an option as all others here. It can be implemented in a single click, has organized layers, and includes several adjustment settings for easier use. It’s easy to edit and provides documentation as well. Once added to your photos, you can enjoy a nice glow effect on top of a traditional double exposure.
Here’s another excellent choice. Using two photos, the Animated Parallax Double Exposure Photoshop Action creates a parallax shift effect. It comes with four different shift styles and can be implemented with just a couple of clicks. It’s also fully layered and can be customized to suit your specific needs.
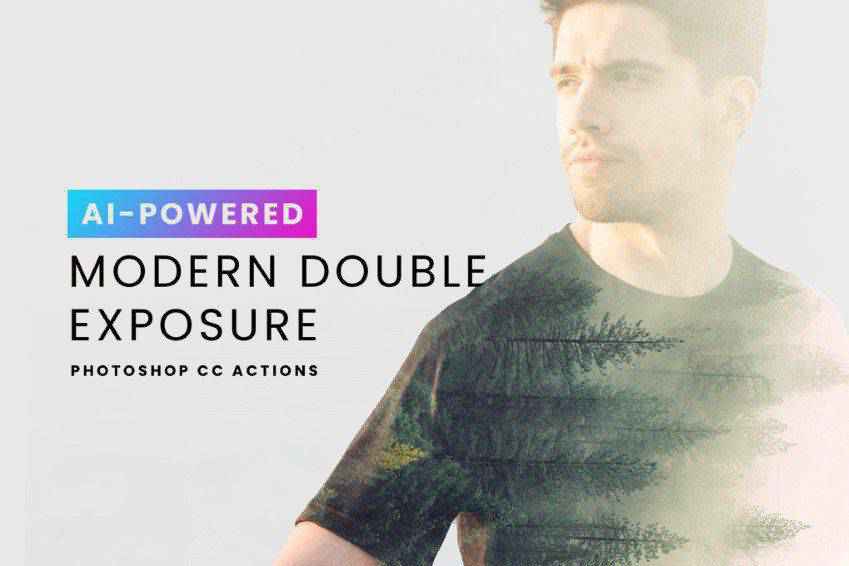
You might also consider the AI Modern Double Exposure Photoshop Actions set. This set makes it easy to create double exposure artwork, and it uses AI to detect faces and produces stunning results. It uses well-organized layers that are completely editable, you can swap textures, and it comes with 30 high-resolution textures.
Another option is the Premium Double Exposure Photoshop Action set. Everything is separated and has grouped elements for easier use. The result is stunning, offering a professional look that’ll make it seem like you spent hours trying to achieve it.

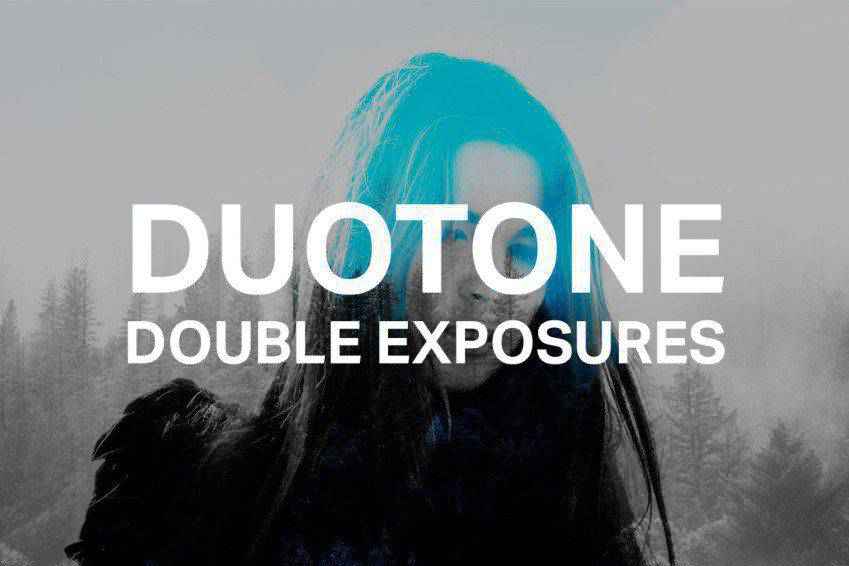
The last action in our collection is the Duotone Double Exposure Photoshop Actions set. This one requires selecting two images and then playing the actions all at once to achieve the desired effect. It comes with duotone effects, on which you can adjust the opacity. It also allows for balance between layers and is non-destructive, so your original images stay intact.
Window > ActionsLoad Actions from the menu and go to the folder where you saved the unzipped action file to select itAction panelActions panelWhat do these Photoshop actions do?
They allow you to apply captivating double exposure or duotone effects to your photos, creating visually stunning and artistic results.
Can I use these actions to enhance the color and contrast in my photos?
Yes, these Actions are excellent for enhancing color and contrast, resulting in striking visual effects that make your photos stand out.
Do these actions work with all types of images, including portraits and landscapes?
These Actions can be applied to various image types, making them versatile for both portraits and landscapes.
Can I customize the intensity of the effect?
Certainly! You can adjust the settings to customize the intensity of the effect, allowing for unique and tailored results.
Can I use these actions to create content for social media and marketing?
Yes, these Actions are versatile and can be used to create eye-catching content for social media, marketing campaigns, and other creative projects.
Each of these Photoshop actions is a fantastic option that can simplify your workflow and make editing your photos easier than ever. It can also transform your images into striking duotone or double exposure effects that will make a lasting impression.
The best part about these Photoshop actions is that they are fully customizable, allowing you to adjust the colors, opacity, and other variables to achieve your desired effect. So go ahead and try a few of them out to see which ones work best for you.
[ad_2]
Source link
Mar 08
[ad_1]
Get ready to shine a spotlight on your best photos of 2023! The 500px Global Photography Awards are back for their third edition, offering you an opportunity to showcase your talent and become the next 500px Photographer of the Year. It’s the perfect competition to wrap up the year, and guess what? It’s entirely free to enter! With six captivating categories, the Awards has something for every photographer, from the zealous hobbyist to the seasoned pro. To level the playing field, we’ve introduced Hobbyist and Pro sections, ensuring everyone has an equal shot at claiming the title.
The Hobbyist section is crafted for passionate enthusiasts, students, or anyone who finds joy in photography as a fulfilling hobby.
The Pro section is designed for photographers who make a living from their craft, handle paid assignments, or even run photography-related businesses.
Ready to claim the title of 500px Photographer of the Year and leave your mark on the world of photography? Submit your best photos of 2023 now!
Each category will have a Hobbyist and Pro winner and five finalists (12 category winners and 30 finalists total). The title “Photographer of the Year” will be awarded to one Hobbyist winner and one Pro winner, with amazing prizes to be won.
Submit your best photos from 2023 to be part of this global celebration of photography!
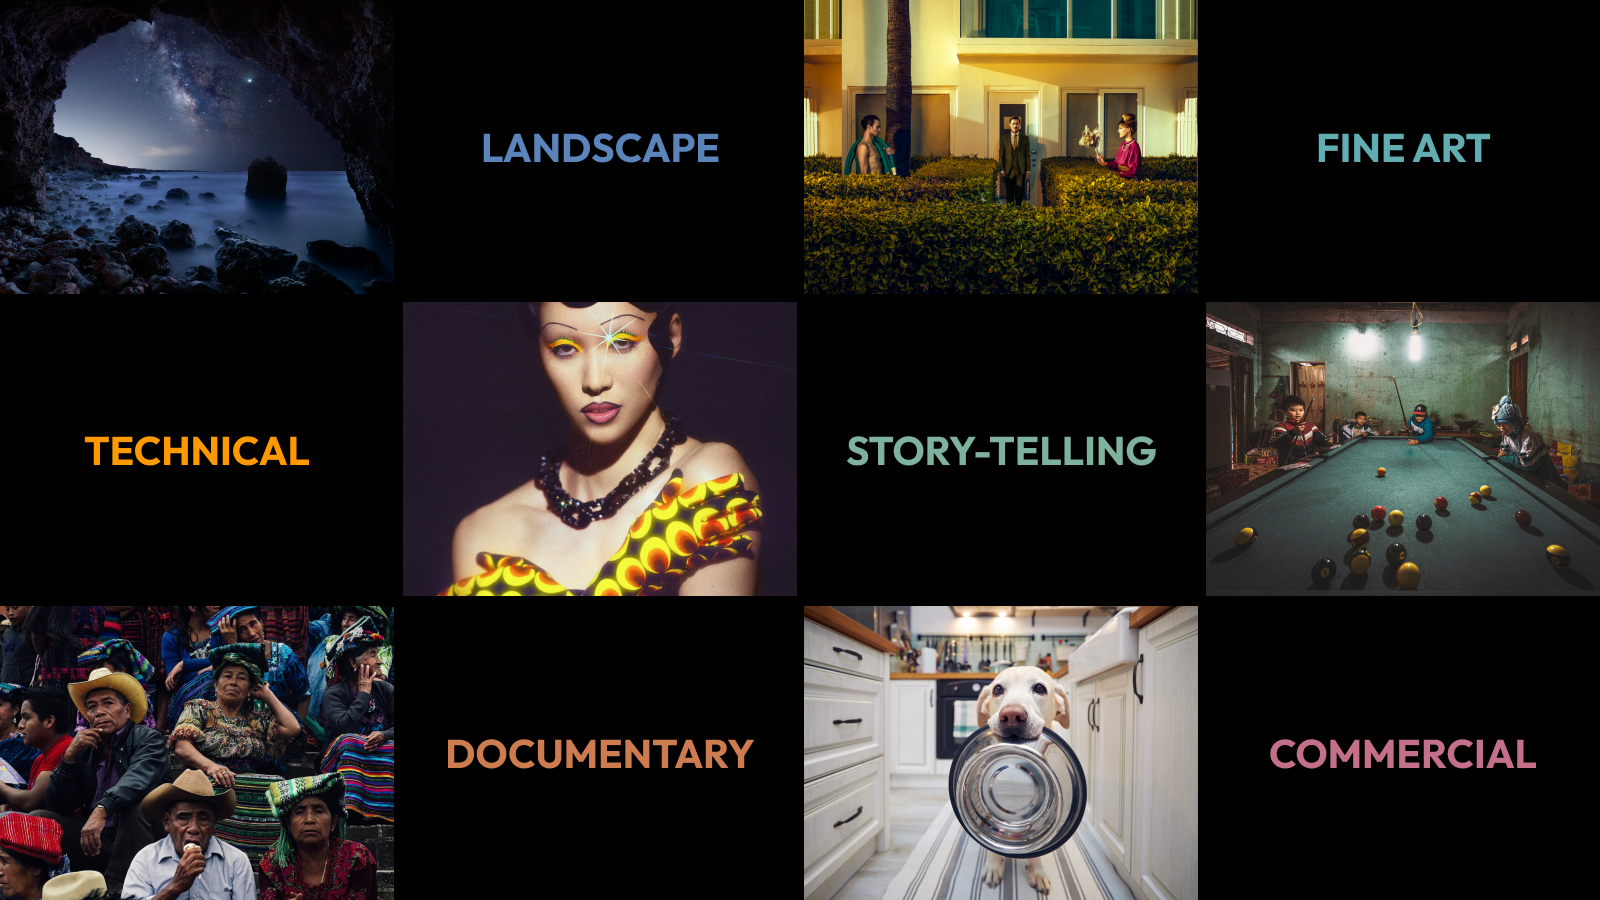
Landscape photography is one of the most diverse genres. There are a plethora of landscapes that can be captured, and each location can be photographed in intriguing ways depending on the time of day or vantage point. Nature is magnificent, and cameras have a special way of articulating that.
Submit your images that capture the spaces within the world—the vast and untouched terrains or environments.
Enter Now
Fine art photography doesn’t hold you back—it’s expressive and full of creative spins on the world around us. Whether by using props or post-production manipulation of colors, grain, or more, imagination is a strong weapon and delivers striking imagery.
Submit your images created as a means of expression, with an undeniable imaginative and aesthetic quality to them.
Enter Now
Let’s get technical. That means sharp and in-focus, intentional manipulation of textures, and precise spacing of subjects. When done well, these images often feel easy—but they are the furthest thing from. Achieving a technically perfect image means mastering light, shapes, and more.
Submit your images considering lines, texture, color, size, and depth, resulting in a high-quality depiction of the subject.
Enter Now
Documentarians help shape history. They tell the story of the underdog or the hidden narratives, they expose rich cultures and help awaken society to necessary change. The moment documented can be a moment that may be interpreted as simple, but through the lens, it becomes complex.
Submit your images that chronicle the world around us realistically and honestly.
Enter Now
When it comes to storytelling, a common mistake is to overcomplicate the elements within the frame. However, what will make a stand-out image is that the narrative is communicated and drives the audience to want to know more, in as simple a way as possible.
Submit your images that capture a moment, making viewers wonder what came before and what will come next.
Enter Now
Commercial content allows brands and small businesses to connect with their audiences and is relatable and authentic when done successfully. Images need to stand out, feel genuine, and resonate with viewers as they see themselves reflected in some way.
Submit your images taken to sell, advertise, or market a business, a product, a service, a person, or persons.
Enter Now
The 2023 500px Global Photography Awards has more than $26,000 in prizes to be won! From cash prizes to stand-out gear from some amazing brands like Hasselblad, Xpozer, Joby, DJI, and Exascend.
Pro:
TOTAL PRIZE VALUE OF $1,025 US
Hobbyist:
TOTAL PRIZE VALUE OF $1,025 US
Pro:
TOTAL PRIZE VALUE OF $13,000 US
Hobbyist:
TOTAL PRIZE VALUE OF $3,000 US
All category winners and finalists (30) will receive a beautiful 24×36 print of their winning photo and a mounting system from Xpozer.

Review the six categories that you can enter (at no charge to you) for this year’s awards. Once you’ve familiarized yourself with what our editors will be looking for, revisit your archive of images taken in 2023 and cull them with intentionality. You can submit any images that you’ve uploaded to the 500px site since January 2023, or upload new work to your profile to submit.
Please only submit your work to the appropriate skill level to keep the competition fair. Our editors will be using a keen eye and their best judgment to curate, but your honesty when submitting is appreciated.
ENTER THE 500px GLOBAL PHOTOGRAPHY AWARDS
Not on 500px yet? Sign up here to explore more impactful photography.
[ad_2]
Source link
Mar 08
[ad_1]
This process is super quick and easy, and you can do it in either Lightroom Classic or the ‘cloud’ version. Here’s how to do it.
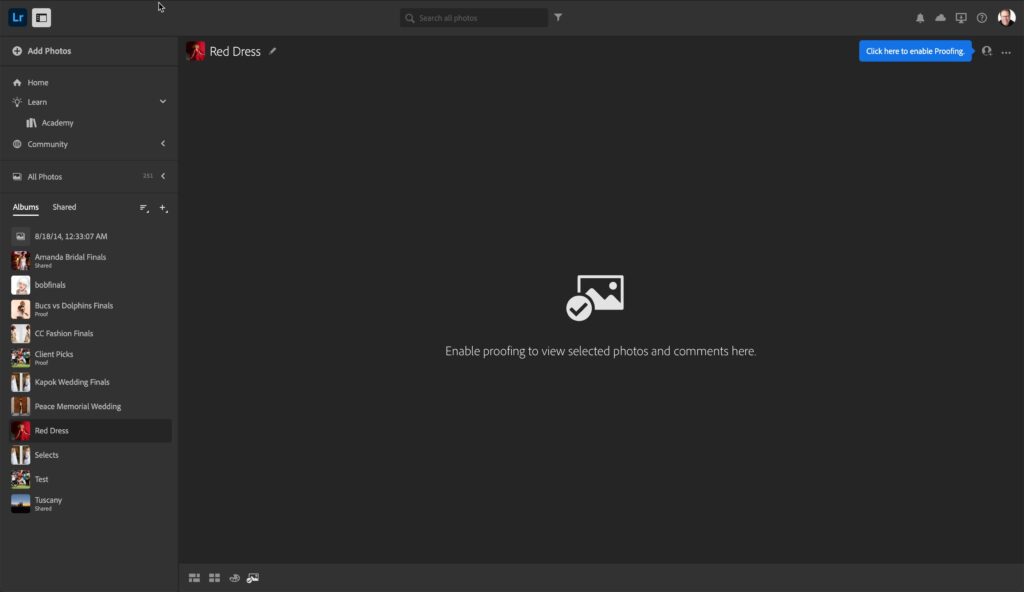
STEP ONE: This step is only for Classic users (cloud users skip this step). First, turn on Syncing if it’s not already turned on (click the cloud icon up in the top right corner of Lightroom Classic’s window), and then go to the Collections panel, to the collection you want your client to be able to choose images from and click the checkbox that appears to the left of it (as shown here). A “Sync” symbol (seen here) will appear, letting you know this album is being synced. By the way – you’ll only see this checkbox appear once syncing is turned on.
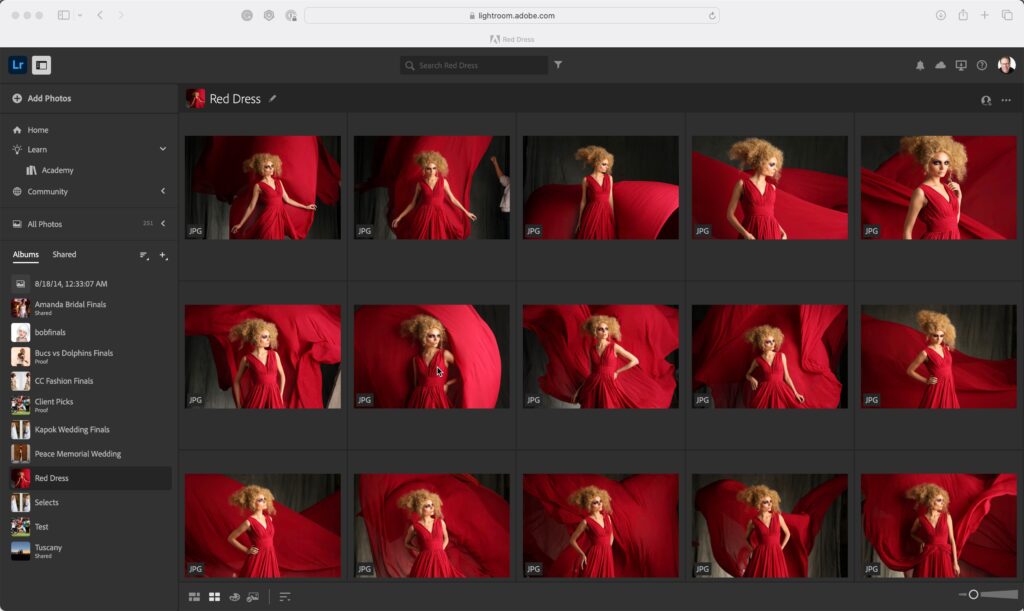
STEP TWO: Now, in your Web Browser (here, I’m using Safari), go to lightroom.adobe.com and log in with your Adobe user ID and password (the same user ID and password you use for your Lightroom photography bundle account). You’ll see the album you just chose to sync right in the collection of Albums on the left side. Click on it, and it will display the images inside (as seen here).
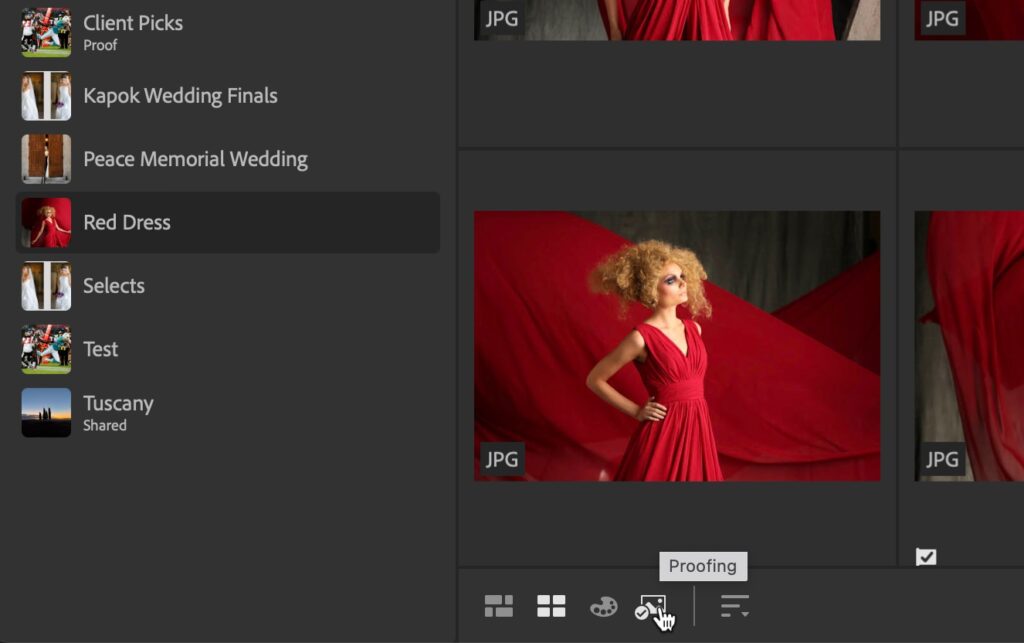
STEP THREE: Go to the bottom left corner of the window, right under your thumbnails, and click on the “Proofing” button (as shown here). It’s the fourth icon from the left.
NOTE: If you don’t see this proofing button, click on the little round icon for your Account up in the very top right corner of the screen, and from the pop-down menu that appears, click on “Technology Previews” and turn on the checkbox to “Enable Technology Previews.” Now that button will appear.
STEP FOUR: The first time you do this, it brings up an empty window, but up in the top right, it prompts you to turn on Proofing (as shown above in blue), so click where it shows you to.
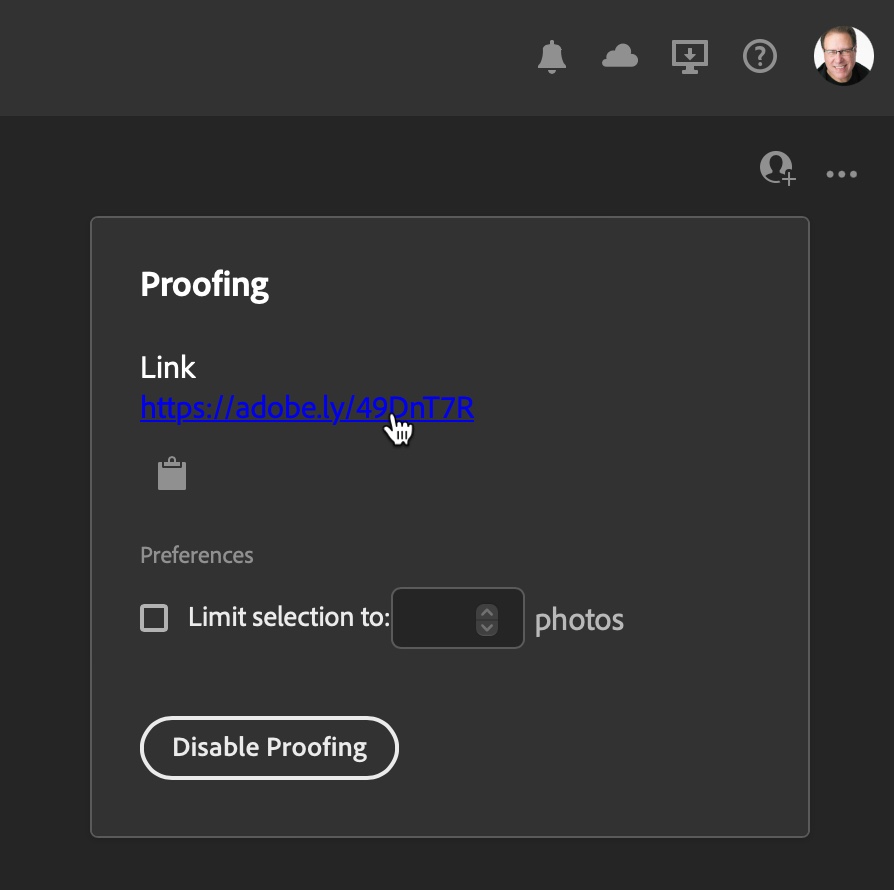
STEP FIVE: A little pop-down window will appear with a custom link that leads just to this gallery of proofing images. Click on the clipboard icon to copy this link into memory (this is the link you’re going to email to text message your client so they can see this gallery too).
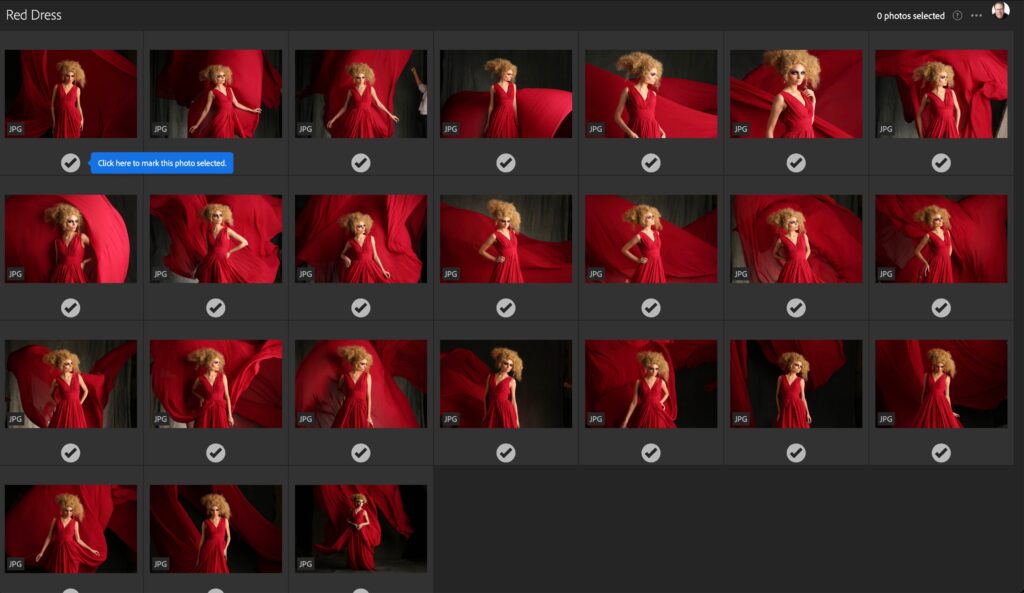
STEP SIX: When your client clicks this link it will take them a screen that looks the one above, with checkmarks below each image and the instruction (in blue) to click on the checkbox below any images they want to select.
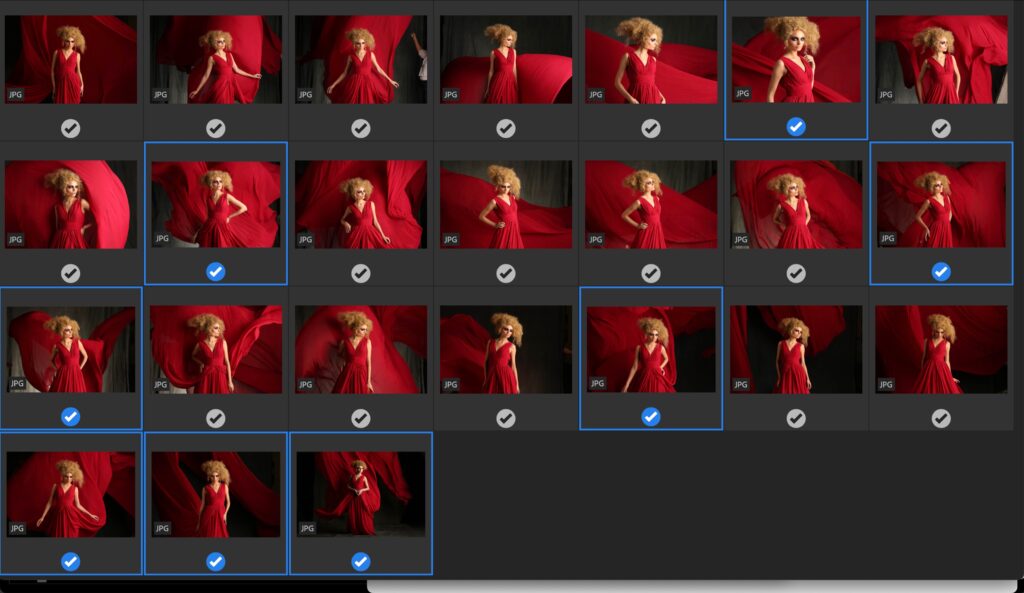
STEP SEVEN: When they click one of those checkboxes, it highlights the checkmark in blue and puts a blue outline around the thumbnail (as seen above).
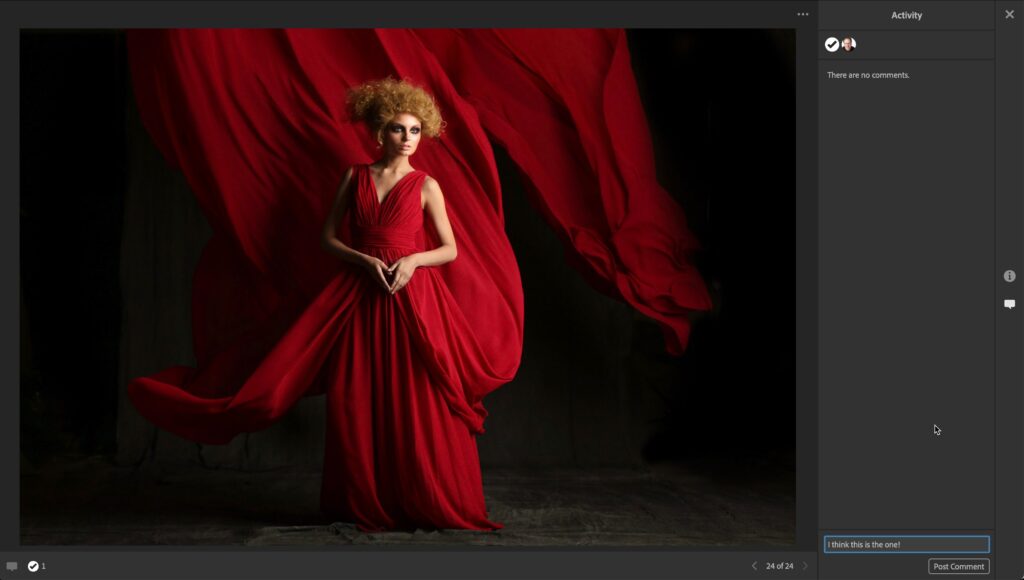
STEP EIGHT: If your client double-clicks on any image, they will see the image larger (as shown here), and they can leave you a comment in the comment field at the bottom (as shown here). When they hit the return key, it adds that comment to this photo, which you can see.
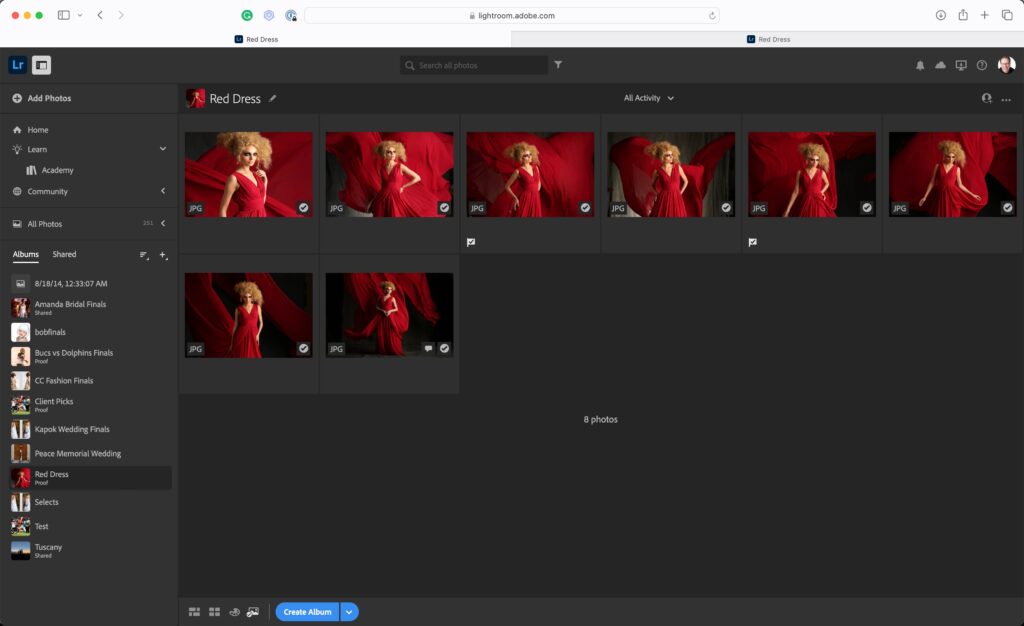
STEP NINE: OK, now back to you. To see which images your client chose, just refresh that Web page, and now only the images they selected will appear here. Any image they commented on will have a comment icon attached to the thumbnail – just double-click on it to see the comment and/or respond back to the client’s comments.
That is all there is to it (pretty slick, right?).
Have a great Monday, everybody. 🙂
-Scott
[ad_2]
Source link
Mar 06
[ad_1]

Happy Friday! Today for the first time in over a week we see the sun. It is cold but beautiful out there, so we hope to play some pickleball (stupid name, great sport) after lunch. Hoping we can get a court, we only have two in our town and apparently everyone and their grandmother plays pickle-ball. Have you fallen into the pickle-ball-craze yet?
Today I have a new Photoshop/PSE photo template to share with you. You can add
single photos or digital papers to each letter using the clipping masks, or
turn on the “Valentine” layer and add one photo or paper to cover the entire
thing. This is a high-resolution storyboard so you can print it as well as
post it on the web.
I used the font “Beth Ellen” for “You are my”. What a great free font, I love it!
Download the CoffeeShop “My Valentine” Photo Storyboard!
Do you want to download thousands of professional CoffeeShop
PSE/Photoshop actions (including exclusive ones not found anywhere
for free), textures/overlays, scrapbooking papers,
clip art/design elements, photo storyboards and frames, and
Lightroom presets from this site in
one convenient zipped file AND help support this one-woman blog?
Just click
here
for my CoffeeShop Mega Download Pack!
[ad_2]
Source link